

Showing posts with label 03-Tools. Show all posts
Showing posts with label 03-Tools. Show all posts
Saturday, May 2, 2015
It's An Airplane!
It's officially an airplane! I got my airworthiness inspection done on Saturday morning. The inspector was DAR Tim Martinez of San Antonio. There were no problems and he said it was the best homebuild he had inspected and that the quality of riveting was better than the factory airplanes he had inspected. I showed Paula the pink slip (airworthiness inspection) and she said it's peach, not pink.


Sunday, March 1, 2015
Wing Jack
I built a wing jack so I could service the tires and brakes easier. Works great and I used it today to while working on the brakes. The hydraulic ram is from Harbor Freight and the legs are electrical conduit.

Saturday, October 5, 2013
Lancaster Shrinker-Stretcher
Here's a new tool I got to help fit the canopy side skirts. It's a Lancaster Shrinker-Stretcher. I only needed the shrinker jaws and I special ordered them with a stippled finish which is the roughness of 180 grit sandpaper and much easier on aluminum than the serrated jaws. You put the edge of the metal you're trying to shrink in the jaws and squeeze with the handle.


It allows you to make a compound curve like the one below. It may be hard to see but the side skirt is bowed in both directions which makes it hug the fuselage nicely.
Tuesday, December 25, 2012
Christmas Gifts
Here are a few of my airplane Christmas gifts. Space shuttle repro switch guard in aluminum. The original in titanium costs $800. Also, an Adel nibbler for cutting inside holes in aluminum. Sweet!

Wednesday, November 28, 2012
Snap-on Torque Wrench
Here's my new-to-me torque wrench. It was an ebay bargain. Snap-on model QD2R100 sells for $282 new was $100.99. Looks almost brand new and has a recent certification report.


I checked it with my digital fish scale which is very accurate. I use the fish scale for mailing packages and the Post Office says everything I ship is accurate to the ounce. I measured 12 inches from the center of the drive lug and pulled. The torque wrench was spot on with the scale.
Tuesday, August 28, 2012
DMC AFM8
Here's my new d-sub crimper - a DMC AFM8. It crimps the tiny pins that go in common electrical connectors that are used in light aircraft. I'm getting ready to order avionics so I'll need a new set of tools and skills. This was another e-bay bargain.


Tuesday, June 28, 2011
Torque Screwdriver
Here's my new ebargain, a torque screwdriver. Recommend by many RV builders as a way to get into tight spaces that have a bolt that needs the proper torque. It's a Utica TS-30. New sells for $245 at Grainger. How about $18.50?
![]()

Sunday, April 24, 2011
Supplemental Air Compressor
Here's a second air compressor I bought off craigslist. Love a bargain - $80! I plan on adding it to my air system to increase the cfm enough to use my new HVLP paint sprayer. I've tested it and it works great and the total air flow will be plenty. My new RV friend, Charles, helped me unload it. He worked with Norm and is just starting the RV journey. Yesterday, he came up and we talked tools and built the first part of the practice kit. He has an RV-9 tail kit that he's anxious to get started.


Austin and Spencer helped me by replacing the stock drain valve with the set-up below. The stock drain valve in every compressor I've seen is almost unusable. The manufacturer must be hoping they will rust out and have to be replaced sooner. All the parts are available in the aviation tool section (plumbing isle) of your local Home Depot. All 1/4" sized. From right to left is a street elbow, a 1.5" nipple and a ball valve. An optional 1.5" nipple on the other side of the ball valve makes it spray better when you're draining the tank on a daily basis. Hope that helps, Charles.

Sunday, February 13, 2011
Solo Rivet Helper
My friend Dan was coming to help rivet the bottom inboard wing skin yesterday while his mom and wife had lunch with Paula and her mom but had to cancel. A trip to the emergency room will change your plans in a hurry. Everyone is fine now. They were also going to the Rodeo in San Antonio and missed that, too. Rough day!
The weather was beautiful so I pressed on solo but had to devise a way to get to some of the more difficult rivets. Below is a picture of what I came up with. Actually works great and the rivets come out very consistent. It's only good for the rivets along the rear spar but some of those are the most difficult, especially the ones where the ribs are close together under the wing walk doubler. It's a very simple tool and took me less than 15 minutes to make. I used a 1.5 x 1.5 board with a hanger bolt in the end that I had used on a tiling project. The notched and angled bucking bar holder is attached to the end of the board with a wing nut and there is a pin (finish nail) that keeps it from rotating if the wing nut loosens. It's actually much smaller than it looks in the picture. It easily fits through lightning holes to remove and reattach in each bay.


The weather was beautiful so I pressed on solo but had to devise a way to get to some of the more difficult rivets. Below is a picture of what I came up with. Actually works great and the rivets come out very consistent. It's only good for the rivets along the rear spar but some of those are the most difficult, especially the ones where the ribs are close together under the wing walk doubler. It's a very simple tool and took me less than 15 minutes to make. I used a 1.5 x 1.5 board with a hanger bolt in the end that I had used on a tiling project. The notched and angled bucking bar holder is attached to the end of the board with a wing nut and there is a pin (finish nail) that keeps it from rotating if the wing nut loosens. It's actually much smaller than it looks in the picture. It easily fits through lightning holes to remove and reattach in each bay.

Here's the setup sticking out the upper or aft lightning hole. A simple twist of the board keeps back pressure on the bucking bar.

Saturday, January 15, 2011
Best Tungsten Bucking Bar
This has to be the best bucking bar ever! It's from Avery Tools, their number 6001 bucking bar. I used it to finish the left flap and it was a piece of cake with this. I've got it taped up to prevent scrapes and scratches.


Tuesday, December 14, 2010
Started On Aileron Installation
I decided to install the ailerons first and then check the flap hinges for spacing before drilling them. I didn't want to order a new hinge if the spacing wasn't correct plus all the trouble of drilling out rivets, etc. Below, I've finished one of the aileron to stick pushrods. These will connect to the bottom of the stick in the cockpit and then through the wings to the bellcranks in each wing which will then connect to pushrods which will control the ailerons. Kind of like Dem Bones: the kneebone's connected to the thigh bone.... Be sure and click on the link and wait for the music and scroll down a little to watch the skeleton dance. Funny!


I added padded magnetic jaw pads to my vise. I had to ream out a brass bushing for the bellcrank and it was much easier with these plus little chance of crushing the soft tubing. I used them on the pushrods above as well. After having used the bench vise for just a couple of days, I now consider it a tool necessity!

Tuesday, December 7, 2010
New Vise Plus Work On Flaps
Here's a picture of my new bench vise with the flaps in the background. I've been trying to find a good vise at a reasonable price on craigslist or ebay for about 6 months with no luck. The flaps require a bend on two pieces of thick aluminum and a vise like this one will make it much easier. This was the only one left at Home Depot that was Wilton brand and it was only $21! It was made in China but under specs for Wilton so I'm hoping the quality is a little better that the usual China junk. The old bullet style Wiltons on ebay go for hundreds. I made this one detachable by epoxying nuts into the bench. The white stuff below the vise on the edge of the bench is the epoxy with the nuts inside.
I'm making slow but steady progress on the flaps. Part of what's holding me up is understanding how to attach the flap hinge. The written plans say to attach one half of the hinge to the flaps now but the plans have a note to move both sides of the hinge forward or aft to align the flaps with the ailerons. Sort of a Catch 22 thing. The RV forum wasn't real clear, either. Hmmm?


I'm making slow but steady progress on the flaps. Part of what's holding me up is understanding how to attach the flap hinge. The written plans say to attach one half of the hinge to the flaps now but the plans have a note to move both sides of the hinge forward or aft to align the flaps with the ailerons. Sort of a Catch 22 thing. The RV forum wasn't real clear, either. Hmmm?


Monday, November 8, 2010
Back Rivet Plate
Here's my inset back rivet plate. It's 3/4 inch thick plate steel and 9"x15". It's flush with the top of my workbench surface and I leave it in place all the time. I beefed up the frame and added screws to level it. I got it smooth by starting with a belt sander with 80 grit and working my way up to about 320 grit on a palm sander. I protect it with Boeshield. I've had it in my workbench since I began building but I never had a picture of it to show others.


Monday, August 9, 2010
Powered Scotch Brite Scuffing
Here's my new method of scotch brite scuffing. I used a shank from a disc cutoff wheel and put three rectangular scotch brite pads where the disc goes. Works great and is really fast.


Thursday, July 15, 2010
Semco Sealant Gun
Here's my new (used) Semco sealant gun. It's a Model 250-B. The Model 250-A is the same except it has a handle and trigger instead of the flat paddle trigger like in the photo below. I tried both and much prefer the paddle trigger. I can get into much tighter places like the fuel tank when sealing the ribs when using the paddle trigger. The tubes also come in several sizes. I've used both the 2.5" and the 6" and prefer the smaller for inside the tank work. I didn't see any use for the 12" unless you're building a 747. It uses pneumatic pressure to push out the sealant in a very controlled manner with the ability to stop the flow instantly. It was much easier to encapsulate the rivet shop heads with it instead of scooping and dabbing with a popsicle stick. I also wet sealed every rivet by putting a tiny dab in each countersunk hole before putting the rivet in and the Semco gun made it fast and clean as it doesn't continue to flow when you let up on the paddle or trigger. You do have to fill the plastic tube (goes inside the metal housing) with your sealant but that wasn't too hard. I told Paula that this would make a great cake or cookie decorating tool...just use icing instead of proseal! Edit: I tried icing a cake with it and it worked fine but the nozzle was too plain to make fancy designs like the dedicated decorating tips.
I purchased several on ebay for such a good deal that I gave some as gifts. If you're shopping for used, make sure you get the factory air line as the fittings look hard to source. I got extra plastic tubes and nozzles from Brown Tool. I ordered 6 or 8 different nozzles and the only two I like are the straight 4" and 2.5" with a 1/8 opening.
For cleanup, I unscrew the plastic nozzle and set it aside. I also pull the plunger out. Then I put a piece of scrap "handle" in the tube and use it to pull the old proseal out after it dries. I don't squeeze any leftover out as it makes it easier to remove almost all the dried proseal including from the nozzle. Leaving it overnight is just the right amount of time as it's rubber like but not too hard. Makes cleanup a breeze.
I've also used the Semco for applying RTV to seal the baffles. I got a caulk gun size container of red high temp RTV from NAPA for just a little more than a retail tube. It was easy to squirt it into the plastic Semco tube and it was much easier to apply in tight spaces. I left the RTV in the tube and it stays fresh and can be used again after pulling a small plug of dry RTV out of the tip.

I purchased several on ebay for such a good deal that I gave some as gifts. If you're shopping for used, make sure you get the factory air line as the fittings look hard to source. I got extra plastic tubes and nozzles from Brown Tool. I ordered 6 or 8 different nozzles and the only two I like are the straight 4" and 2.5" with a 1/8 opening.
For cleanup, I unscrew the plastic nozzle and set it aside. I also pull the plunger out. Then I put a piece of scrap "handle" in the tube and use it to pull the old proseal out after it dries. I don't squeeze any leftover out as it makes it easier to remove almost all the dried proseal including from the nozzle. Leaving it overnight is just the right amount of time as it's rubber like but not too hard. Makes cleanup a breeze.
I've also used the Semco for applying RTV to seal the baffles. I got a caulk gun size container of red high temp RTV from NAPA for just a little more than a retail tube. It was easy to squirt it into the plastic Semco tube and it was much easier to apply in tight spaces. I left the RTV in the tube and it stays fresh and can be used again after pulling a small plug of dry RTV out of the tip.

Sunday, July 11, 2010
Fuel Tank Vent Line Installed
Here's the vent line installed in the right fuel tank. In front is my Parker Rolo-Flair tool for flaring the ends of aircraft tubing with a 37° flair. I practiced on several pieces of scrap tubing to make sure I had the technique down. Austin was home for Shelby's MBA graduation party and helped by drilling the hole for the AN fitting.
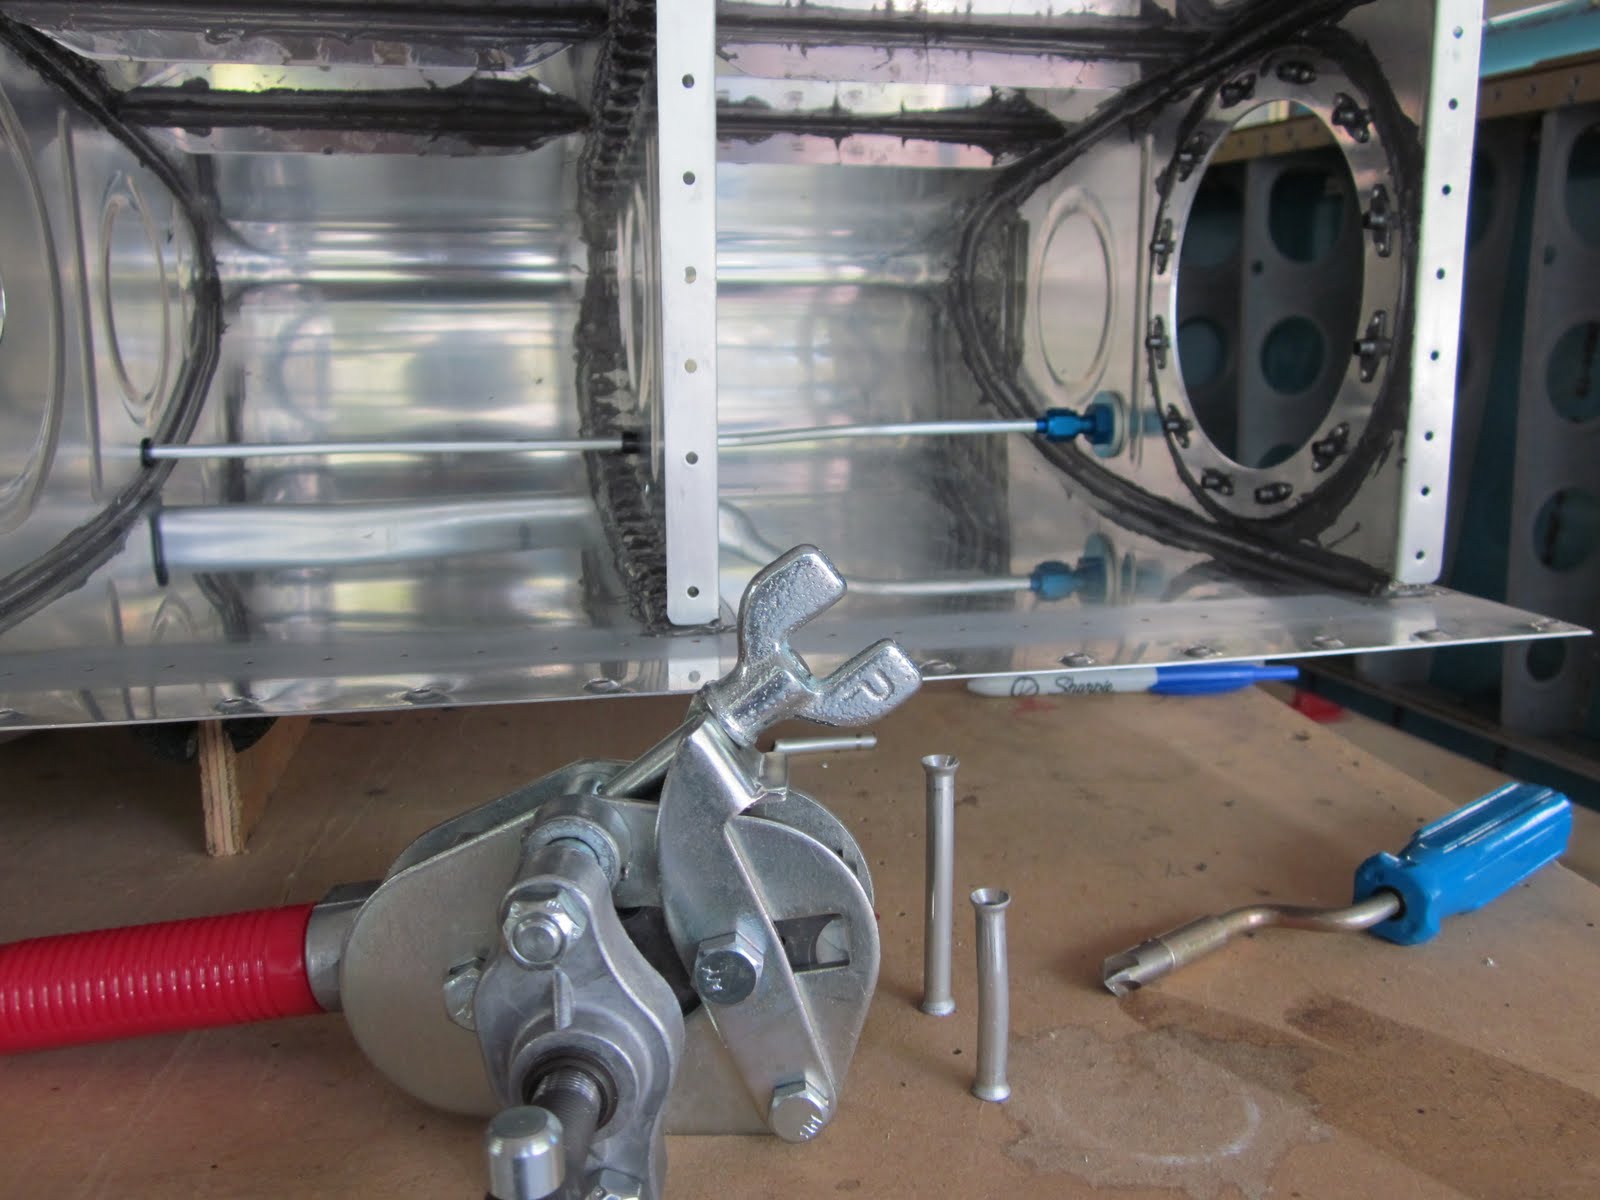
Here's the other end of the vent line at the highest point of the tank next to the fuel cap.

Here's the other end of the vent line at the highest point of the tank next to the fuel cap.
Saturday, May 15, 2010
Crimper & Stripper
Here's my new (used) AMP 59250 Crimper and my new (used) Stripmaster wire stripper. I'm having to get up to speed on electrical as I have to wire the stall warning to finish the leading edge. The crimper is the tool to use for crimping as recommended by 'lectric Bob Nuckolls, author of The AeroElectric Connection. Time to get electroeducated!


Friday, March 5, 2010
Nifty New Seat
Here's a new addition to the Aircraft Factory (garage) I got for my birthday from my Mother and Father-in-Law, Dean and Jerry. Since I'm building the wings, there will be a lot of work that can be easier accessed from sitting height. The stool is on rollers so I'll be able to scoot around. I'm using it here to finish riveting the rear spar. Thank you for the present. It was the only airplane related one I got.


Thursday, July 30, 2009
New (Used) Compressor
Finally, a quiet, powerful air compressor. Here's my newest addition to the aircraft factory tool crib. I found it on craigslist late Wednesday night. It was in San Antonio and very close to my Dad so I asked him to go by and look at it Thursday. It was owned by an older gentleman who appeared to have only used it a couple of times. The oil is still a golden color. I gladly paid $160 (sells new for around $500-$600 plus tax and shipping) for a belt driven, oil fed, cast iron twin cylinder, 5.5cfm @90psi, 115v, 20 gallon air compressor. That's about the biggest you can get and still run off household current. Any bigger and you'll need 220v. Now, I need some wings to drill and rivet to really put the compressor to the test.


Monday, July 20, 2009
Bandsaw Part II
Help, I'm addicted to bandsaws. Or so you would believe if you listened to Paula and Austin. I just bought a used bandsaw off craigslist on Friday when I happened upon this one at Sears on Saturday. Returned but never used. Heavily marked down. I went out to the car where Paula and Austin were waiting and told them about the bargain. When I went back in to buy it, it had just been marked down further. I returned to the car with my bounty and told them about the extra markdown and they started laughing uncontrollably. Apparently, they had been making up stories about me being addicted to bandsaws and other such nonsense.
Well, I got the last laugh. I just sold the first bandsaw on craigslist today for more than I bought it. I showed them...ha..ha...ha. Wait, is that another bandsaw. I gotta' go!

Well, I got the last laugh. I just sold the first bandsaw on craigslist today for more than I bought it. I showed them...ha..ha...ha. Wait, is that another bandsaw. I gotta' go!

Subscribe to:
Posts (Atom)

 Posts

