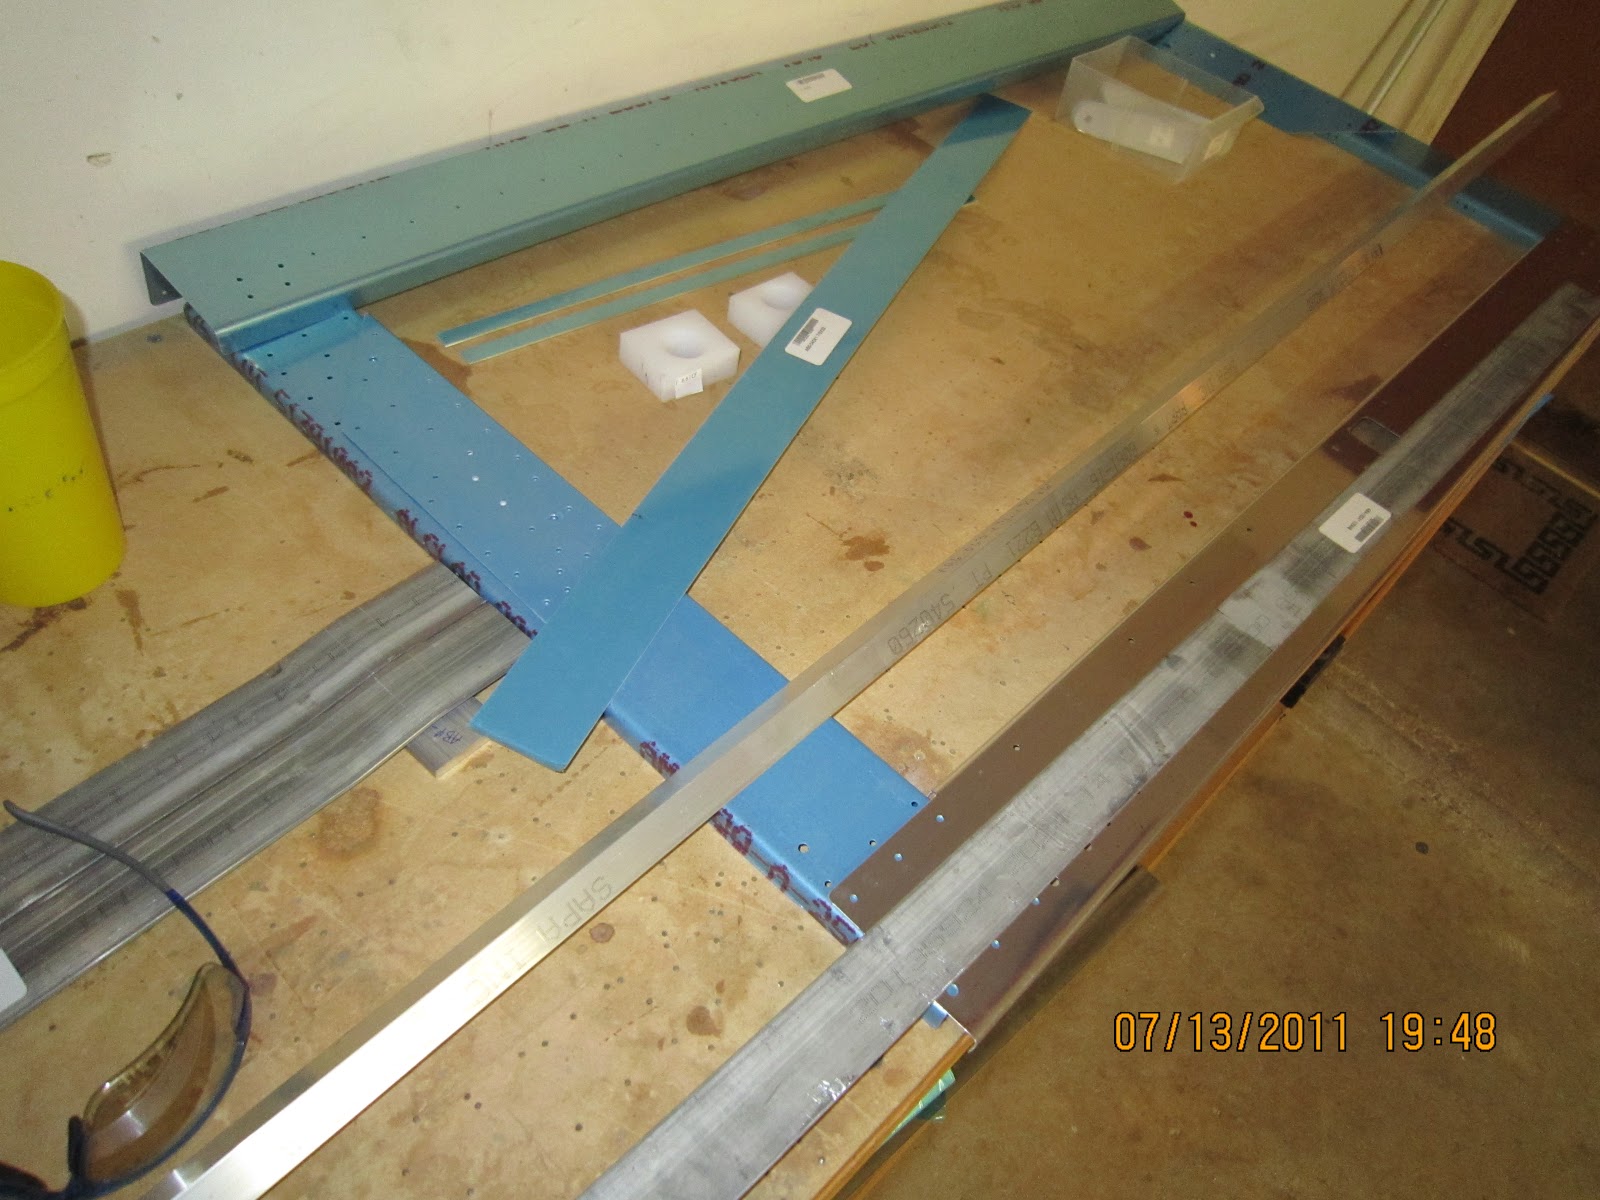
Ready to match drill the center fusleage. Getting to be a rather large structure now. I may have to build another sawhorse to be able to flip the section to work on the bottom. Either that or lie on my back with the work above me.
The center fuselage is where the seats, control sticks and baggage compartment are and where the wings will attach to the side.
I've finished the aft lower fuselage. I'm happy with the quality of the work. I was kind of playing to see if I could make show quality rivets. The key is definitely getting a good dimple. I had a few that were under dimpled and you can see a slight pucker around them.
Now it's on to the center fuselage section with the seats ribs. Lots of different tasks.
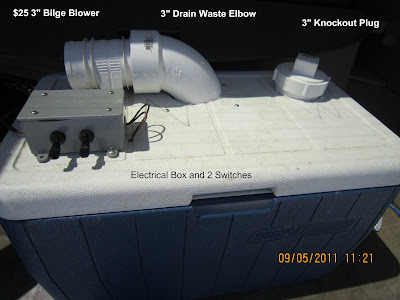
Here's the rough prototype of the Redneck air conditioning Austin and I made. We only spent about $60 because we already had the cooler and bilge pump. If you're starting from scratch, expect to spend about $100. Sporty's Pilot Shop sells fancy but functionally the same units starting around $500 and up! My daughter is using it now in her car as her a/c is kaput. It's meant to go in a small airplane. It is possible to install an automotive freon type system in a small airplane but they start at about $5000 for a portable system and go way up if it's permanently installed. You can buy a lot of ice or freeze a bunch of gallon milk jugs of water for that money.
We looked at several different designs but chose this one for several reasons. With the blower on the outside, it creates suction that helps keep the ice chest cooler lid closed. Also, with the screw-in plugs, the ice will last a lot longer when you're not using it as you can seal the two big holes (vent and blower).
We also liked the design of blowing air over the chilled heater core instead of just blowing it over ice. That keeps the humidity lower as it's doing basically the same thing as a freon system.
Hopefully, the pictures and video will answer most of the questions but here are some things that might not be clear. We didn't get a good picture of the plenum but all we did was take some scrap aluminium and mark a square the size of the heater core and added 1 1/2" to form a lip that we folded up and riveted to form an open top box. I used the skin from a rejected trim tab. Everyone that's building an RV knows what that is and probably has one. Some weather stripping would help seal it. The strap goes across the bottom to hold the heater core in. The plenum makes it cooler and more efficient by making all the air go past our heat exchanger (heater core) plus it makes room for the elbow of the blower to come down through the hole in the lid. It also eliminates a lot of sealing to the bottom of the lid that's required without it. We don't show it but another female clean out (or knockout) goes on the end of the blower so you can put a plug in it. Also, the wood block above the plenum shouldn't be there. That's to fill the hole in the bottom of the lid from one of our earlier attempts. On our next one, the plenum will screw right to the bottom of the lid.
The bilge pump and blower were both bought at Academy Sports and made by Attwood. Walmart probably has them, too. Get the smallest as they put out plenty of volume. The white 3" plastic pipes, clear tubing and electrical box were bought at McCoys but Lowes or Home Depot will have them, too. Get the size tubing that fits your heater core and bilge pump.
We got about 5' for the return line as it can be used for draining the water. We didn't need any extra electrical line as the pump and blower came with plenty. The two switches and a 12 volt "cigarette lighter plug" came from Radio Shack. The heater core is from an automotive parts store. I had to keep asking for the cheapest they had. It's hard to buy something from the chain stores without telling them what vehicle it's for. I think this is from an 80's Ford truck but didn't care as it was the right size and only $19.95.
We haven't finished all the sealing and such as this was just a prototype. It cools unexpectedly well and you can hear how well it seals in the video when the vent plug is removed.
Almost finished riveting the lower section of the aft fuselage. The upper skins get put on later. I was trying to show the quality of the rivets in this picture. After about 10,000 rivets, I think I'm starting to get the hang of it.
I've finished all the match drilling, deburring, dimpling and priming and have assembled the aft fuselage for riveting. I'll put the upper skins on to ensure it's straight but shouldn't be long before I'm finished and on to the the center fuselage. I had to look ahead to see how the empennage attaches in a few places to understand how things go together but other than that, it wasn't too difficult.
Took Paula flying today. That's definitely a look of shear joy on her face! Actually, she was being silly and took several photos and seemed to enjoy the flight.
Here's a good one of Canyon High School. The original is large and high resolution so you can zoom in quite a bit. I sent a copy to one of the teachers that I know and hopefully she has some good use for it. Maybe my picture will become as widespread as Paula's cougar picture that she had made when she was the basketball mom. It's everywhere now including the football scoreboard and websites and t-shirts.
I'm ready to match drill the aft fuselage. Lots of little tips to make thing better. Below is one on bulkhead F-712 where a tab needs to be trimmed to prevent overlap with the bottom F-779 skin.
This is a wedge spacer I made to smooth the transition between the overlap of the two aft bottom skins where the stringers attach. It tapers from .040 to .016 and matches the width of the stringer on its rivet face and will transition over 3 rivet holes. Without, it would leave an ugly wrinkle on the outer side skin near the rudder cables exit.
Here, I've put the two upper aft fuselage skins on to make sure the lower aft fuselage is straight with absolutely no twist before drilling. It will be safe in the garage tonight as it looks like a porcupine with all the clecos.
I much preferred fitting the two aft bulkheads to the side skins prior to fitting the bottom skin. They took quite a bit of flange bending to get them to match the taper of the skin.
I also had to hand bend the bottom skin to add more curve. Mainly on the most aft bend and mostly on the left side. After about an hour of tweaking flanges of the two aft bulkheads and bending the bottom skin and repeating, I got the bottom skin to easily slide up into position. This picture shows the perfect alignment of the tie down guide hole in skin through the tie down bracket.
I finished the longerons last night and started putting skins on the bulkheads. Paula was happy to get the bulkheads (aka "nesting dolls") out of the living room. Van was right - it really is fun to start putting big pieces together. It's surprising how rigid things get when you put on the skins. That's semi-monocoque aircraft construction where the skins carry part of the load. If you follow the link in the previous sentence, scroll up one paragraph as there is a picture of an RV-7 with the caption "The Van's Aircraft RV-7 fuselage is slender for high speed flight". I like speed!
I finally got the longerons bent. Van's instructions mention that bending aluminum angle can be "maddening". Now I know why. You bend it in one direction and it moves in another seemingly random axis. Oh well, it's done and eventually came our really good. I match drilled the "elbow rest" pieces and they match the curve perfectly. I also checked the downward bends against the side skins and they look good.
Here's the length of the longerons. It's going to be a tight fit in the garage.
I've finished all the fuselage bulkheads (or nesting dolls as Paula calls them). Next comes the longeron bending and then on to some skins!
Shelby's cat Hadley takes a look at the last bulkhead, F-712. It's the tail of the plane where the vertical stabilizer attaches and where the tail tie-down is.
I'm working on the forward most bulkhead in the aft fuselage that supports the elevator bellcrank ribs. It's going well but I had to ask Paula, "why is it that the parts that won't be seen, like the elevator bellcrank ribs that I'm working on, come out perfect and the ones that are exposed are perfectly fine structurally but get the small blemishes?" These ribs will be behind the cargo compartment wall and will only be seen during building and the one a year maintenance checks.
Here, I've finished the big 705 bulkhead. It's the one with the lower seatbelt attachments and the upper seatback rest. It's also where the rear spar of the wing will attach.
Coming up next are the smaller bulkheads that support the aft fuselage. They're progressively smaller hoops that define the shape of the aft fuselage toward the tail.
Here's a handy little tip. When squeezing rivets on a flange, use a backing plate to avoid gouges. The picture below is the scrap sacrificial plate that I used on the 705 bulkhead. Thickness of .032 works about right - not so thick that the squeezer doesn't cover the rivet tail but thick enough to keep it from gouging the web.
I finished the Main Spar Bulkhead last night. Now it's on to the large bulkhead that goes behind the seats. The control sticks are bolted to this bulkhead but the instructions said to fit and adjust then remove for installation later leaving the brackets attached. I suspect it's an access issue when the seats are installed. You can see the slot where the main wing spar slides into the side of the fuselage in the lower left of the picture. The blue covered skin isn't riveted yet because it gets attached when the main fuselage skins are riveted.
I was particularly proud of the rivets on the bulkhead. Below are some of the rivets I did with a factory rivet in the upper right corner for comparison. I used my Cleaveland c-frame with the female cupped die in the bottom and backriveted from the top. For some reason, the gold anodizing didn't show up in the picture below but you can see it above.
I torqued the bolts that weren't going to be removed and added torque seal. The nut is new and in good shape. I think the flash did funny things to the picture. Torque seal is like thick fingernail polish and its job is to indicate that a bolt has been properly torqued and hasn't moved since.
I've started the main bulkhead that the big wing spar mates to. Love that gold anodizing. Wouldn't it be great to have the entire airplane gold anodized kind of like C-3PO?
I finished the stainless steel firewall last night. No problems but I did have to call the mother ship (Vans) to ask about the rivet orientation on the fuel pump doubler. All the other rivets have the smooth side forward to make for an easy to clean firewall except for the fuel pump doubler. Spoke to Ken Kreuger and he set me straight. I back riveted almost all of the rivets using my 3/4 inch thick plate which was the perfect size to offset the forward flange of the firewall and allowed the skin to sit flat. Now, on to the bulkheads.
Here's my new ebargain, a torque screwdriver. Recommend by many RV builders as a way to get into tight spaces that have a bolt that needs the proper torque. It's a Utica TS-30. New sells for $245 at Grainger. How about $18.50?
Here's one of the father's day presents I received. This t-shirt is from Austin. Shelby also gave me some much needed shorts and socks. Thanks, kiddos!
I've started building the stainless steel firewall, the forward most part of the fuselage kit. It's nice to get back to clecos and drills and such. There have been several parts I've had to fabricate from raw stock which is enjoyable. More of that working with your hands creating stuff fun. Famous last words but the firewall shouldn't take too long.
I've finished the fuselage inventory and it's time to get building. Shelby was home for father's day and helped a bunch by checking off the inventory as I called it out. Below are the bookshelves Austin and I built from the fuselage crate. Everything except for the big stuff like skins and landing gear or small stuff like rivets is on those shelves. I'm looking forward to having everything in (almost) one place. Scooter the cat wants to know if he can have some more food.
I had to buy two more small parts bins for all the additional rivets and nuts and bolts and cotter pins and washers and, and, and the list seems to go on forever. I finished all the inventory of the small stuff - 6 pages worth - and this picture shows me almost finished. Paula helped but she really didn't like all the super small detail work required. My recommendation to someone just getting started is to get all the same brand organizer as it makes moving things much easier. Lowes and Home Depot have Stack On brand which is made in the USA and only costs $5 or $6 more than the smaller Harbor Freight ones. The ones with 39 bins (9 of them larger) would be my choice. They're the ones pictured on the right. The large bins are good because many of the items won't fit in the smaller ones. Only a few items are missing but I would highly recommend going through every item. Not only to make sure everyting is there and you don't have to stop building to order a missing washer but also to learn what the parts look like and how they are named as it helps later in the build. I also recommend putting all the parts in bins instead of leaving them in the paper bags. It's faster and easier when you're building.
I haven't finished the big parts inventory below. It's 10 pages long! Austin and I got some of the big skins checked off and stored under his bed along with the landing gear and some of the weldments but I still have quite a ways to go. I plan on turning the crate into shelves to store all the medium sized parts in the same place. I'm anxious to finish inventory and get to some drilling, deburring, dimpling, priming and riveting.
The girls (Paula, Shelby and Dean) went to New York for a "bucket list" trip. Paula and Shelby have been but Dean (Gma) had never seen the Big Apple. Here, they're in Central Park. Notice the jackets? It was 100 degrees back in Texas.
Here's what Paula brought me for a gift. It's the closest she could find in M&M's to the colors I plan on painting the RV. Nice of her to think of me and the airplane and chocolate at the same time.
The fuselage is scheduled for delivery on Wednesday at 5pm. I'll have to check with our good neighbor Tim to see if he's available to help when it gets here. The crate weighs 340 lbs! I picked up two small furniture dollys at Harbor Freight so maybe that will lessen the load a little.
The fuselage is the body of the aircraft from the engine firewall to the tail with the cockpit and seats in between. I'll add some pictures of the crate when it gets here.
I'm finishing up all the fiberglass on the tail. I haven't posted in a while partially because it's so messy working with fiberglass. I was nervous about getting resin on our camera and computer. Here, I've finished the bottom cap of the rudder.
Below is the last of the fiberglass tips on the empennage. It's the upper cap of the vertical stabilizer. I'm adding a resin shell to the part after adding and then sanding the lightweight filler smooth. I think of it as adding the candy shell to an M&M. The lightweight filler is too porous and won't paint well so that's why the outer layer is added.
Here, I'm working on the fiberglass tips of the right horizontal stabilizer and elevator. I wanted to get the back side of the stabilizer tip to be concave to match the convex curve of the horn on the elevator tip. I used some of the green flower arranging foam from Hobby Lobby that I cut about 1/2" inch thick and then pushed the tip down onto it like I was cutting out cookies. The foam was only $1.77 and should be enough to do all the empennage. Plus, I didn't like the idea of buying a 4' x 8' sheet of insulation foam at Home Depot and throwing 95% of it in the trash.
I then used folded paper as a spacer taped to the elevator horn with sticky backed sandpaper on the leading edge.
I used the leading edge of the elevator horn as a sanding block to shape the green foam to the perfect concave shape with a consistent gap. Then I removed the tip and layed several layers of fiberglass over the green foam. The resin didn't stick to the foam and it was easy to chip out after it dried. I then filled the inside of the new fiberglass layups with several more reinforcing layers like shown in Vans' instructions. I can't imagine an easier or more accurate way to do this so I'll do the same with the left side and the rudder and vertical stabilizer.
Yes, I'm building an airplane in my garage. It's a 2 seat side-by-side, 200+ mph, all metal aircraft capable of 6g aerobatics with a range of about 900 miles on one tank of gas getting 25 mpg. It's powered by a traditional 180hp Lycoming just like a Cessna 172. There are over 8000 like mine completed AND flying. This is where I'll document the build for friends and family to see. This isn't meant to be a construction how-to, just a little show-and-tell.
Oh, and to answer the question, "when will it fly?" I'm planning my first flight on Thursday. I'm not saying which week, or which month, or even which year, just Thursday.




 Posts
Posts