Tuesday, May 29, 2012
Wing Root Fairings
Below, I'm test fitting the wing root fairings and the rubber strip that seals them to the fuselage. Everything fits so far and the wings can come off after they're finished.
This is the scrap left from trimming the fairings. Thought it was interesting the way it came off in a coil after cutting with my right handed aviation snips.
Labels:
05-Wings,
06-Fuselage
Wednesday, May 23, 2012
Received Finish and Firewall Forward Kits
That is one big, heavy box. I was happy that it arrived in great condition. That's going to keep me busy for the next year. The finish kit has items like the cowl and fairings, canopy and frame, engine mount, nose gear and all the wheels and brakes. The firewall forward kit has all the stuff that goes on or around the engine. It's a big list that includes the baffles, the cable brackets, the oil cooler, the cable controls, the
exhaust system, the alternator, the solenoids, the air filter plus lots more little items.
Paula liked the pink cowl but said the color was carnation pink and not Pepto Bismol pink as described by the guys at vansairforce. The cowl is the cover for the engine. It's fiberglass mainly because it's too hard to make compound shapes with metal. I don't have a clue why the fiberglass is pink, though. Seems like you'd have to go to extra trouble to make it pink.
Labels:
07-Finish Kit,
08-Engine
Monday, May 21, 2012
Attached Ailerons To The Control Column
I've finished installing the sticks and control column. I've got the new stick grips temporarly attached.
Here's where the aileron pushrod comes in from the wing and attaches to the control column. It's only temporarly held as the wings will come off soon and not be reinstalled until I get to the airport.
Labels:
06-Fuselage
Working On Fuel Lines
I've almost finished the fuel lines in the cockpit along with the fuel selector. There are two tanks, one in each wing. The tank that feeds the engine is selected with the valve shown in the picture below. I've temporarily removed the pointer during installation of the lines but you can see the brass valve below the plate and the shaft sticking out above it where the pointer attaches.
The selection of the fuel tank is not automatic for several reasons. If they were interconnected, you couldn't stop a fuel leak from draining both tanks or if one tank had contaminated fuel, it might contaminate both. Also, with lower compression aircraft engines, you can safely burn auto gas which is cheaper but doesn't have the same energy as aviation fuel. Some folks will put auto gas in one tank but only use it during cruise flight and use the aviation fuel for takeoff and landing.
Labels:
06-Fuselage
Finished Vent Lines
I've finished the vent lines. Was a little more work than I expected. You can see in the picture below the circuitous route the line takes. The vent system keeps the fuel tank from becoming over or under pressurized with changes in altitude or heat.
Here's where the vent line exits on the bottom of the fuselage. Shelby had the good idea of gluing tiny screen to the outside of the vent.
Here's where the vent line attaches to the fuel tank at the wing root.
Here's where the vent line exits on the bottom of the fuselage. Shelby had the good idea of gluing tiny screen to the outside of the vent.
Labels:
05-Wings,
06-Fuselage
Tuesday, May 15, 2012
Finished Control Column
I finished the control column installation. It was more difficult than I expected as it was tight quarters and some of the pieces were really small unlike my hands and fingers. Next, I'll attach and adjust the aileron pushrods.
Labels:
06-Fuselage
Fresh Air for Painting
I've started assembling things I'll need to paint. Here are the two main items for a supplied air system to save me from breathing some of the hazardous to your health chemicals in modern paint. The mask is surplus fire fighter equipment. It comes with a regulator and hose and belt. I already have a filter and all I need now is the air line.
The air pump is a Gast rotary carbon vane pump commonly used in high dollar supplied air systems.
Labels:
10-Paint
Thursday, May 10, 2012
Finishing Wing Attach
There are several more steps to finish mating the wings to the fuselage. Here's the fuel tank attachment. Paula wasn't thrilled to hear why one of the brackets was slotted instead of there being a hole. It's so the fuel tank can break away if you're crashing and hit something.
I also got the right flap operating. Here's a little video. I made the handheld flap switch so I could lie under the fuselage and move the flap up and down to check for clearance and file the opening for the pushrod. The toggle switch is the one that will go in the airplane but the angle with "FLAPS - UP DN" is just scrap with a hole drilled in it to temporarly mount the switch.
Labels:
05-Wings,
06-Fuselage
Monday, May 7, 2012
Attached The Wings
Austin came home this weekend and wanted to work on the airplane so we went big! We mounted the wings and set the sweep and incidence and drilled the rear spar. Drilling the rear spar is one of those tasks that many dread because it's important to the flying quality and safety of the airplane and because there's very little margin for error. You can fix a mis-drilled rear spar but it's a lot of work. It came out great and Austin was a huge help.
Here's Austin drilling (actually reaming) the rear spar on the left wing. I told him there are very few people I trust to work on the plane and he's at the top of the list.
It was a long, hot day (high 93°) and just as we finished drilling the spars, Paula called us to meet downtown where she was volunteering at the Wein & Saengerfest. We ate at Friesenhaus and had really good German food and some Hafbräu Hefe Weizer. After we returned home, the plane was in the driveway and the weather forecast didn't have any inclement weather and we'd just had a good meal and some good beer so I considered leaving it there until tomorrow. No, maybe better put it to bed properly in the garage. Good thing we did as we had thunder and lightning and it rained cats and dogs later that night. Just barely fit in the garage.
I haven't blogged in a while but I have been making good progress. The landing gear is completed and you can see it resting on dollys in the picture above.
For drilling the pilot holes prior to the final size, I made a drill guide from the longeron bending jig by drilling guide holes in each end and clamping it to the rear spar.
There's only a very small area that can be drilled to allow for proper edge distances for the rear spar bolt. The picture below shows the area for the center of the hole.
Labels:
05-Wings,
06-Fuselage
Thursday, April 12, 2012
Installing Landing Gear Mount
I've started installing the landing gear mounts and have finished the right one except for torquing the nuts and bolts. It wasn't terribly hard but it did take a lot of taking the mount on and off and then incrementally trimming and filing. I did have to remove the three platenuts on the gold anodized flange just above the piece of wood in the picture. They will be easy to reinstall and they were getting in the way.
Here, I've temporarily installed the right landing gear. It looks small in the picture but it's really a beefy hunk of metal. It will look larger with the wheels, wheel pants and fairings installed.
Labels:
06-Fuselage
Tuesday, April 10, 2012
Drilled the Upper Landing Gear Mount
I drilled the landing gear mount holes last night. There is one big bolt at the top that holds the leg. It wasn't nearly as difficult as I thought it was going to be and only took about 45 minutes. I used my new .311 reamer and the holes in each mount turned out great. I test fit the AN5 bolt and it's a perfect snug fit.
I had to lightly file and sand the openings of each gear mount to remove a little powder coating and then I greased the gear legs so they would slide in smoothly.
I put some Boelube on the reamer and used a curved dental pick to make sure the holes in the mount and gear leg were aligned. Now it's time to install the mount in the fuselage.
I had to lightly file and sand the openings of each gear mount to remove a little powder coating and then I greased the gear legs so they would slide in smoothly.
Labels:
06-Fuselage
Monday, April 9, 2012
Finished the Electric Flap Actuator
I've finished the electric flap actuator. This picture is taken before I put the last cover over the flap motor. The triangle shaped housing sits between the seats and provides a lot of rigidity to the cross member behind the seats.
Labels:
06-Fuselage
Tuesday, April 3, 2012
Finished The Center Cabin Covers
I finished and installed all the center cabin covers. They cover the fuel lines, pump and valve. Here are most of the parts on the workbench.
The big cover is supposed to be 15/16ths above the floor which is not all the way down flush so this is the simple jig I made to set the height. It's cut to 15/16ths tall with a notch cut out to fit over the angle and the top edge rounded to fit the curve of the cover. The width is a little short to allow the cover to nest inside and be snug for a solid drill base. Fast and easy and wouldn't change a thing as it turned out great. Now, on to the electric flaps!
Labels:
06-Fuselage
Monday, April 2, 2012
Saturday, March 24, 2012
Finished Right Seat
I finished the right seat. I put some cushions in and let Paula try it on for size. She said it fit great and when are we going?
Here's the upper attachment on the back of the seat. The holes are there to make it lighter.
Labels:
06-Fuselage
Friday, March 23, 2012
Working On Seat Back
I'm working on the right seat back and getting to use some of my woodworking skills. Several places on the seat backs require work that would be best done on machining equipment if it were steel but since it's aluminum, my router does just fine. I had to round over the outside corner of the angle that nests in the top of the seat back and also remove a .0040 notch for the hinge to nest into the vertical angle.
Here's my router I have set up in the wing of my table saw. This is the piloted roundover bit I used on the corner of the angle. I cut the notch with a flat top router bit. Worked great.
Labels:
06-Fuselage
Thursday, March 22, 2012
Finished the Baggage Floors
I finished the baggage bulkheads and floors and the aft seat floors. The suitcase is there for a test fitting and to remind Paula that we can do a lot of traveling in the plane when it's finished. There's plenty of room and the baggage compartment is rated for 100 lbs which should be enough for any trip.
Here are the seat back skins temporarily set into place just for fun. They're next on the build list. If you look closely, you can see the hinges where the bottom of the seat back attaches. There are three locations to move the seat forward and back.
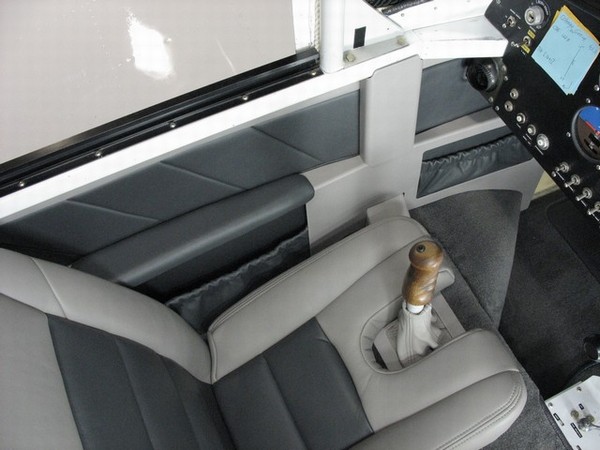
Here is an example of how I'd like the interior to look. It's the mid-grade RV
interior package from Classic Aero Designs. I've thought about making my own but it would be hard to duplicate these.
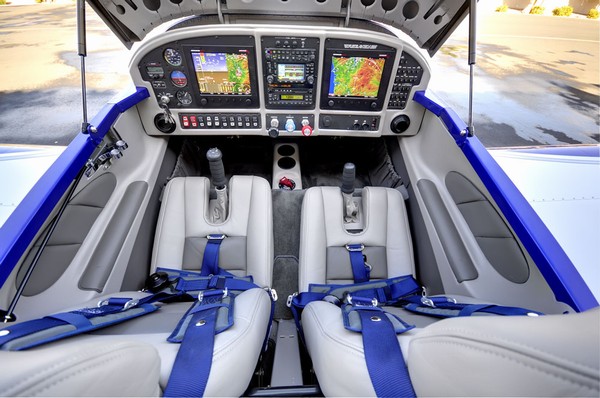
This is an example of their top of the line interior. Looks like a fancy sports
car.
Labels:
06-Fuselage
Friday, March 16, 2012
Propeller Arrived
Here's my new Sensenich propeller. I ordered it directly from the factory. I love the way an expertly crafted piece of machinery looks like a work of art. If I wasn't going to hang it on the front of an airplane, I'd hang it on the wall!
Here's a close-up of the hub. It doesn't show it in the pictures but it's quite big. It's about 6 feet long and weighs about 40 lbs. That's a big hunk of aluminum. Sensenich designed this series of propellers specifically for high speed homebuilts like the RV. Previously, wood propellers were used but there are limitations on wood propellers. Flying in the rain is damaging and the bolt torque needs to be constantly checked due to the expansion and contraction of wood. The metal propellers made for slower factory aircraft like Cessnas and Pipers couldn't safely be modified without exceeding the manufacturers limits on pitch and twist. Since the RV market is so big, manufacturers have started catering to us and this Sensenich prop is a good example.
Labels:
08-Engine
Finishing Aft Baggage Bulkhead
I'm finishing the aft baggage bulkheads. The first picture shows the platenuts where the bulkheads attach .
This picture is the upper bulkhead with the cutouts for the shoulder harnesses
Labels:
06-Fuselage
Sunday, March 11, 2012
Finished The Steps
I finished both steps. As usual, the right one took a week and the left one took less than two hours. The rivet spacing as shown on the step plans works great and allows one of the rivets along the line that overlays the inside rib to line up perfectly. I just had to drill out the rivet and all the others are well clear of the existing rivets.

I did have to wait for a #19 short angle threaded drill bit to drill the wear block into the baggage floor rib.

I did have to wait for a #19 short angle threaded drill bit to drill the wear block into the baggage floor rib.
Labels:
06-Fuselage
Wednesday, February 29, 2012
Installing Steps
I'm installing the steps. Much easier to get up onto the wing. Some folks use a step stool but I don't want anyone getting in a hurry and jumping on the flaps and damaging them.
Directions said to first install the side panel in the baggage compartment and then refer to the instructions for the optional steps. First thing the instructions for the step said was to remove the side panel. Go figure. Lots of drilling out rivets.
Labels:
06-Fuselage
Monday, February 6, 2012
Fitting the Two Upper Fuselage Skins
I'm fitting the two upper aft fuselage skins. Makes it look like a real airplane. Before this, I fabricated and installed several gussets.
Labels:
06-Fuselage
Wednesday, January 11, 2012
Drilling the Aft Deck
I'm preparing to drill the aft deck which makes the fuselage rigid so it can't twist. Just for fun, I set the horizontal stabilizer with elevators on the aft deck. In addition to being fun, it was another check to make sure everything is lined up properly.
With the horizontal stabilizer attached, it's starting to look like a full size aircraft.
Too bad I'm not polishing as the side skins turned out really nice.
With the horizontal stabilizer attached, it's starting to look like a full size aircraft.
Too bad I'm not polishing as the side skins turned out really nice.
Labels:
06-Fuselage
Tuesday, January 3, 2012
Rolled the Canoe
Austin and I hit it hard this past Saturday and finally "rolled the canoe" (flipped the fuselage right side up). There are a few rivets left on the side skins but they're much easier with it upright and it's plenty rigid. Austin was a big help and we were both getting tired but finished a major milestone in construction. Here's a picture looking aft through the access hole in the firewall.
Labels:
06-Fuselage
Subscribe to:
Posts (Atom)