

Sunday, June 28, 2009
New Sioux 1410 Pnuematic Drill
I finally got a Sioux 1/4 inch drill that I had been wanting. I got it on E-bay for $49! Used, of course, but it works great. The best price new I could find was $225. It's much quieter than my others so now our neighbor can't accuse me of torturing cats. NO, I never tortured cats. She just said from across the street, that's what my pneumatic drill sounded like.


Wednesday, June 17, 2009
Finishing Right Elevator
I've started the easy part, the final riveting of the right elevator. I haven't posted in a while because my laptop battery died. I do all the pictures from my laptop. Got a new one off ebay. I have been working on the plane, though. Since my last post I match drilled, deburred, scotch-brighted, dimpled, primed and reassembled the right elevator.


Tuesday, June 9, 2009
Right Elevator Match Drilling
Here's the right elevator clecoed together ready for match drilling the skin. That should only take 30 minutes and then it's on to the familiar pattern of deburring, dimpling, priming as required and reassembly for final riveting. I'm looking forward to using the pneumatic squeezer to dimple and rivet.
I mentioned (OK, I bragged) to Paula about how well things have been going together while I was showing her the trailing edge of the elevator below. She was thrilled, as those who know her could imagine. One thing that's surprised me about the build so far is how well the instructions from the manufacturer work. I made the bending brake exactly as described in Van's instructions and the trailing edge came our near perfect. I didn't make it like all the modified and improved versions I've seen on other's websites. I'm sure there are some great ideas out there but I will think long and hard before I deviate from Van's words of wisdom!

I mentioned (OK, I bragged) to Paula about how well things have been going together while I was showing her the trailing edge of the elevator below. She was thrilled, as those who know her could imagine. One thing that's surprised me about the build so far is how well the instructions from the manufacturer work. I made the bending brake exactly as described in Van's instructions and the trailing edge came our near perfect. I didn't make it like all the modified and improved versions I've seen on other's websites. I'm sure there are some great ideas out there but I will think long and hard before I deviate from Van's words of wisdom!

Friday, June 5, 2009
Elevator Trailing Edges Done
I finished bending the trailing edges of the elevators last night. It took me three days to bend the first one with all the careful measuring and reading and visiting websites to read about it and remeasuring, etc. The second one took 10 minutes. Life is kinda' like that. Once you've done it, it's easy.

NOT MUCH LEFT NOW! These are all the parts I have left to finish the entire empennage. I have to learn fiberglass for all the tips but most of the remaining work left to do is more of the same. Time to order the wings as there's an 8 week delivery time. I have to schedule an appointment with my aviation Financier.


NOT MUCH LEFT NOW! These are all the parts I have left to finish the entire empennage. I have to learn fiberglass for all the tips but most of the remaining work left to do is more of the same. Time to order the wings as there's an 8 week delivery time. I have to schedule an appointment with my aviation Financier.

Monday, June 1, 2009
Bending the Elevator Trailing Edges
After a little bit of a break working on the vehicle in the background (the famous Dodge Dart), I finally got my bending brake made for bending the trailing edges of the elevators. The hardest part was finding a straight board. I make sure I used plenty of hinges as I've read you can't have too many.

It's pretty simple, really. You just put the part between the boards and smoosh it. The trick is getting the correct radius of the bend. Too much and the aluminum will crack, too little and it will affect the flying qualities. I'm getting close to the goldilocks amount.


It's pretty simple, really. You just put the part between the boards and smoosh it. The trick is getting the correct radius of the bend. Too much and the aluminum will crack, too little and it will affect the flying qualities. I'm getting close to the goldilocks amount.

Friday, May 22, 2009
Finished Elevator Stiffeners
I finished riveting the stiffeners on the left and right elevators. The picture below is the inside of the right elevator. I haven't been posting much lately but I have been making progress. I always try and do at least something everyday even if it's just reading the plans or straightening up. Next, I'll make a bending brake to bend the trailing edge of the elevators. The plans call for 2 straight 2x8's with door hinges.

Here is the outside of the skin of one of the elevators after riveting the stiffeners. It's really easy to get a smooth rivet with the 3/4 inch plate steel back rivet plate I have.


Here is the outside of the skin of one of the elevators after riveting the stiffeners. It's really easy to get a smooth rivet with the 3/4 inch plate steel back rivet plate I have.

Tuesday, May 12, 2009
Pneumatic Squeezer
Here's a new tool in the crib. It's a pneumatic squeezer. A member of Van's Airforce had it for sale at a good price and I was the first to grab it. I've been bidding on ebay for a year and probably bid on 30 of these looking for a steal. It's used but works well. Austin and I dimpled about 30 stiffeners in about 10 minutes. Paula and Shelby even gave it a try. Should be just the ticket to give my sore arm a rest.


Saturday, May 9, 2009
RV Grin - First Flight in an RV
I got to fly an RV this weekend! Here's a picture of the plane I flew. That's Norm and his lovely bride.

Norm (he's the Tech Counselor who inspected my plane about a month ago) gave me a ride in the RV-7A that he built. He's an A&P certified mechanic and did a really beautiful job.
We flew for 40 minutes and I did 1 takeoff, 3 touch-and-go's, steep turns and stalls. It had been quite a while since I had flown so I was definitely rusty! I've landed on aircraft carriers and snow covered runways but this was the first time I've landed on a grass strip.
Norm said it would be a motivational flight and it really was. There's clearly a reason why the RV's are such an incredibly popular line of homebuilts. I don't have much small single time but I do have a little flight time in Cessnas and the RV felt like twice the airplane to me. I am certain now that I made the right choice of aircraft to build!
One thing that surprised me was how foreign the EFIS (Electronic Flight Information System) in Norm's RV felt. An EFIS is the computer screen that has replaced most of the older round gauges. I'm comfortable around computers and I've studied the EFIS and thought flying behind one would come naturally but I was wrong. My eyes kept going back to the "steam gauges" that Norm had left as backups. It will definately require some hanger flying to get comfortable with them. Here's an example of a popular EFIS.


Norm (he's the Tech Counselor who inspected my plane about a month ago) gave me a ride in the RV-7A that he built. He's an A&P certified mechanic and did a really beautiful job.
We flew for 40 minutes and I did 1 takeoff, 3 touch-and-go's, steep turns and stalls. It had been quite a while since I had flown so I was definitely rusty! I've landed on aircraft carriers and snow covered runways but this was the first time I've landed on a grass strip.
Norm said it would be a motivational flight and it really was. There's clearly a reason why the RV's are such an incredibly popular line of homebuilts. I don't have much small single time but I do have a little flight time in Cessnas and the RV felt like twice the airplane to me. I am certain now that I made the right choice of aircraft to build!
One thing that surprised me was how foreign the EFIS (Electronic Flight Information System) in Norm's RV felt. An EFIS is the computer screen that has replaced most of the older round gauges. I'm comfortable around computers and I've studied the EFIS and thought flying behind one would come naturally but I was wrong. My eyes kept going back to the "steam gauges" that Norm had left as backups. It will definately require some hanger flying to get comfortable with them. Here's an example of a popular EFIS.

Saturday, May 2, 2009
Started Elevators
I started on the elevators. Here are the stiffeners being match drilled to the inside of the skins.


Friday, May 1, 2009
Elevator Stiffener Oops
I had a small setback when I trimmed three of the elevator stiffeners too short. I missed note 2 on the blueprints below and trimmed the distance "X" on note 1 from the next to the last hole. Note 2 said the last hole was not drilled until later. Dang! I was initially bummed when I went to order replacements but was happily surprised when the price was only $6.49 for the pack of 4. Way to go Van.


Added Drawers to Workbench
I added drawers to my workbench. The clear shoeboxes weren't working well as toolboxes and I had most of the material for drawers including the slides which are the expensive parts. These seem to be working well so far.


Friday, April 24, 2009
Elevators Next
Next up are the elevators. Below is the blueprint for the right elevator. It's built before the left elevator which has a trim tab making it more difficult.
The elevators are control surfaces like the rudder. They have thinner skins and light weight stiffeners. The flying surfaces that support the weight of the aircraft in flight like the horizontal and vertical stabilizers have thicker skins and heavier ribs. I've noticed that as the building has progressed, it's gotten more challenging. I guess Van wants to ease us into the hard stuff. Sounds kind of addicting, doesn't it?

The elevators are control surfaces like the rudder. They have thinner skins and light weight stiffeners. The flying surfaces that support the weight of the aircraft in flight like the horizontal and vertical stabilizers have thicker skins and heavier ribs. I've noticed that as the building has progressed, it's gotten more challenging. I guess Van wants to ease us into the hard stuff. Sounds kind of addicting, doesn't it?

Wednesday, April 22, 2009
Finished the Rudder
I finished the rudder today. Three components down, elevators left and that will finish the empennage. I don't want to think too far ahead but the wings will come next.

Here, I clamped the rudder to the workbench to get an idea of how big it is.


Here, I clamped the rudder to the workbench to get an idea of how big it is.

Finished the Trailing Edge of the Rudder
I'm not sure that this makes a good picture below. What I'm trying to show is the straightness of the trailing edge of the rudder. The instructions say this is one of the most difficult parts to get right. One of my friends actually ordered and built a second rudder to get it right. I have to admit that I'm not completely satisfied with my work. I'm trying hard not to let perfect get in the way of excellent but it's not easy. The rudder is certainly built within specs and all and I'm sure I'll forget about the small appearance flaws but things were going near perfect up until now.

Here's the rudder all riveted. The only thing left besides the fiberglass tips is to roll the leading edge.


Here's the rudder all riveted. The only thing left besides the fiberglass tips is to roll the leading edge.

Tuesday, April 21, 2009
Custom 60 degree Rivet Set
Here's a nifty little tool I modified to be able to rivet in really tight areas. I ground down the tip to make it thin enough to get into the last hole or two in a narrow rib like the rudder tips. I tried several other techniques including one on the "Hints for Homebuilders" section of the EAA website. This method is far superior to every one I tried. I also like that this was an ebay bargain. Got it for $2 plus about $5 for shipping. Can you say steal? They normally sell for about $50.


Thursday, April 16, 2009
Prosealed the Rudder Trailing Edge
This is proseal. It's a 2-part epoxy "glue" that's used extensively in aircraft construction. The main place it's used on the RV is sealing the fuel tanks. I'm using it here for the first time to glue the trailing edge of the ruddder together before riveting as recommended in the plans. It's really a mess and gets everywhere. The thing that makes me laugh for some reason is that this stuff has NO KNOWN SOLVENT. Nothing will melt it! Now that's a glue! Hope I didn't get it on my favorite shirt.

Here's the rudder all glued on the trailing edge. It's clecoed to a heavy piece of aluminum angle to keep it straight while the proseal is drying.


Here's the rudder all glued on the trailing edge. It's clecoed to a heavy piece of aluminum angle to keep it straight while the proseal is drying.

Wednesday, April 15, 2009
Counterbalance Lead Weight
This is the top of the rudder before installing the top rib. It contains a lead counterweight that helps balance the control forces during flight.


Tuesday, April 14, 2009
EAA Technical Counselor Visit
I invited Norm, our EAA chapter's Technical Counselor over to take a look at my project. It's not a requirement but I really wanted to have another set of "educated" eyes look at how I was doing early in the project. I'd hate to get to the end of the build and have someone ask why I put all the rivets in backwards! Norm has built the same aircraft that I'm working on and is finishing his second (an RV-9). He's what you call a repeat offender. Anyway, Norm was nice enough to drive over from Seguin and give me some good pointers and validate that I wasn't putting the rivets in backwards. Thanks, Norm.
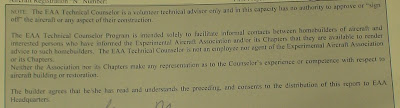
I'll let you read what he wrote. No, I didn't bribe him with a beer or anything!


I'll let you read what he wrote. No, I didn't bribe him with a beer or anything!

Sunday, April 12, 2009
Rudder Ready for Button Up
I finished all the prep work for the Rudder and now it's time to button it up. Here's the view of the inside of the rudder that won't be seen after riveting on the other side skin.

Here's the front of the rudder at the bottom. The hole is where the hinge rod will be screwed. On the right side you can see a couple of manufactured heads of rivets. I'm proud of those as the plans call for optional pop-rivets if you can't get a good structural rivet in there. With the help of my trusty tungsten bucking bar, no problem!

Here are some of the stiffeners that I got help riveting (see the video several posts back). The specs are dust that I'll blow off before sealing it up.


Here's the front of the rudder at the bottom. The hole is where the hinge rod will be screwed. On the right side you can see a couple of manufactured heads of rivets. I'm proud of those as the plans call for optional pop-rivets if you can't get a good structural rivet in there. With the help of my trusty tungsten bucking bar, no problem!

Here are some of the stiffeners that I got help riveting (see the video several posts back). The specs are dust that I'll blow off before sealing it up.

Wednesday, April 8, 2009
Dimpling the Narrow End of the Rudder Rib
Here's another McGyver tool. I had to dimple the very narrow end of the upper rudder rib. My visegrip dimpler wouldn't fit in the last hole so I had to improvise. I used my pop-rivet dimpler with spacers and came through the opposite side hole.

Turned out just fine:


Turned out just fine:

Sunday, April 5, 2009
Dimpling the Rudder Spar
I'm working on dimpling the rudder prior to riveting and got a visit by niece Micaeli. She was here for Shelby's birthday. Happy Birthday Shelby! She helped by dimpling a couple of holes in the lower rudder spar. Thanks! Also got some help dimpling from R who came out to the shop to see what's new.
Wednesday, April 1, 2009
Change In Direction
Well, after all the work I've put in on the airplane, I've decided it's not for me. I'm going a different direction now and plan on building a Shelby Cobra replica car. I saw a couple dozen of them drive through town last Friday and loved the look. It's all aluminum so the construction is surprisingly similar to aircraft construction so I'll have a head start on the learning curve. I'll keep you updated under the same label below as this post.


Tuesday, March 31, 2009
Rudder Taking Shape
I got the rudder temporarily clecoed together. This is one of those deceptive stages of building. It looks almost complete but there's really a lot left to finish. From this stage, I will match drill all the holes. That means a lot of cleco moving. Then, I'll disassemble everything and deburr all the holes. Next, all the external holes and the corresponding understructure gets dimpled. Then comes edge finishing, scuffing, cleaning and priming. Oh, and don't forget fitting the lead counterweight and epoxying the trailing edge wedge and rolling the leading edge. All that before riveting. But...it does look like an airplane part for now!


Sunday, March 29, 2009
Rudder Riveting Party
Everyone wanted to get in on the rudder riveting party today. First, my Dad and his friend Irene came by for lunch and a look-see at the airplane. They both did a little riveting. I had the camera set up so I got a little stealth video of my Dad riveting. Then Shelby came home to pick up Hadley (named after Hemingway's wife that loved cats) the cat. She tried her hand at a little riveting and did great. Then Paula tried it and did great also. Thanks for all the help finishing up riveting the stiffeners to the rudder skins!
Wednesday, March 25, 2009
Drilling the Rudder Stiffeners
Here's a little video of me drilling the rudder stiffeners. One of my neighbors told me the pneumatic drill sounds like I'm torturing cats. The other sound is my too small compressor kicking in. If it looks like I'm drilling into the workbench, you're right! The instructions actually recommend that you drill and cleco right to the workbench to keep everything flat.
Tuesday, March 24, 2009
Trimming the Rudder Stiffeners
Here's one of the rudder stiffeners all trimmed and sanded and smoothed. The rule of thumb for how smooth edges need to be is if there's no chance of getting a cut from the edge, it's good to go. The stationary belt sander and scotchbright wheel make it fast and easy to do.

Here are the scraps left from trimming the stiffeners. I took a picture of the pile because I thought it looked interesting. I once took a picture of a slimy green rock in the headwaters of our local river and framed it and entered it in the county fair. It looked like art to me. I can't help it if no one else can see art like I do, including the county fair judges!


Here are the scraps left from trimming the stiffeners. I took a picture of the pile because I thought it looked interesting. I once took a picture of a slimy green rock in the headwaters of our local river and framed it and entered it in the county fair. It looked like art to me. I can't help it if no one else can see art like I do, including the county fair judges!

Monday, March 23, 2009
Plans for the Rudder
Here is the page from the plans for the rudder. The rudder has a lot of stiffeners instead of a skeleton structure of ribs and spars. There are also parts fabricated from raw stock, leading edge rolling and lead counterweights. Something new.


Saturday, March 21, 2009
Stored the Vertical Stabilizer, Rudder Next
With the Vertical Stabilizer finished, it's time to move to the rudder. Here's Austin helping begin the rudder by drawing a robot on the box the rudder skins are in. He's so funny!

Here's the Vertical Stabilizer stored on the ceiling of the garage next to the Horizontal Stabilizer. I like having the parts displayed as an extra motivator and reminder for the next step.


Here's the Vertical Stabilizer stored on the ceiling of the garage next to the Horizontal Stabilizer. I like having the parts displayed as an extra motivator and reminder for the next step.

Finished the Vertical Stabilizer
I finished the Vertical Stabilizer today. Another small milestone. There are 4 basic parts to building the empennage. This is the 2nd sub assembly I've completed.


Wednesday, March 18, 2009
Avery Hand Squeezer
I received the Avery Hand Squeezer today. I also got a standard 3" yoke (it's the one in the squeezer below) and a 4" thin nose, no-hole yoke with it. I've already used it and REALLY like it, much better than the Tatco squeezer. The no-hole yoke makes it very easy to get into those hard to access places.


Sunday, March 15, 2009
Finishing the Vertical Stabilizer
I'm almost done with the Vertical Stabilizer but I'm stuck on the rivets that are adjacent to the spar doubler. Everyone on vansairforce.net said you've got to have a narrow head no-hole yoke for your squeezer and this picture shows why. I've ordered one from Avery Tools and it should be in Wednesday.


Monday, March 9, 2009
Vertical Stabilizer Ready to Rivet Skin
Here's the Vertical Stabilizer ready to rivet the skin. It doesn't look much different from a previous post showing the VS skinned but a surprising amount of work goes into getting it ready to rivet on skins. You've got to match drill, deburr, dimple, clean, scuff, re-clean, prime and rivet the skeleton before you get to this stage.

Here's a picture of the inside of the VS that will be closed off after the main spar is riveted. This is another of those places where a lot of care goes into getting it right but no one will ever be able to see it except with pictures like these.


Here's a picture of the inside of the VS that will be closed off after the main spar is riveted. This is another of those places where a lot of care goes into getting it right but no one will ever be able to see it except with pictures like these.

Sunday, March 8, 2009
Riveting Vertical Stabilizer Spar
Here's the setup I used to rivet the main spar of the Vertical Stabilizer. The spar has a thick stiffener so it takes a bigger rivet. Part of the fun of building is "McGyvering" a tool to get the job done. It may be hard to see, but I've shimmed and taped spacers to my C-Frame to get the spar at the right height to use the rivet gun on the AN4704-7 rivets.


Thursday, March 5, 2009
Primed Vertical Stabilizer Skeleton
I got all the ribs and spars for the Vertical Stabilizer primed. I've been using the shipping box the empennage came in as my paint booth.


Tuesday, March 3, 2009
Skinned the Vertical Stabilizer
I got the skin on the Vertical Stabilizer. Preparing the skeleton went fast as it is very similar to the Horizontal Stabilizer. Next, I'll match drill the skin to the spars and ribs before removing the skin to deburr, dimple, prime, reinstall and finally rivet.


Rib Flange squaring tool
Here's a nifty little shop made tool for squaring the flanges of ribs. It's cut with a 10 degree undercut to allow for spring back. I can't claim the design as I saw similar ones on several other RV builder's websites. Some used 14 degrees of under cut which was too much when I tested it.
I used an old hinge which is sorta' loose which seems best as it allows for a little flex when needed. I also found I needed to always have some blue painters tape on the parts that touch the rib to prevent scuffing.

I used an old hinge which is sorta' loose which seems best as it allows for a little flex when needed. I also found I needed to always have some blue painters tape on the parts that touch the rib to prevent scuffing.

Sunday, March 1, 2009
Vertical Stabilizer Plans Page
Here's the page from the plans for the Vertical Stabilizer. Not as complicated as the Horizontal Stabilizer.


Saturday, February 28, 2009
Stored the Horizontal Stabilizer
I stored the Horizontal Stabilizer on the ceiling of the garage. It's plenty sturdy and I like that it's in plane sight. I know...I know, it's a lame attempt at a pun! The workbench is looking kind of lonely. Must be time for the Vertical Stabilizer (the front part of the tall tail).


Friday, February 27, 2009
Finished the Horizontal Stabilizer!
Sure was nice to read this part of the assembly manual.

Here's the completed Horizontal Stabilizer along with the intrepid builder wearing his Van's Aircraft hat. It's a small milestone but it feels good to see a part that someone would recognize as belonging to an airplane. I haven't decided where I'll store it but I'd like it to be somewhere I can see it while I'm building for a little added motivation.


Here's the completed Horizontal Stabilizer along with the intrepid builder wearing his Van's Aircraft hat. It's a small milestone but it feels good to see a part that someone would recognize as belonging to an airplane. I haven't decided where I'll store it but I'd like it to be somewhere I can see it while I'm building for a little added motivation.

Subscribe to:
Posts (Atom)

 Posts
Posts


