

Monday, April 28, 2014
Oil Access Door
I made good progress on the oil access door on the cowl. It was a busy weekend with not much time to build so this was done Sunday afternoon. Most of the day Saturday was spent at the AOPA San Marcos Fly-In. It was a great success but they had me at "Free BBQ" for lunch from Hays County BBQ. Friends also came to visit with the boys meeting me at the Fly-In and the girls going shopping in Gruene. Dan and Beth brought Franklin's BBQ for dinner and Paula baked an apple pie. Mark and Wendy from Pennsylvania were visiting Dan and Beth and also came. They have a booth at Airventure Oshkosh and let Dan and me have entrance wristbands and rest in the shade during our week in Oshkosh. We also had a visit from a VAF friend, Dan, and family to look at the interior seats and trim as they are considering the same for their RV-9A. What a great day! Friends, airplanes and BBQ from two of the top joints in Texas.
Monday, April 21, 2014
Preparing To Paint
I've started my prep for paint by building a paint booth. Austin was home for Easter and helped me assemble it. We bragged on ourselves as the instructions said it takes two people two hours to assemble but we did it in less than half an hour.

I've been making good progress on the build but haven't been posting as much as I've been taking care of Paula. She should be back in her Gruene Hall dancing shoes soon.

I've been making good progress on the build but haven't been posting as much as I've been taking care of Paula. She should be back in her Gruene Hall dancing shoes soon.
Finishing Lower Cowl
I'm almost finished with the lower cowl. I've attached the hinges and put two coats of thinned epoxy on the inside. The epoxy helps keep it clean by sealing the surface so oil and stains don't soak in. I'll paint the inside with white paint soon.

I also finished the lower cowl support bracket. It was a fun challenge as the only instructions were the blueprints and there was a complicated order of fabrication to avoid violating edge distances for rivets and holes. It turned out well as five years of building experience must be good for something. The red wire is just there to temporarily hold the exhaust pipe out of the way. The two pins sticking out the bottom are how the hinge pins for the bottom cowl attachment are secured.

I also finished the lower cowl support bracket. It was a fun challenge as the only instructions were the blueprints and there was a complicated order of fabrication to avoid violating edge distances for rivets and holes. It turned out well as five years of building experience must be good for something. The red wire is just there to temporarily hold the exhaust pipe out of the way. The two pins sticking out the bottom are how the hinge pins for the bottom cowl attachment are secured.
Tuesday, April 8, 2014
Portable Oxygen System
I got a good eBay deal on an Aerox portable oxygen system for the airplane. The RV series of airplanes can easily climb to and cruise well above 10,000 feet which gets you away from most small airplane traffic plus you can get above weather, turbulence, birds and the heat all while getting better gas mileage. To fly that high in an unpressurized airplane legally requires oxygen anytime you're between 12,500 feet and 14,000 feet for more than 30 minutes and all the time you're above 14,000 feet. Those are the minimums but most use it more often to arrive refreshed after a long cross country at high altitude and especially at night as night vision is affected early with just a little oxygen debt. Later, I'll get a small battery operated pulse oximeter to monitor actual oxygen content. They're the kind that clip onto your finger like you see in the hospital.


Thursday, April 3, 2014
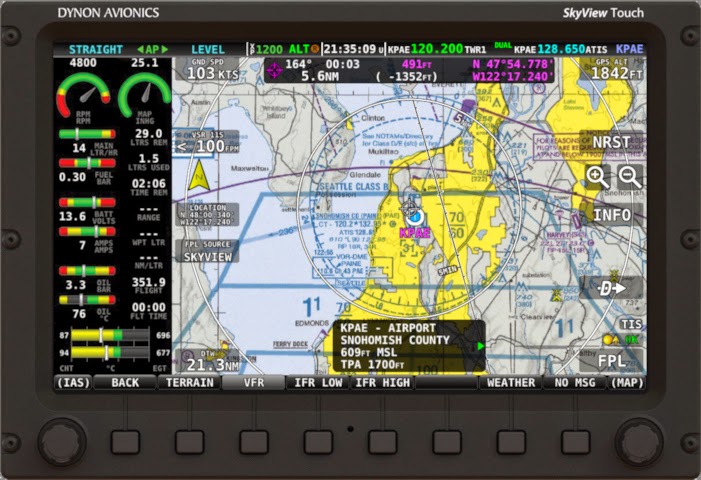
Skyview EFIS Major Update
Dynon had a major update that added a bunch of great features to my EFIS system. Skyview is now available in touch screen and current screens like mine can be upgraded for a reasonable cost. There are two big software improvements that I really like. Now all US maps and charts and procedures and airport diagrams are displayed on the screen and they're georeferenced. The chart subscription only costs $99 per year. That replaces several thousand dollars worth of paper charts not to mention the hours I used to spend doing the paper swap when I flew with the airlines. Also, Skyview now links to my Garmin IFR GPS and displays and can automatically follow the flight plan.
More Cowl Work
I'm making good progress and the end is in sight for the cowl. I think doing the hinges and pins is harder than camlocs but the look is a smooth cowl. All the hinges are sill clecoed as I've got to do some minor fiberglass work including sealing and painting the inside before I rivet them permanently.

Thursday, March 13, 2014
Cowling Fit
I'm working on the cowling fit now. I've got the upper and lower piano hinges installed which is how the cowling is attached to the firewall and itself. I still need the side firewall hinges and the long hinge at the upper and lower seams. It's going well but just takes time as there is a lot of measuring and sanding then more measuring and sanding then more.......well, you get the idea.

Monday, March 3, 2014
Air Vents
I installed the air vents last night during the Academy Awards. It was too cold to open the garage door which I need to do to work on the cowl. So much for global warming. It was 26 degrees this morning and there's sleet and ice in the forecast for tonight and tomorrow morning IN MARCH IN TEXAS!

Saturday, March 1, 2014
Started On Bottom Cowling
Austin came home to visit and work on the airplane a little. Actually, he wanted to avoid having to shop at the outlet mall so he asked if I would come pick him up. The bottom cowl is large so having extra hands was a big help.

Here's the oil door latch I'm planning on using. They were used on Cessna oil doors and look nice on the RV installations I've seen. It's a Camloc KM610-64. The "-64" is the preferred size for the oil door and indicates the height of the raised center part of the button but they're getting hard to find. I got this from Univair Aircraft in Kansas and it was the lowest price I could find ($26 shipped). B&B Aircraft has the "-32" size for only $10 but they fit a thinner door. It's the same latch, just with a lower raised center.

Here's the oil door latch I'm planning on using. They were used on Cessna oil doors and look nice on the RV installations I've seen. It's a Camloc KM610-64. The "-64" is the preferred size for the oil door and indicates the height of the raised center part of the button but they're getting hard to find. I got this from Univair Aircraft in Kansas and it was the lowest price I could find ($26 shipped). B&B Aircraft has the "-32" size for only $10 but they fit a thinner door. It's the same latch, just with a lower raised center.
Sunday, February 23, 2014

Tuesday, February 18, 2014
Engine Mount Bolts With Uncle Thomas
My Aunt Lois and Uncle Thomas came to visit this weekend and Uncle Thomas helped me torque the engine mount bolts. He was a big help as you can see from the photo they were not easy to reach. I've got the easy job on the outside with the torque wrench. We joked that that was how he paid for the delicious homemade lasagna Paula served for lunch.


Emerging from the depths of the cockpit.
The three airplane amigos.
Tuesday, February 11, 2014
Wingtip Light Cover
Working on the wingtip lights. I made a polished aluminum backing plate.

I polished it with a rouge wheel I got from Lowe's. About $9 for the wheel and the polish stick.

Here's the work-in-progress for the Plexiglas light cover. I finished all the brackets and fittings and wiring for the lights and strobes and installed and tested them but didn't get a photo before I took everything back apart.

I polished it with a rouge wheel I got from Lowe's. About $9 for the wheel and the polish stick.
Here's the work-in-progress for the Plexiglas light cover. I finished all the brackets and fittings and wiring for the lights and strobes and installed and tested them but didn't get a photo before I took everything back apart.
Monday, February 3, 2014
Installing the Archer VOR/ILS Antenna
I've got the Archer VOR/ILS navigation antenna match drilled to the left wingtip. It's the 8th and final antenna for the airplane. Here are Wikipedia links to VOR and ILS navigation. The information the antenna receives will go to the Garmin 430W to be use for navigation. VOR systems (VHF Omni Directional Radio Range) are still active but are being made obsolete by GPS. The ILS system will probably remain in use longer but they're also being replaced by GPS. ILS (Instrument Landing System) requires transmitters at every airport that must be calibrated and maintained whereas the GPS approaches don't. The other 7 antennas in the airplane are 2 Com, 2 Gps, Transponder, ADS-B and ELT.

Finishing Wingtips
I finished the right wingtip and will finish the left in a day or so. I made them removable as they'll have lights and one antenna. Here's a close-up of the #6 screws that hold them on. There are about 25 per side. The rivets with the red line attach the rib in the trailing edge of the wingtip.

Sunday, January 26, 2014
Wingtip Installation
Austin was home for my birthday party on Sunday and helped me work on installing the wingtips.

Wednesday, January 22, 2014

Sunday, January 19, 2014
Heated Pitot Installed
I removed the stock pitot tube and installed my Dynon heated pitot and Angle of Attack (AOA) probe this weekend.

Here's the routing I used for the pitot and AOA tube routing around the aileron bellcrank.

Here's where I mounted the controller. I was able to get my pneumatic rivet squeezer up into the space and install nutplates. I cut some small UHMW blocks and used them as spacers between the controller and the rib. The spacers also helped by holding the screws in-place to make it easier to screw them into the nutplates.

Here's the routing I used for the pitot and AOA tube routing around the aileron bellcrank.
Here's where I mounted the controller. I was able to get my pneumatic rivet squeezer up into the space and install nutplates. I cut some small UHMW blocks and used them as spacers between the controller and the rib. The spacers also helped by holding the screws in-place to make it easier to screw them into the nutplates.
Friday, January 10, 2014
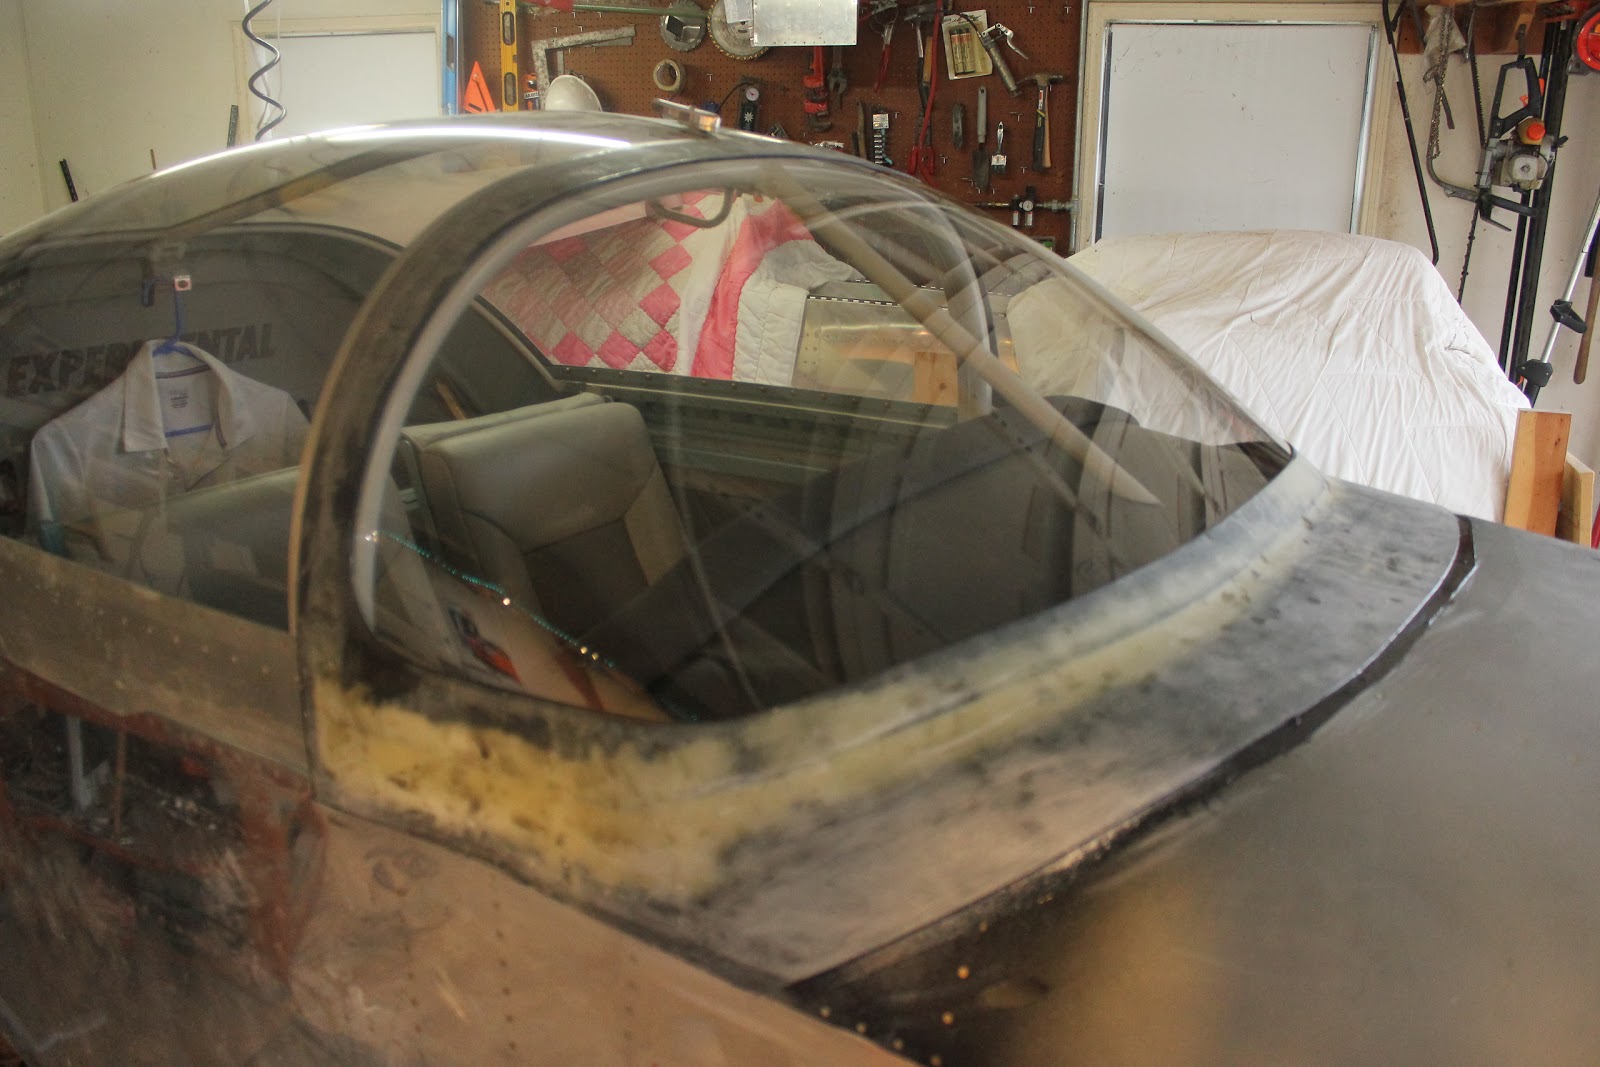
Finishing Front Windscreen Fairing
Last night, I finished sanding the front windscreen fairing and applied three thin coats of resin. The West System fiberglass resin gets squeegeed hard into the sanded surface to fill all the pinholes and seal the surface. I'll sand it again with fine sandpaper to make sure everything is smooth and repeat the resin coating (or as I like to call it, the hard candy shell) if required until it's all smooth. Then, all that's left is primer and a bead around the edges to seal everything and I'll be done.


Here's the fairing after priming. It turned out well and I was planning to paint the final finish the next day but the weather forecast of sunny and 72 turned into drizzle and 65. Shelby was home and helped me a bunch in the garage for my Christmas present. She does a great job organizing and was able to help me with cleaning and putting things back in their place and making better places so I could find the tools I need when I need them! I told her that her help was just as important as anything else during the build because it all has to be done before flying no matter what the job.
Monday, January 6, 2014
Working On Panel Labels
I've started planning work on the panel labels. Most things like switches will need to be labeled. I still have the throttle attachment to go on the lower center of the panel but planning is a good activity while fiberglass is drying on other parts of the airplane. Several have asked about the color of the interior paint. It's Sherwin Williams JetFlex Interior Aircraft Finish L09026, Robin Blue, BAC 510.

Monday, December 30, 2013
Front Windscreen Fairing Attached
Austin helped trim and sand the front windscreen fairing and it's ready to attach.

I used West System fiberglass resin that's dyed black to attach the fairing.

More sanding and filling but as Paula said last night, "It's starting to look like an airplane".

I used West System fiberglass resin that's dyed black to attach the fairing.
More sanding and filling but as Paula said last night, "It's starting to look like an airplane".
I'm happy with the fairing over the top and how it fits and looks with the trim strip on the leading edge of the slider canopy.
Thursday, December 12, 2013
Front Windscreen Fiberglass Fairing
I'm ready to start on the front windscreen fiberglass fairing and have everything covered and waxed. Looks like someone's angry that I haven't finished the canopy yet. I'm planning on doing the fiberglass this Saturday and hopefully it will go faster than the aft canopy fairing now that I've got some experience.


My first attempt at a fairing was a bust. I ran out of the nice 9 oz. 8 harness bi-directional (BID) fiberglass so I used some fiberglass tape from West Marine and used the stipple method. I also used black dye in the resin. With the dye, I couldn't tell if the resin was saturated correctly and couldn't see the positioning as it wasn't transparent. I'm sure glad I made the fairing removable because I didn't like the results at all.
I ordered what I wanted from Aircraft Spruce (7781-60 FIBERGLASS CLOTH STAND 7781-60) and started over. The way I like to do it is to start with a large piece of cloth sandwiched between clear medium thick plastic. Then I use a paper template and roughly mark an outline with Sharpie on the plastic.
Then I peel back the top layer of plastic and pour resin on the cloth where the pieces will be. Marking with the Sharpie leaves a faint outline or you can just estimate as the exact position isn't critical.
Then I carefully put the top layer of plastic back and start rolling the resin. The roller I use was bought for rolling plastic Formica counter tops but any will work. I like this one because it cleans easily with acetone without damage.
After all the fiberglass inside the lines is thoroughly saturated and all the excess resin is rolled out to the side, I cut the pattern with a rotary cutter. It helps a bunch to have a self-healing cutting mat below and both can be bought at a hobby or sewing center like Hobby Lobby.
Pull away the excess and you're left with this.
It's easy to peel off one side of the plastic.
Then lay the section where you want it and smooth it out by hand or with a roller before peeling the top layer of plastic. I use a small roller that was a wallpaper roller in its previous life.
I much prefer this method as it's very easy to handle and gives total saturation of the cloth with NO extra resin. It does take longer, though plus there's some wasted cloth. Here's what it looks like after drying and some sanding and trim work. I have several iterations left before I glue it down but it's looking good so far. This is four layers of 9 oz. BID cloth. It may be a little thick but I don't want to worry about the top lip breaking from people using it as a hand hold to get in and out.
Tuesday, December 3, 2013


Sunday, December 1, 2013
Canopy Tab Opener
Here's the canopy opener tab I fabricated to help pull the canopy open. The canopy is really snug so this helps keep the pull up and even.


Thursday, November 21, 2013
Canopy Rear Skirt
I'm almost finished with the rear canopy skirt. I decided to go fiberglass and it's looking fine. Here's the prep work. I used heavy clear packing tape on the area to get fiberglass and outlined the final size with electrical tape. Then I waxed everything with paste wax.

Here's the final rough product. It popped off easily. I've been busy for the last couple of days sanding and filling. Overall, I was really happy with the way it turned out.

Here's the final rough product. It popped off easily. I've been busy for the last couple of days sanding and filling. Overall, I was really happy with the way it turned out.
Monday, November 4, 2013
Installing Interior
I got a good start installing the Classic Aero interior. I'm really impressed with the fit and quality. We had a crowd home for Austin's birthday party so everyone got to sit in it. Austin said it looked like the interior of a Corvette. I'm also happy with the color of the panel and how it looks against the black panel instruments.

Here's Shelby with her Halloween cat ears watching me and Dave make airplane noises.

Here's Shelby with her Halloween cat ears watching me and Dave make airplane noises.
Subscribe to:
Comments (Atom)

