

Wednesday, August 11, 2010
Fuel Tank Passes Leak Test with Flying Colors
Well how about that. My first tank tested leak free! Below, I used the liquid column manometer method to measure the pressurization in the tank. I added 1 psi which is about a 27" difference in the water level (dyed green) in the looped clear tubing. Then, I carefully sprayed every rivet, screw or potential leak point with soapy water to look for leaks. NONE! Now it's on to the left tank. Like most things in life, it should be much easier the second time around.


Monday, August 9, 2010
Powered Scotch Brite Scuffing
Here's my new method of scotch brite scuffing. I used a shank from a disc cutoff wheel and put three rectangular scotch brite pads where the disc goes. Works great and is really fast.


Sunday, August 8, 2010
Finished Right Fuel Tank
I finished the right fuel tank and now the hardest part begins...waiting for proseal to dry so I can leak test.


Saturday, August 7, 2010
Finishing Right Fuel Tank
The right tank is getting close to finished. I made and installed the fuel pickup. I used my new Imperial tubing bender I picked up at Oshkosh from Aircraft Spruce. Worked great. The right tool makes all the difference.
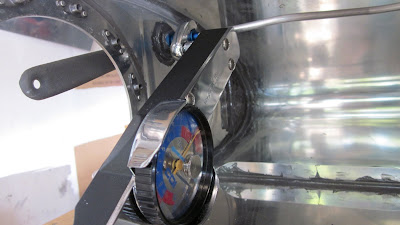
Below, I'm getting the proper torque on the vent line fitting using my torque wrench and crowfoot wrench.
I also sealed the baffle. It's not easy getting a good bead on the inside of the tank at the baffle since there is no access once the baffle is in place. You have to carefully lay down a line of proseal on the inside of the tank skin and let the baffle "squeegee" it into place as you lower the baffle. Too much or too little and the bead won't form correctly. The Semco sealant gun made it easy to get a properly sized and placed line of proseal which resulted in a good bead like you see below. I shot this picture with the camera held inside the first bay through the tank access hole.

Below, I'm getting the proper torque on the vent line fitting using my torque wrench and crowfoot wrench.

I also sealed the baffle. It's not easy getting a good bead on the inside of the tank at the baffle since there is no access once the baffle is in place. You have to carefully lay down a line of proseal on the inside of the tank skin and let the baffle "squeegee" it into place as you lower the baffle. Too much or too little and the bead won't form correctly. The Semco sealant gun made it easy to get a properly sized and placed line of proseal which resulted in a good bead like you see below. I shot this picture with the camera held inside the first bay through the tank access hole.

Monday, July 19, 2010
Fuel Sender Ready
I finished the fuel sender and temporarily installed it on the fuel access plate. Paula came out and helped me check the electrics of the gauge by moving the float up and down while I used a multi-meter to check the resistance. The only thing left before finishing the tank with the baffle is the fuel pickup. I need a 3/8's tube bender for that job and I've ordered one from Aircraft Spruce that I'll pick up at Oshkosh to save the shipping cost.


Thursday, July 15, 2010
Semco Sealant Gun
Here's my new (used) Semco sealant gun. It's a Model 250-B. The Model 250-A is the same except it has a handle and trigger instead of the flat paddle trigger like in the photo below. I tried both and much prefer the paddle trigger. I can get into much tighter places like the fuel tank when sealing the ribs when using the paddle trigger. The tubes also come in several sizes. I've used both the 2.5" and the 6" and prefer the smaller for inside the tank work. I didn't see any use for the 12" unless you're building a 747. It uses pneumatic pressure to push out the sealant in a very controlled manner with the ability to stop the flow instantly. It was much easier to encapsulate the rivet shop heads with it instead of scooping and dabbing with a popsicle stick. I also wet sealed every rivet by putting a tiny dab in each countersunk hole before putting the rivet in and the Semco gun made it fast and clean as it doesn't continue to flow when you let up on the paddle or trigger. You do have to fill the plastic tube (goes inside the metal housing) with your sealant but that wasn't too hard. I told Paula that this would make a great cake or cookie decorating tool...just use icing instead of proseal! Edit: I tried icing a cake with it and it worked fine but the nozzle was too plain to make fancy designs like the dedicated decorating tips.
I purchased several on ebay for such a good deal that I gave some as gifts. If you're shopping for used, make sure you get the factory air line as the fittings look hard to source. I got extra plastic tubes and nozzles from Brown Tool. I ordered 6 or 8 different nozzles and the only two I like are the straight 4" and 2.5" with a 1/8 opening.
For cleanup, I unscrew the plastic nozzle and set it aside. I also pull the plunger out. Then I put a piece of scrap "handle" in the tube and use it to pull the old proseal out after it dries. I don't squeeze any leftover out as it makes it easier to remove almost all the dried proseal including from the nozzle. Leaving it overnight is just the right amount of time as it's rubber like but not too hard. Makes cleanup a breeze.
I've also used the Semco for applying RTV to seal the baffles. I got a caulk gun size container of red high temp RTV from NAPA for just a little more than a retail tube. It was easy to squirt it into the plastic Semco tube and it was much easier to apply in tight spaces. I left the RTV in the tube and it stays fresh and can be used again after pulling a small plug of dry RTV out of the tip.

I purchased several on ebay for such a good deal that I gave some as gifts. If you're shopping for used, make sure you get the factory air line as the fittings look hard to source. I got extra plastic tubes and nozzles from Brown Tool. I ordered 6 or 8 different nozzles and the only two I like are the straight 4" and 2.5" with a 1/8 opening.
For cleanup, I unscrew the plastic nozzle and set it aside. I also pull the plunger out. Then I put a piece of scrap "handle" in the tube and use it to pull the old proseal out after it dries. I don't squeeze any leftover out as it makes it easier to remove almost all the dried proseal including from the nozzle. Leaving it overnight is just the right amount of time as it's rubber like but not too hard. Makes cleanup a breeze.
I've also used the Semco for applying RTV to seal the baffles. I got a caulk gun size container of red high temp RTV from NAPA for just a little more than a retail tube. It was easy to squirt it into the plastic Semco tube and it was much easier to apply in tight spaces. I left the RTV in the tube and it stays fresh and can be used again after pulling a small plug of dry RTV out of the tip.

Tuesday, July 13, 2010
Flew an RV-7A Again
I got to fly Norm's RV-7A yesterday for 1.5 hours and 8 landings. Felt great to get back into the air. Norm really did a great job helping me shake off some of the rust. I am really excited about how nice of an aircraft the RV-7 is and how fun it is to fly. Definitely good motivation to keep pounding those rivets (or prosealing those tanks).
Sunday, July 11, 2010
Fuel Tank Vent Line Installed
Here's the vent line installed in the right fuel tank. In front is my Parker Rolo-Flair tool for flaring the ends of aircraft tubing with a 37° flair. I practiced on several pieces of scrap tubing to make sure I had the technique down. Austin was home for Shelby's MBA graduation party and helped by drilling the hole for the AN fitting.
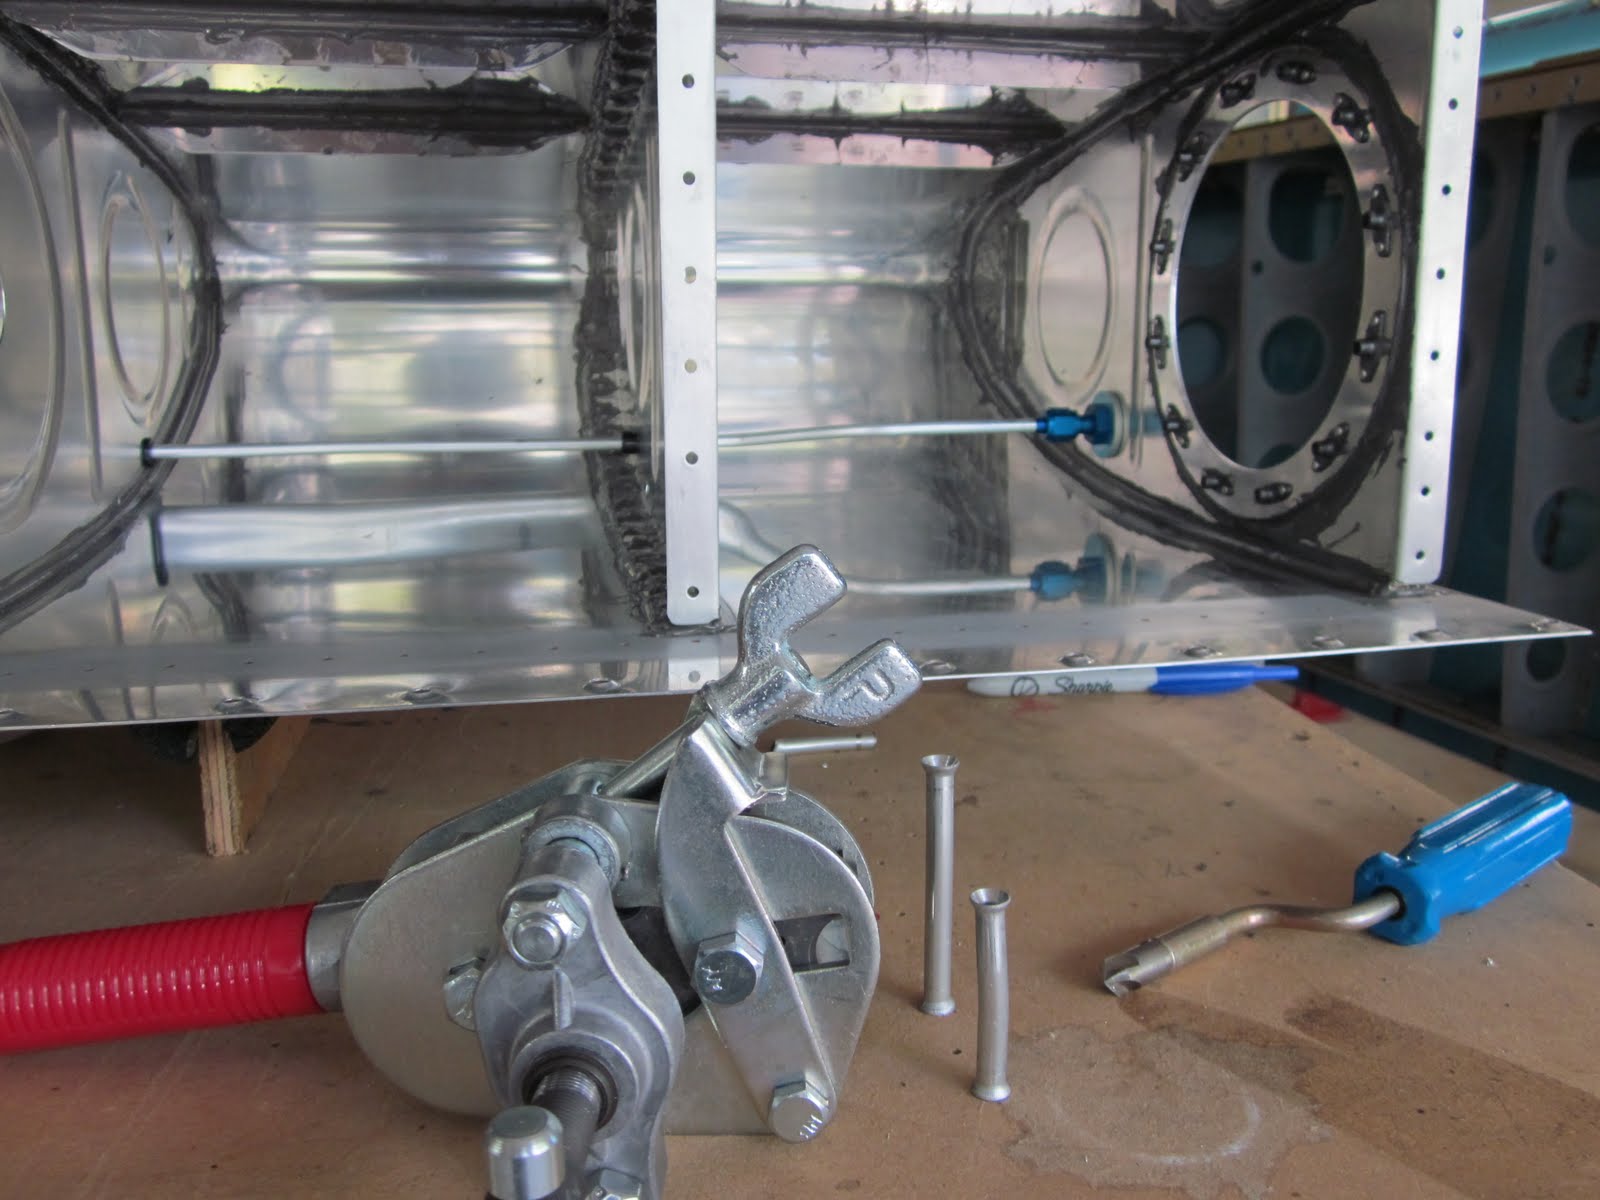
Here's the other end of the vent line at the highest point of the tank next to the fuel cap.

Here's the other end of the vent line at the highest point of the tank next to the fuel cap.
Monday, July 5, 2010
Finished Inner Ribs of Right Tank
I finished the 5 inner ribs of the right fuel tank. Don't tell Paula, but below is a picture of the tank IN THE LIVING ROOM! I sneaked it in to finish encapsulating the rivet shop heads with proseal while in the comfort of air conditioning.
My friend and RV mentor, Norm, came by today with his son Jeff to look at the project. He's packing up to move and all his tools and the RV-10 project are inaccessible so he said he'd like to come by as he's going through building withdrawals. I told him I was going to talk bad about him if he was willing to visit during proseal. It turned out to be really great for me as Jeff works on Boeings (KC-135) and uses proseal extensively. He said everything looked good and that he wasn't just saying that to be polite. Nice to have an outside opinion as it sometimes feels as if I'm working in a vacuum. Van's instructions are good but don't cover everything. I've read Rick G's method of fay sealing and watched the Orndorff video's but nothing substitutes for having a pro look everything over carefully.

My friend and RV mentor, Norm, came by today with his son Jeff to look at the project. He's packing up to move and all his tools and the RV-10 project are inaccessible so he said he'd like to come by as he's going through building withdrawals. I told him I was going to talk bad about him if he was willing to visit during proseal. It turned out to be really great for me as Jeff works on Boeings (KC-135) and uses proseal extensively. He said everything looked good and that he wasn't just saying that to be polite. Nice to have an outside opinion as it sometimes feels as if I'm working in a vacuum. Van's instructions are good but don't cover everything. I've read Rick G's method of fay sealing and watched the Orndorff video's but nothing substitutes for having a pro look everything over carefully.

Thursday, July 1, 2010
First Fuel Tank Rib Prosealed
Below, I'm buttering the flanges of the first Fuel Tank Rib with proseal. I'm going to go with the Rick G. method of fay sealing so I'll let this set up overnight and wet shoot the rivets tomorrow.


Here's the first Fuel Tank Rib installed with a nice fillet of proseal. I used a 12cc syringe I got from the farm and ranch store to get the proseal in the right place and a popsicle stick to do the fillet. Worked well but the next syringe will be bigger and I'll drill the opening a little.
Sunday, June 27, 2010
Prosealed Stiffeners to Fuel Tank
Austin and I prosealed the stiffeners to the inside of the right fuel tank today. The stiffeners go on the bottom of each tank to prevent the tank skin from sagging. Each tank holds 21 gallons so at about 6 lbs per gallon, that's 126 lbs the bottom of the tanks need to carry.
Apparently, proseal makes you crazy. It wasn't as bad as I thought it was going to be. It helped that we took all the precautions I'd read about over the last year including protective hand cream and two pair of gloves. Anytime the top layer glove got proseal on it, we'd replace it. We went through almost a box (100) of gloves between the two of us but we stayed clean. Early on, I thought a little proseal on a glove wouldn't be a problem but when I tried to pick up a little rivet, I'd get 5 stuck to the proseal so that's when we started replacing gloves with impunity.


Apparently, proseal makes you crazy. It wasn't as bad as I thought it was going to be. It helped that we took all the precautions I'd read about over the last year including protective hand cream and two pair of gloves. Anytime the top layer glove got proseal on it, we'd replace it. We went through almost a box (100) of gloves between the two of us but we stayed clean. Early on, I thought a little proseal on a glove wouldn't be a problem but when I tried to pick up a little rivet, I'd get 5 stuck to the proseal so that's when we started replacing gloves with impunity.

We applied proseal until we could say "there's no way in hell this is gonna' leak". We didn't actually say that...cursing isn't polite...we just wanted to to apply enough proseal so we could say it if we were in the mood for cussing, which we weren't because things went fine but we still reserve the right to cuss if needed some time in the future.

Here, I'm mixing the proseal on my new scale. It measures down to a tenth of a gram which helps when measuring small quantities. I plan on doing the fuel tank ribs one or two at a time so I'll only be using small amounts of proseal for each session. Glad Paula didn't see me mixing it on her nice dining room table.

Saturday, June 26, 2010
Redneck Air Conditioning Helps with Tank Dimpling
Austin came home today to help with the tanks as my late father's day present. He's standing in front of our "Redneck Air Conditioning" ice chest with a fan blowing over it. Actually worked well. Got the idea from a company that sells a Van's RV air conditioning system very similar to this.
My friend and RV mentor, Norm, came by today with his wife Carol for a little visit. He's working on an RV-10 and was interested in seeing and talking about my fuel tank progress. He's built an RV-7A and finished an RV-9A and said the tanks were a mess. He talked me into doing the fay sealing method of sealing the tanks and I extracted a promise from him of help if they leak.

My friend and RV mentor, Norm, came by today with his wife Carol for a little visit. He's working on an RV-10 and was interested in seeing and talking about my fuel tank progress. He's built an RV-7A and finished an RV-9A and said the tanks were a mess. He talked me into doing the fay sealing method of sealing the tanks and I extracted a promise from him of help if they leak.
Tuesday, June 22, 2010
Fuel Cap & Flange
Here's an inside the tank view of the fuel cap and flange. I finished match drilling and countersinking both flanges last night. Since the fuel tank is a wet wing type, the flange will be prosealed and riveted in place. The fuel cap that's sticking out of the flange below is similar to a plumber's pipe stopper where two plates with a flexible gasket between them are squeezed together to seal the hole. Just a lot higher quality. And, hi to Little Gail. You're welcome anytime.

Monday, June 14, 2010
Fuel Tank Access Plates
Below are the inboard ribs of the fuel tanks showing the backing plates and the holes I cut in the ribs with the hole cutter. Oh, the carnage...it was a noisy, messy job with the hole cutter (aka fly cutter) in the drill press. But, the holes did come out nice and neat and round. In the above right of the picture are the covers that close up the holes and hold the fuel level senders and fuel supply lines. Should be a quick job to finish up these and then it's on to the fuel caps and fuel drains.

Saturday, June 12, 2010
Oshkosh B'Gosh
I get to go to EAA AirVenture Oshkosh for the first time this year. Yippee! 10,000 visiting airplanes make Oshkosh the busiest airport in the world during "The World's Greatest Aviation Celebration". 2,500 showplanes, 500 forums, 100's of vendors, aviation museums, music by Chicago, Gary Sinise and the Lt. Dan Band and Asleep at the Wheel. I also get to go to a special reception for EAA Chapter Presidents. Free food and drinks...wouldn't miss it.
I do have a question or minor pet peeve about AirVenture. I couldn't find the words "experimental" or "homebuilt" on the professionally built home page linked above. The letters "EAA" stand for Experimental Aircraft Association. Are they afraid of the word Experimental? Inquiring minds want to know.
I'll be going with Dan, the husband of one of Paula's co-workers. He's got a similar aviation background. Paula said his wife was happy to have someone to sub for her as she's been many times.

I do have a question or minor pet peeve about AirVenture. I couldn't find the words "experimental" or "homebuilt" on the professionally built home page linked above. The letters "EAA" stand for Experimental Aircraft Association. Are they afraid of the word Experimental? Inquiring minds want to know.
I'll be going with Dan, the husband of one of Paula's co-workers. He's got a similar aviation background. Paula said his wife was happy to have someone to sub for her as she's been many times.

Thursday, June 10, 2010
Tanks Almost Ready for Proseal
The fuel tanks are almost ready for proseal. I've gotten all the ribs and stiffeners and baffles for both tanks done and I've match drilled everything. The skins are countersunk for the baffles. I've finished the tank attach brackets and only need to open the ends for the fuel attach hardware and then deburr and dimple and then on to the black goop from hell. I still get a kick out of the the fact that the tank sealant (proseal) has no known solvent on the planet. Nothing melts this stuff...which is good considering it helps hold the fuel that keeps you aloft!
In the left side of the picture below, you can see the tank attach brackets that were fabricated out of a big hunk of aluminum angle. Both are shown but only the left one that's nested into the the nose flanges goes with this rib. I just had them together showing Paula how fun it is to fabricate stuff. She was thrilled.
In the left side of the picture below, you can see the tank attach brackets that were fabricated out of a big hunk of aluminum angle. Both are shown but only the left one that's nested into the the nose flanges goes with this rib. I just had them together showing Paula how fun it is to fabricate stuff. She was thrilled.

Here are the two tanks in their cradles. I'm building both tanks and wings at the same time so clecos are at a premium which is why the left one has no clothes tomatoes clecos. I ordered more from Vans when I ordered the proseal but I accidentally ordered 3/16's and not 3/32's. I returned them and I'm waiting to receive the correct size. I also planned a swap sale at our next EAA 958 meeting and put out the word that I'm looking for more (good) clecos. I will send a crisp one dollar bill to the first person to contact me and mention this post.

Sunday, May 30, 2010
Fluting Tank Ribs
I finally finished deburring the tank ribs and now it's time to bend the flanges to 90° and flute them so they will be straight and lay flat against the inside of the tank skins. Here's the stack of ribs (14) and the shop made flange straightener.

Monday, May 24, 2010
Flight Instructor Ratings CFI, CFII, MEI
Today, I got my Flight Instructor Ratings. Below is a cropped copy of my temporary certificate. The hard copy will come in the mail in a couple of weeks. Having past military flight instructor experience allowed me to get three instructor ratings, CFI, CFII (Instrument) and MEI (Multi-Engine) with a test and a records review. The FAA designated examiner was really nice and said he was happy that he could do something for those that served in the military. My Dad went with me and we had a nice dinner at Jason's Deli before meeting the examiner.
I'm not sure if I'll use the ratings but I couldn't pass up the chance to get them for a nominal cost. It's a brand new program that sounds too good to be true which means the FAA will probably be quick to cancel it. They are not cheap to get normally. The cost for all three ratings can easily run to five figures. I could use them to give instruction to family or even for a little part time weekend income. Anywho, I've got them now and I'll decide later what to do with them.

I'm not sure if I'll use the ratings but I couldn't pass up the chance to get them for a nominal cost. It's a brand new program that sounds too good to be true which means the FAA will probably be quick to cancel it. They are not cheap to get normally. The cost for all three ratings can easily run to five figures. I could use them to give instruction to family or even for a little part time weekend income. Anywho, I've got them now and I'll decide later what to do with them.

Sunday, May 23, 2010
On to the Fuel Tanks
Time to get started on the fuel tanks. The fuel tanks are the inboard leading edges of the wing, just really beafed-up and sealed with all the appropriate lines and vents. Here, I'm test fitting the tank skin to the baffle and the adjacent wing skins. The round hole in the skin is where the fuel cap will go.

Monday, May 17, 2010
RV-12 Field Trip
Here are a few pictures of EAA Chapter 958 at Chuck Woods' hanger looking at his RV-12 progress. He also has a beautiful RV-9A painted in stars and stripes.


Carol and Norm looking at the RV-12 with Chuck's RV-9A in the background. Now that's a good looking paint job! Norm, you've got an RV-7A, an RV-9A and you're building an RV-10. Are you considering an RV-12 now too?

Don and Ed deep in conversation. If you want to hear some really good flying stories and just have an enjoyable conversation, sit with Don and talk about the Waco.

Sunday, May 16, 2010
Built Stall Warning
Since I still had Austin home, we built the stall warning assembly. Installation will come while the leading edge ribs are being installed. Was a nice change of pace doing some small intricate work.


Saturday, May 15, 2010
Finished Leading Edges and Tank Attach Strips
Wow, Austin and I got a lot of work done today. He finished his last final on Thursday and came home Friday night. Officially a senior in college with a 3.85 GPA in the business school at the University of Texas. Proud Dad! After my EAA 958 meeting this morning, we put in a solid six hours finishing the leading edges including the fuel tank attach strips. Austin was a huge help coming up with innovative ideas to help get it done. It helps that he has good hand-eye coordination and attention to detail so I don't have to watch him drill every hole. Below, he's match drilling an aft leading edge rib flange to the main spar web on the left wing. Got that? There will be a test later.

Crimper & Stripper
Here's my new (used) AMP 59250 Crimper and my new (used) Stripmaster wire stripper. I'm having to get up to speed on electrical as I have to wire the stall warning to finish the leading edge. The crimper is the tool to use for crimping as recommended by 'lectric Bob Nuckolls, author of The AeroElectric Connection. Time to get electroeducated!


Tuesday, May 11, 2010
Match Drilling and Leading Edges
Finished with match drilling the right wing. I assembled the leading edge and attached it as well. The wing is surprisingly wide (or tall since it's on edge). It will be even bigger with the ailerons and flaps installed.


Monday, May 3, 2010
More Wing Skins Clecoed
This weekend, I got a lot of airplane work done. On the left wing I finished riveting together the rib and spar skeleton while leveling it. I also clecoed (temporarily fastened) six of the eight wing skins. I installed so many clecos that I got a blister on my hand. I just need to cut and match drill the wing walk doublers before putting up the other two skins. Since the airplane, including the wings, are constructed using the semi-monocoque technique, the skins make the wing box really rigid.
Shelby was home for a short while this weekend. She was picking up her cat, Hadley (named after Ernest Hemingway's first wife who loved cats), so I got her to help hold some wing skins until I got them started. She also placed some of the rivets in the tight spots where my big hands get in the way. Thanks, Shelbs!

Tuesday, April 27, 2010
First Skin on Wing
I got the first skin put on top of the right wing. Yeah! Looks a little like an airplane part. It looks small now because there's no leading edge or flaps or ailerons yet. See the wood brace under the middle of the wing? The middle of the wing has to be supported while you're attaching the wing skins otherwise it sags a little. I made adjustable poles when I was tiling the ceiling of the shower and I get to keep using them for different projects. It's a two piece pole with a tee nut and hole in one end and a hanger bolt in the other. The top is padded and to use it, you just turn one section to raise or lower it. Paula said I should patent them. I suspect they're a little too simple to patent but I appreciate the compliment!


Here's a picture of a P-51 Mustang wing being restored. I thought the similarity was interesting.

Sunday, April 25, 2010
Riveting Main Wing Ribs to Spars
Although I haven't posted in a while, I have been making good progress. Here are some pictures of the right wing with the main ribs riveted to the main and rear spar. I've finished the left wing main ribs and only need to prime them.
This is looking through the lightening holes.


This is looking through the lightening holes.

Rear spar as attached to a main rib.
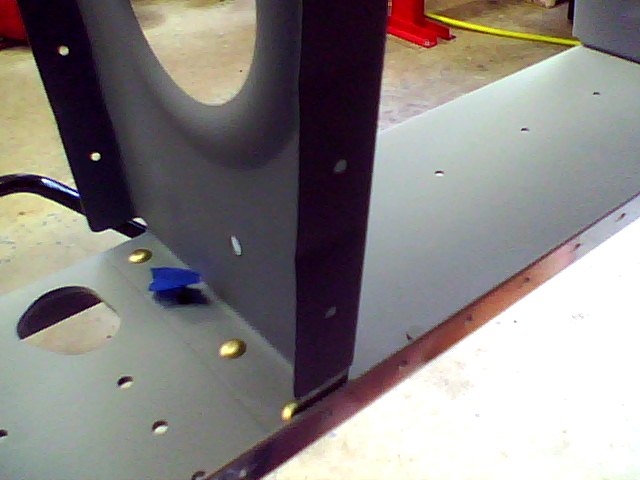
Top of the main spar with the rivets holding the main ribs below. I shot the rivets old school - rivet gun with bucking bar. I like doing it that way. Definitely takes more care and practice but rewarding. Like making consistent 3' putts.

Monday, March 29, 2010
Flight Instructor Ratings
I took my flight instructor test this morning and passed with a 97! It was the military competence instructor exam which allows me to use my military flight instructor experience to get my CFI, CFII (instrument) and MEI (mulit-engine) civilian instructor ratings. All I need to do now is take my paperwork to the FSDO (Flight Standards District Office) and apply. Not sure if I'll use the ratings but nice to have.


Saturday, March 27, 2010
Real Purpose of Lightning Holes
I think I found the real purpose of lightning holes. Gotta' love those old Wurstfest beer pitchers used as cleco buckets. Perfect fit.


More Ribs Starting to Look Like a Wing
Got some more ribs done this morning. I had enough hung on the left wing to attach the rear spar. Looks vaguely like an airplane part.


Monday, March 22, 2010
Still Working on Ribs
Man-o-man, there are a lot of ribs. I have an assembly line set up but it takes a long time to deburr all the little nooks and crannies.

I have been putting the ribs on the wing spars when I finish deburring and straightening them although I'll have to take them back down before final assembly. Seeing them hanging makes it look like I'm making a little progress and motivates me to deburr some more.


Saturday, March 6, 2010
Time to Start the Ribs
No, I'm not barbecuing. The ribs are the internal bracing that go between the spars. There are a lot of them in the wings and they all have to be deburred and straightened. That's going to take me a while!


Finished the Rear Spars - For Now
Finished up the rear spars. Several other parts attach to the rear spars so I haven't seen the last of them but I've done all I can do for now. I sure like having a pneumatic squeezer for the bigger rivets like on the reinforcing plates below (painted grey). Big rivets are hard to accurately squeeze by hand. Almost feels like cheating...but I'm not giving it up.


Friday, March 5, 2010
Nifty New Seat
Here's a new addition to the Aircraft Factory (garage) I got for my birthday from my Mother and Father-in-Law, Dean and Jerry. Since I'm building the wings, there will be a lot of work that can be easier accessed from sitting height. The stool is on rollers so I'll be able to scoot around. I'm using it here to finish riveting the rear spar. Thank you for the present. It was the only airplane related one I got.


Sunday, February 28, 2010
Working on the Rear Spar
Starting the rear spar. Not real difficult so far, just a lot of deburring. Deburring keeps scratches from growing into cracks due to vibration. It is convenient having two of the standard sized (5'x2') EAA 1000 work tables on wheels and bolted end-to-end as the spars are about 9' long. I built the standard tables but customized them with locking wheels, an inset back-rivet plate, two drawers, an electric plug strip, and long bolts that allow them to be bolted side-by-side or end-to-end.


Saturday, February 27, 2010
Finished with Tie Downs
Here are the finished tie downs. Picture the threaded ring hanging down under the wing. That's where the rope or chain will attach. I had to tap (thread) the inside of the block where the ring screws. Austin and I have a lot of experience using the tap and dies from working on the Dart. It was much easier working with aluminum which gives me pause about the strength but there are over 6500 RV's flying and I've never heard about people having problems.
Speaking of RV's flying, I read yesterday that an organization that covers certified aircraft reported that 965 CERTIFIED piston aircraft were sold in 2009. Contrast that with 1032 EXPERIMENTAL piston aircraft that were given airworthiness certificates in 2009 in the U.S. alone. Of those 1032, well over half were RV's!


Speaking of RV's flying, I read yesterday that an organization that covers certified aircraft reported that 965 CERTIFIED piston aircraft were sold in 2009. Contrast that with 1032 EXPERIMENTAL piston aircraft that were given airworthiness certificates in 2009 in the U.S. alone. Of those 1032, well over half were RV's!

The tie down assembly also doubles as the attach point for the aileron pushrod brackets as seen below.

Tuesday, February 23, 2010
Working on Tie Downs
Tie downs are the metal rings that hang down under the wings where you attach ropes or chains to hold the aircraft firmly on the ground when it's parked. Small airplanes are surprisingly light. An average completed RV weighs around 1000 lbs. That's not much when you consider they have a wing span of 25 ft. A strong gust of wind can tip over most small airplanes if they're not tied down. The two large rectangles of metal get bolted to the main wing spar and the rings are screwed into the bottom. You can see how it works on the plans in the upper right corner of the photo below. These can also be used as jack points for lifting the airplane.
The shiny rectangles of aluminum with the holes in them (bottom right in picture) are spacers that go behind the tie down brackets against the spar. I fabricated them from scratch and put lightening holes in them. Lightening holes are just a way to make things lighter without affecting the strength of the item. I like to tease the gullible that lightning (without the "e") holes let the lightning out if you're struck by it.

The shiny rectangles of aluminum with the holes in them (bottom right in picture) are spacers that go behind the tie down brackets against the spar. I fabricated them from scratch and put lightening holes in them. Lightening holes are just a way to make things lighter without affecting the strength of the item. I like to tease the gullible that lightning (without the "e") holes let the lightning out if you're struck by it.

Subscribe to:
Posts (Atom)

 Posts
Posts

