

Wednesday, August 11, 2010
Fuel Tank Passes Leak Test with Flying Colors
Well how about that. My first tank tested leak free! Below, I used the liquid column manometer method to measure the pressurization in the tank. I added 1 psi which is about a 27" difference in the water level (dyed green) in the looped clear tubing. Then, I carefully sprayed every rivet, screw or potential leak point with soapy water to look for leaks. NONE! Now it's on to the left tank. Like most things in life, it should be much easier the second time around.

Monday, August 9, 2010
Powered Scotch Brite Scuffing
Here's my new method of scotch brite scuffing. I used a shank from a disc cutoff wheel and put three rectangular scotch brite pads where the disc goes. Works great and is really fast.


Sunday, August 8, 2010
Finished Right Fuel Tank
I finished the right fuel tank and now the hardest part begins...waiting for proseal to dry so I can leak test.


Saturday, August 7, 2010
Finishing Right Fuel Tank
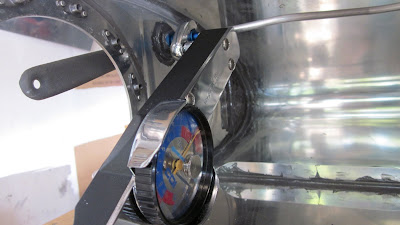
The right tank is getting close to finished. I made and installed the fuel pickup. I used my new Imperial tubing bender I picked up at Oshkosh from Aircraft Spruce. Worked great. The right tool makes all the difference.
Below, I'm getting the proper torque on the vent line fitting using my torque wrench and crowfoot wrench.
I also sealed the baffle. It's not easy getting a good bead on the inside of the tank at the baffle since there is no access once the baffle is in place. You have to carefully lay down a line of proseal on the inside of the tank skin and let the baffle "squeegee" it into place as you lower the baffle. Too much or too little and the bead won't form correctly. The Semco sealant gun made it easy to get a properly sized and placed line of proseal which resulted in a good bead like you see below. I shot this picture with the camera held inside the first bay through the tank access hole.

Below, I'm getting the proper torque on the vent line fitting using my torque wrench and crowfoot wrench.

I also sealed the baffle. It's not easy getting a good bead on the inside of the tank at the baffle since there is no access once the baffle is in place. You have to carefully lay down a line of proseal on the inside of the tank skin and let the baffle "squeegee" it into place as you lower the baffle. Too much or too little and the bead won't form correctly. The Semco sealant gun made it easy to get a properly sized and placed line of proseal which resulted in a good bead like you see below. I shot this picture with the camera held inside the first bay through the tank access hole.

Subscribe to:
Posts (Atom)

