

Tuesday, December 27, 2011
Paula's Birthday
Today is Paula's birthday so I was making sure she didn't do any dishes and started to clean a cookie sheet and thought it could use a little garage engineering.

Christmas Present
I got coupons for an hour of garage work from no less than four this Christmas which was exactly what I asked for. I made immediate use of them. In the first picture there's me and Austin working on the forward fuselage, Spencer countersinking angle for the forward fuselage floor and Cameron and Shelby dimpling the forward side skins. They all did good work and the best part was I got to spend time with all of them. Time with loved ones is the best Christmas present you can get!

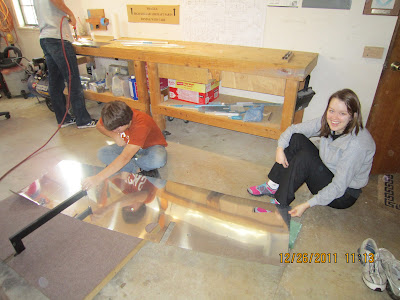

Shelby and Cameron dimpling side skins. Shelby was laughing that she was replaced by a carpeted board that kept the skins from scraping on the floor. Really, she does a good job when she helps but she prefers organizing. Cameron was a natural with the c-frame dimpler. He just finished his Eagle Scout and I joked that he should have built an airplane instead of benches for his project. He wasn't buying it.

Monday, December 12, 2011
Finishing Bottom Of Fuselage
I'm starting the last of the bottom of the fuselage before the the instructions say to "roll the canoe". You have to read the blueprints to determine what is left to finish. I'll need help with the riveting as my arms aren't long enough to reach inside and outside at the same time.
This picture is looking in through the firewall recess that's removed for access.


This picture is looking in through the firewall recess that's removed for access.

The fuselage is still upside down. I'm hoping Austin can help with some of the harder to reach rivets and we can flip this baby by Christmas.

Wednesday, November 30, 2011
Drilled Rudder Bearing Blocks
I finished building all the brake pedals so I moved on to drilling the rudder bearing blocks. They are what hold and pivot the tubes that the rudder pedals hang from. I was really sweating drilling the long vertical holes for the bolts that attach them to the longeron. I read many posts and websites about special jigs and tricks but in the end, it turned out to be easy peazy. I just used the large angle left from the fuel tank and squared it up on my drill press table. I did have to use a few thicknesses of tape on the angle to get it shimmed and then I drilled multiple practice holes in some oak. Clamps held everything in place and all the holes are straight and consistent.


Tuesday, November 29, 2011
Finished First Brake Pedal
Here's the first finished brake pedal. I started doing all four in an assembly line but I couldn't resist finishing one. I temporarily fastened it to the rudder pedal.


Christmas Present
Here's one of my Christmas presents to my sister-in-law. She has an entryway wall with 20 or so small crosses and I thought she might like one that was uniquely from me. It turned out to be harder than I thought to make partially because it's small but also because I made the angle backing from one piece with notches and bent it into a cross shape.


Here's another angle.

Monday, November 28, 2011
Working On Rudder and Brake Pedals
I finished all the braces in the forward fuselage and am now working on the rudder and brake pedals. Nephew Spencer found a brilliant way to polish all the lightening holes in the brake pedals. He chucked a small sanding drum in the drill press and rolled 320 grit sandpaper around it and held it on with a large rubber o-ring. Fast and worked great.


Here's the whole package of rudder and brake pedal parts.

Saturday, November 26, 2011
Busy With Forward Fuselage
I haven't posted in a while but I have been making very good progress. There are a lot of braces and gussets and brackets and reinforcing plates in the forward fuselage that I've been finishing. I'm working on the last of them now and have started the rudder pedals.


Thursday, November 3, 2011
Steps Drilled and Conical Bend
I've drilled the holes in the skin and interior ribs for both steps. Wasn't near as hard as I was expecting. I was able to use the drill press and fly cutter despite the large size of the skins. The steps are an option that just make it easier to get up onto the wing. The steps are the two dark bars pointing up in the picture below. They're pointing up since the fuselage is upside down for working on the bottom. I also did the conical bend on the skin behind the step. It starts with a tight bend at the step and opens to a gentle bend where it joins with the aft fuselage. That was a little more difficult. I did get a small crease right were the tight bend starts but I don't think it will be seen and it's only cosmetic.


Monday, October 31, 2011
Joined Center and Aft Fuselage
I've joined the center and aft fuselage. Looks a lot like a canoe now that it's upside down. I think that's what I'll tell people I'm building if they don't already know and drop by the garage to ask. It's getting quite long and I had to scoot the sawhorses back away from the garage door to get it to fit. The picture doesn't show it because the "blue" side skin is curved inward but the new "blue" skin is the same length as the silver side skin.
Everything went together easily after I got some help from good neighbor Tim flipping the center section. It's the structural heart of the aircraft and was too heavy to handle by myself. I'm still amazed at the accuracy of the kit and how well the pre-punched holes line up.

Everything went together easily after I got some help from good neighbor Tim flipping the center section. It's the structural heart of the aircraft and was too heavy to handle by myself. I'm still amazed at the accuracy of the kit and how well the pre-punched holes line up.

Wednesday, October 26, 2011
Finishing Center Fuselage
I'm almost finished with this phase of the center fuselage. There's obviously more work to be done but the instructions have you finishing the shell of the center fuselage and joining it to the aft fuselage. With the center floor skins temporarily fastened, the structure is very rigid. Hopefully, I'll be building and installing the seats and control stick and other important items like that at some point in the future.


Tuesday, October 18, 2011
RV Airshow
Not build related but I just had to post this beautiful picture of RVs. They're are several groups that perform at airshows. This is two flights of four caught passing relatively close during their maneuvering. I'm sure the focal length of the camera makes it look closer than it really is.


Sunday, October 16, 2011
Finishing Riveting the Center Fuselage Bottom Skin
I've just about finished riveting the bottom skin of the center fuselage. Paula was nice enough to buck some rivets as the ones in the middle were hard to reach. The skin is so big that my c-frame riveter couldn't reach about 26 or so center holes and I had to use my pop rivet dimpler. Just a little more work and they look fine but I thought it would reach every hole in every skin. Guess not. Here are few hints for the seatbelt attach brackets. Trim them like shown in the plans because they will interfere with the ribs and cause a bad fit. Also, don't final torque (and put torque seal like I did) until after riveting the bottom skin. The bolts interfere with riveting and they have to be removed.


Tuesday, October 4, 2011
Installing Crotch Strap
Paula asked what I was taking a picture of this morning. I told her I was doing an Anthony Weiner and taking a picture of my crotch strap and posting it online. She quickly said, "that didn't work out too well for him". She's funny!
I decided to install the crotch strap hardware while the floor was apart before riveting and was surprised that the holes had already been cut. The crotch strap is an option that makes the harness into a more secure 5-point so it's nice of Van's to send modified parts based on the options you order.

I decided to install the crotch strap hardware while the floor was apart before riveting and was surprised that the holes had already been cut. The crotch strap is an option that makes the harness into a more secure 5-point so it's nice of Van's to send modified parts based on the options you order.

Monday, October 3, 2011
Finished Match Drilling Center Fuselage
I've finished match drilling all the center fuselage. Now it's time to prep the parts for riveting. In the picture below, you can see the spacers I used to get the proper distance on the main spar bulkhead where the wings fit. They're blocks of oak with paper shims. Plans call for 1.438" and I'm showing 1.439" on the micrometer (thanks Steve and Peggy). I tightened the nut that goes through the oak block and bulkhead parts just a smidgen (official aviation term) to close the gap by one thousandths of an inch. Van's does such a good job on the matched hole manufacturing that the holes in the skin and bulkhead flange aligned perfectly when the spacing was correct. I just had to run a drill through the holes to bring them up to the right size.


Wednesday, September 28, 2011
Match Drilled Bottom of Center Fuselage
I finished match drilling the bottom of the center fuselage. I was able to flip it upside down onto my EAA standard workbench. It fit perfectly. The more I know about building, the less inclined I am to "reinvent the wheel". Two feet by five feet is the standard EAA 1000 workbench. Several times I've had the workbench be the exact size I've needed and I don't think it's a coincidence. My recommendation to builders just getting started is to do what 10's of thousands before you have done unless there's overwhelming evidence to change. They usually did it for a reason. I'm trying to keep as much of the experimental out of experimental aviation as I can.


Sunday, September 25, 2011
Working on Center Fuselage
Ready to match drill the center fusleage. Getting to be a rather large structure now. I may have to build another sawhorse to be able to flip the section to work on the bottom. Either that or lie on my back with the work above me.


The center fuselage is where the seats, control sticks and baggage compartment are and where the wings will attach to the side.

Monday, September 12, 2011
Finished Aft Lower Fuselage
I've finished the aft lower fuselage. I'm happy with the quality of the work. I was kind of playing to see if I could make show quality rivets. The key is definitely getting a good dimple. I had a few that were under dimpled and you can see a slight pucker around them.

Now it's on to the center fuselage section with the seats ribs. Lots of different tasks.

Tuesday, September 6, 2011
Redneck Ice Chest Air Conditioning
Here's the rough prototype of the Redneck air conditioning Austin and I made. We only spent about $60 because we already had the cooler and bilge pump. If you're starting from scratch, expect to spend about $100. Sporty's Pilot Shop sells fancy but functionally the same units starting around $500 and up! My daughter is using it now in her car as her a/c is kaput. It's meant to go in a small airplane. It is possible to install an automotive freon type system in a small airplane but they start at about $5000 for a portable system and go way up if it's permanently installed. You can buy a lot of ice or freeze a bunch of gallon milk jugs of water for that money.
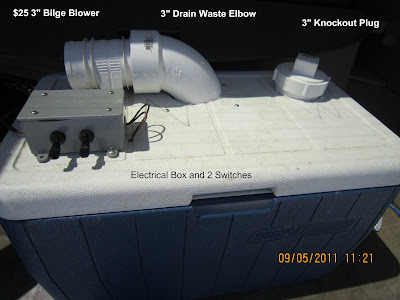
We looked at several different designs but chose this one for several reasons. With the blower on the outside, it creates suction that helps keep the ice chest cooler lid closed. Also, with the screw-in plugs, the ice will last a lot longer when you're not using it as you can seal the two big holes (vent and blower).
We also liked the design of blowing air over the chilled heater core instead of just blowing it over ice. That keeps the humidity lower as it's doing basically the same thing as a freon system.

The bilge pump and blower were both bought at Academy Sports and made by Attwood. Walmart probably has them, too. Get the smallest as they put out plenty of volume. The white 3" plastic pipes, clear tubing and electrical box were bought at McCoys but Lowes or Home Depot will have them, too. Get the size tubing that fits your heater core and bilge pump.

We got about 5' for the return line as it can be used for draining the water. We didn't need any extra electrical line as the pump and blower came with plenty. The two switches and a 12 volt "cigarette lighter plug" came from Radio Shack. The heater core is from an automotive parts store. I had to keep asking for the cheapest they had. It's hard to buy something from the chain stores without telling them what vehicle it's for. I think this is from an 80's Ford truck but didn't care as it was the right size and only $19.95.
We looked at several different designs but chose this one for several reasons. With the blower on the outside, it creates suction that helps keep the ice chest cooler lid closed. Also, with the screw-in plugs, the ice will last a lot longer when you're not using it as you can seal the two big holes (vent and blower).
We also liked the design of blowing air over the chilled heater core instead of just blowing it over ice. That keeps the humidity lower as it's doing basically the same thing as a freon system.
Hopefully, the pictures and video will answer most of the questions but here are some things that might not be clear. We didn't get a good picture of the plenum but all we did was take some scrap aluminium and mark a square the size of the heater core and added 1 1/2" to form a lip that we folded up and riveted to form an open top box. I used the skin from a rejected trim tab. Everyone that's building an RV knows what that is and probably has one. Some weather stripping would help seal it. The strap goes across the bottom to hold the heater core in. The plenum makes it cooler and more efficient by making all the air go past our heat exchanger (heater core) plus it makes room for the elbow of the blower to come down through the hole in the lid. It also eliminates a lot of sealing to the bottom of the lid that's required without it. We don't show it but another female clean out (or knockout) goes on the end of the blower so you can put a plug in it. Also, the wood block above the plenum shouldn't be there. That's to fill the hole in the bottom of the lid from one of our earlier attempts. On our next one, the plenum will screw right to the bottom of the lid.

The bilge pump and blower were both bought at Academy Sports and made by Attwood. Walmart probably has them, too. Get the smallest as they put out plenty of volume. The white 3" plastic pipes, clear tubing and electrical box were bought at McCoys but Lowes or Home Depot will have them, too. Get the size tubing that fits your heater core and bilge pump.
We haven't finished all the sealing and such as this was just a prototype. It cools unexpectedly well and you can hear how well it seals in the video when the vent plug is removed.
Finishing Aft Fuselage
Almost finished riveting the lower section of the aft fuselage. The upper skins get put on later. I was trying to show the quality of the rivets in this picture. After about 10,000 rivets, I think I'm starting to get the hang of it.


Wednesday, August 31, 2011
Ready to Rivet Aft Fuselage
I've finished all the match drilling, deburring, dimpling and priming and have assembled the aft fuselage for riveting. I'll put the upper skins on to ensure it's straight but shouldn't be long before I'm finished and on to the the center fuselage. I had to look ahead to see how the empennage attaches in a few places to understand how things go together but other than that, it wasn't too difficult.


Sunday, August 28, 2011
Took Paula Flying
Took Paula flying today. That's definitely a look of shear joy on her face! Actually, she was being silly and took several photos and seemed to enjoy the flight.


Here's a good one of Canyon High School. The original is large and high resolution so you can zoom in quite a bit. I sent a copy to one of the teachers that I know and hopefully she has some good use for it. Maybe my picture will become as widespread as Paula's cougar picture that she had made when she was the basketball mom. It's everywhere now including the football scoreboard and websites and t-shirts.

Monday, August 15, 2011
Ready to Match Drill Aft Fuselage
I'm ready to match drill the aft fuselage. Lots of little tips to make thing better. Below is one on bulkhead F-712 where a tab needs to be trimmed to prevent overlap with the bottom F-779 skin.


This is a wedge spacer I made to smooth the transition between the overlap of the two aft bottom skins where the stringers attach. It tapers from .040 to .016 and matches the width of the stringer on its rivet face and will transition over 3 rivet holes. Without, it would leave an ugly wrinkle on the outer side skin near the rudder cables exit.

Here, I've put the two upper aft fuselage skins on to make sure the lower aft fuselage is straight with absolutely no twist before drilling. It will be safe in the garage tonight as it looks like a porcupine with all the clecos.

I much preferred fitting the two aft bulkheads to the side skins prior to fitting the bottom skin. They took quite a bit of flange bending to get them to match the taper of the skin.

I also had to hand bend the bottom skin to add more curve. Mainly on the most aft bend and mostly on the left side. After about an hour of tweaking flanges of the two aft bulkheads and bending the bottom skin and repeating, I got the bottom skin to easily slide up into position. This picture shows the perfect alignment of the tie down guide hole in skin through the tie down bracket.

Thursday, August 11, 2011
Putting Skins on Aft Fuselage
I finished the longerons last night and started putting skins on the bulkheads. Paula was happy to get the bulkheads (aka "nesting dolls") out of the living room. Van was right - it really is fun to start putting big pieces together. It's surprising how rigid things get when you put on the skins. That's semi-monocoque aircraft construction where the skins carry part of the load. If you follow the link in the previous sentence, scroll up one paragraph as there is a picture of an RV-7 with the caption "The Van's Aircraft RV-7 fuselage is slender for high speed flight". I like speed!


Wednesday, August 10, 2011
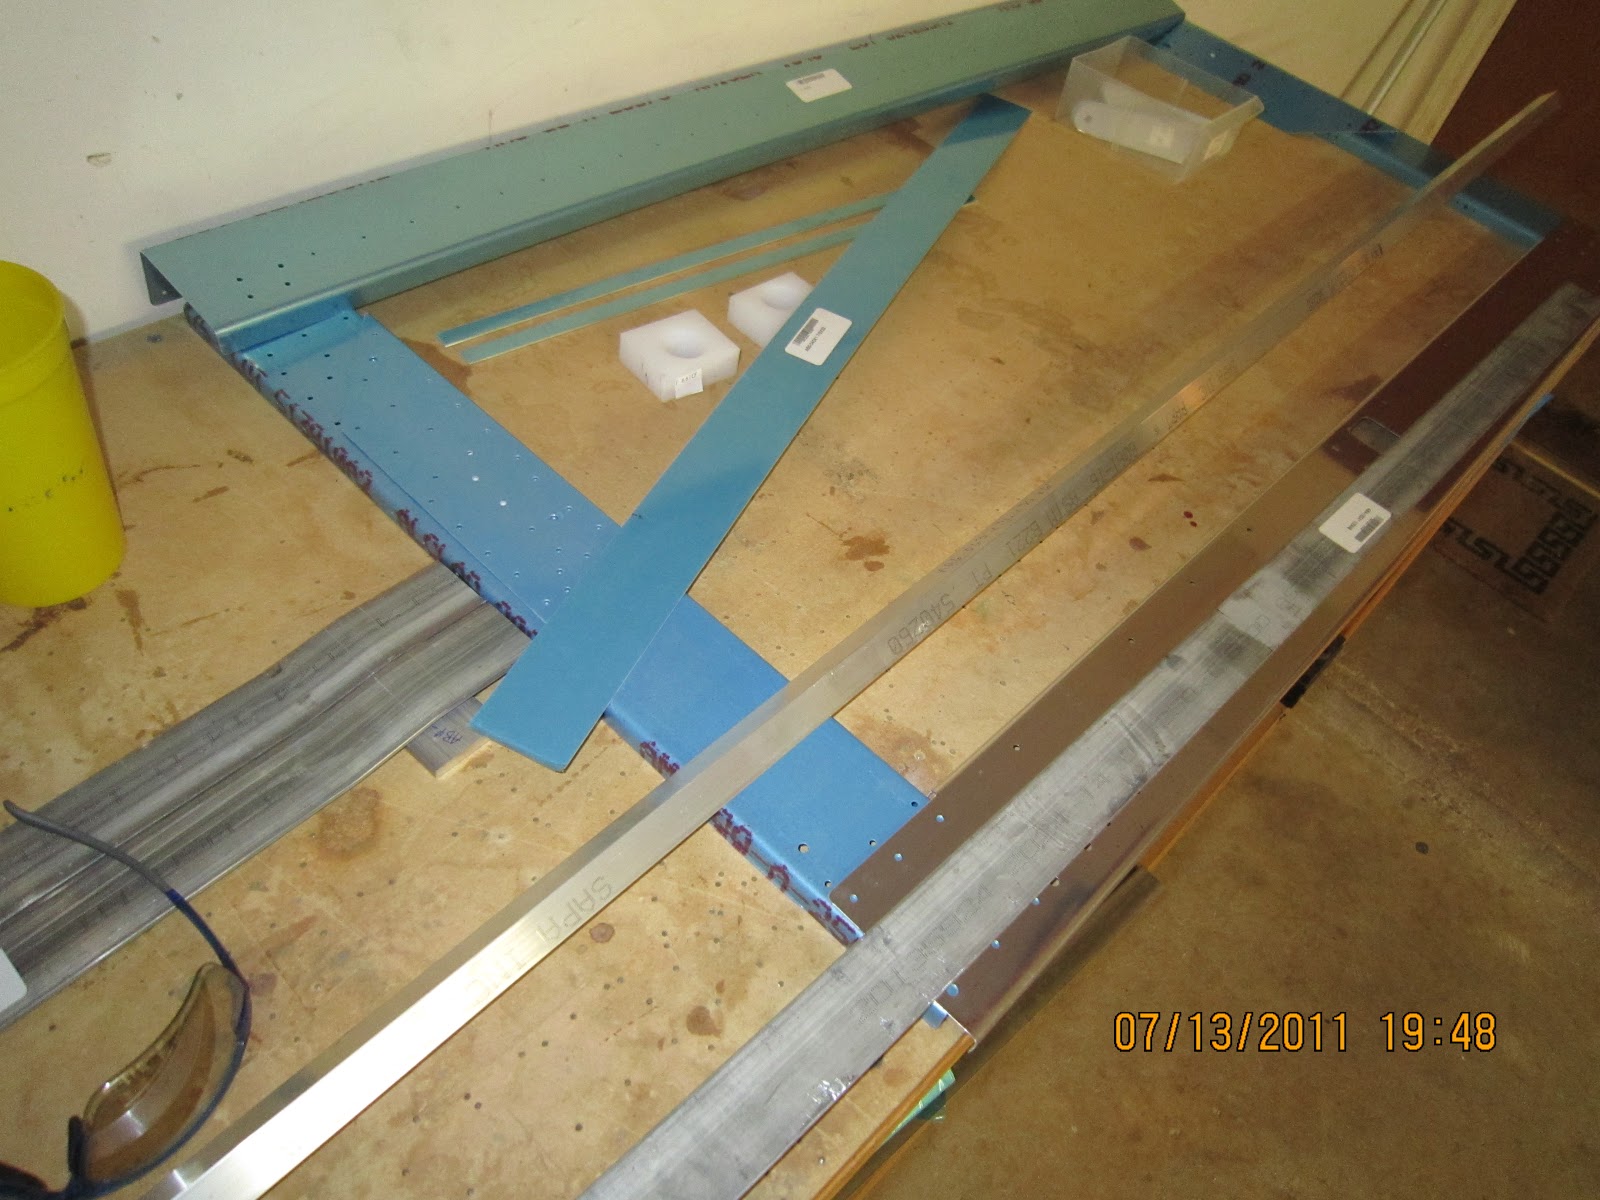
Bent the Longerons
I finally got the longerons bent. Van's instructions mention that bending aluminum angle can be "maddening". Now I know why. You bend it in one direction and it moves in another seemingly random axis. Oh well, it's done and eventually came our really good. I match drilled the "elbow rest" pieces and they match the curve perfectly. I also checked the downward bends against the side skins and they look good.

Here's the length of the longerons. It's going to be a tight fit in the garage.


Here's the length of the longerons. It's going to be a tight fit in the garage.

Saturday, August 6, 2011
Finished Fuselage Bulkheads
I've finished all the fuselage bulkheads (or nesting dolls as Paula calls them). Next comes the longeron bending and then on to some skins!
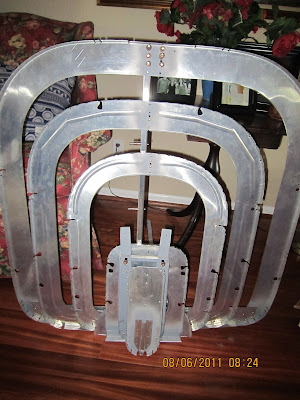
Shelby's cat Hadley takes a look at the last bulkhead, F-712. It's the tail of the plane where the vertical stabilizer attaches and where the tail tie-down is.


Shelby's cat Hadley takes a look at the last bulkhead, F-712. It's the tail of the plane where the vertical stabilizer attaches and where the tail tie-down is.

Tuesday, August 2, 2011
Working on Aft Fuselage Bulkheads
I've finished 5 of the 7 aft fuselage bulkheads. Paula said they looked like nested dolls stacked like this.


Here's the 6th bulkhead F-711 that I'm working on. The bars that stick up will be where the tail attaches.

Friday, July 29, 2011
Elevator Bellcrank Ribs
I'm working on the forward most bulkhead in the aft fuselage that supports the elevator bellcrank ribs. It's going well but I had to ask Paula, "why is it that the parts that won't be seen, like the elevator bellcrank ribs that I'm working on, come out perfect and the ones that are exposed are perfectly fine structurally but get the small blemishes?" These ribs will be behind the cargo compartment wall and will only be seen during building and the one a year maintenance checks.


Monday, July 25, 2011
Finished the F-705 Bulkhead
Here, I've finished the big 705 bulkhead. It's the one with the lower seatbelt attachments and the upper seatback rest. It's also where the rear spar of the wing will attach.

Coming up next are the smaller bulkheads that support the aft fuselage. They're progressively smaller hoops that define the shape of the aft fuselage toward the tail.

Here's a handy little tip. When squeezing rivets on a flange, use a backing plate to avoid gouges. The picture below is the scrap sacrificial plate that I used on the 705 bulkhead. Thickness of .032 works about right - not so thick that the squeezer doesn't cover the rivet tail but thick enough to keep it from gouging the web.

Thursday, July 14, 2011
Started on Bulkhead F-705
Here's the big bulkhead that goes behind the seats and has the anchors for the seatbelts. It's also where the rear spar of the wing will attach.
![]()

Subscribe to:
Posts (Atom)

