

Tuesday, December 25, 2012
Christmas Gifts
Here are a few of my airplane Christmas gifts. Space shuttle repro switch guard in aluminum. The original in titanium costs $800. Also, an Adel nibbler for cutting inside holes in aluminum. Sweet!
Monday, December 24, 2012
Firewall Forward Progress
Austin is home for Christmas and we worked all day on the firewall forward and got tons done! Here's the battery installed with the battery maintainer pigtails installed.


Here's the heat muff with the orange scat tube going to the heater.
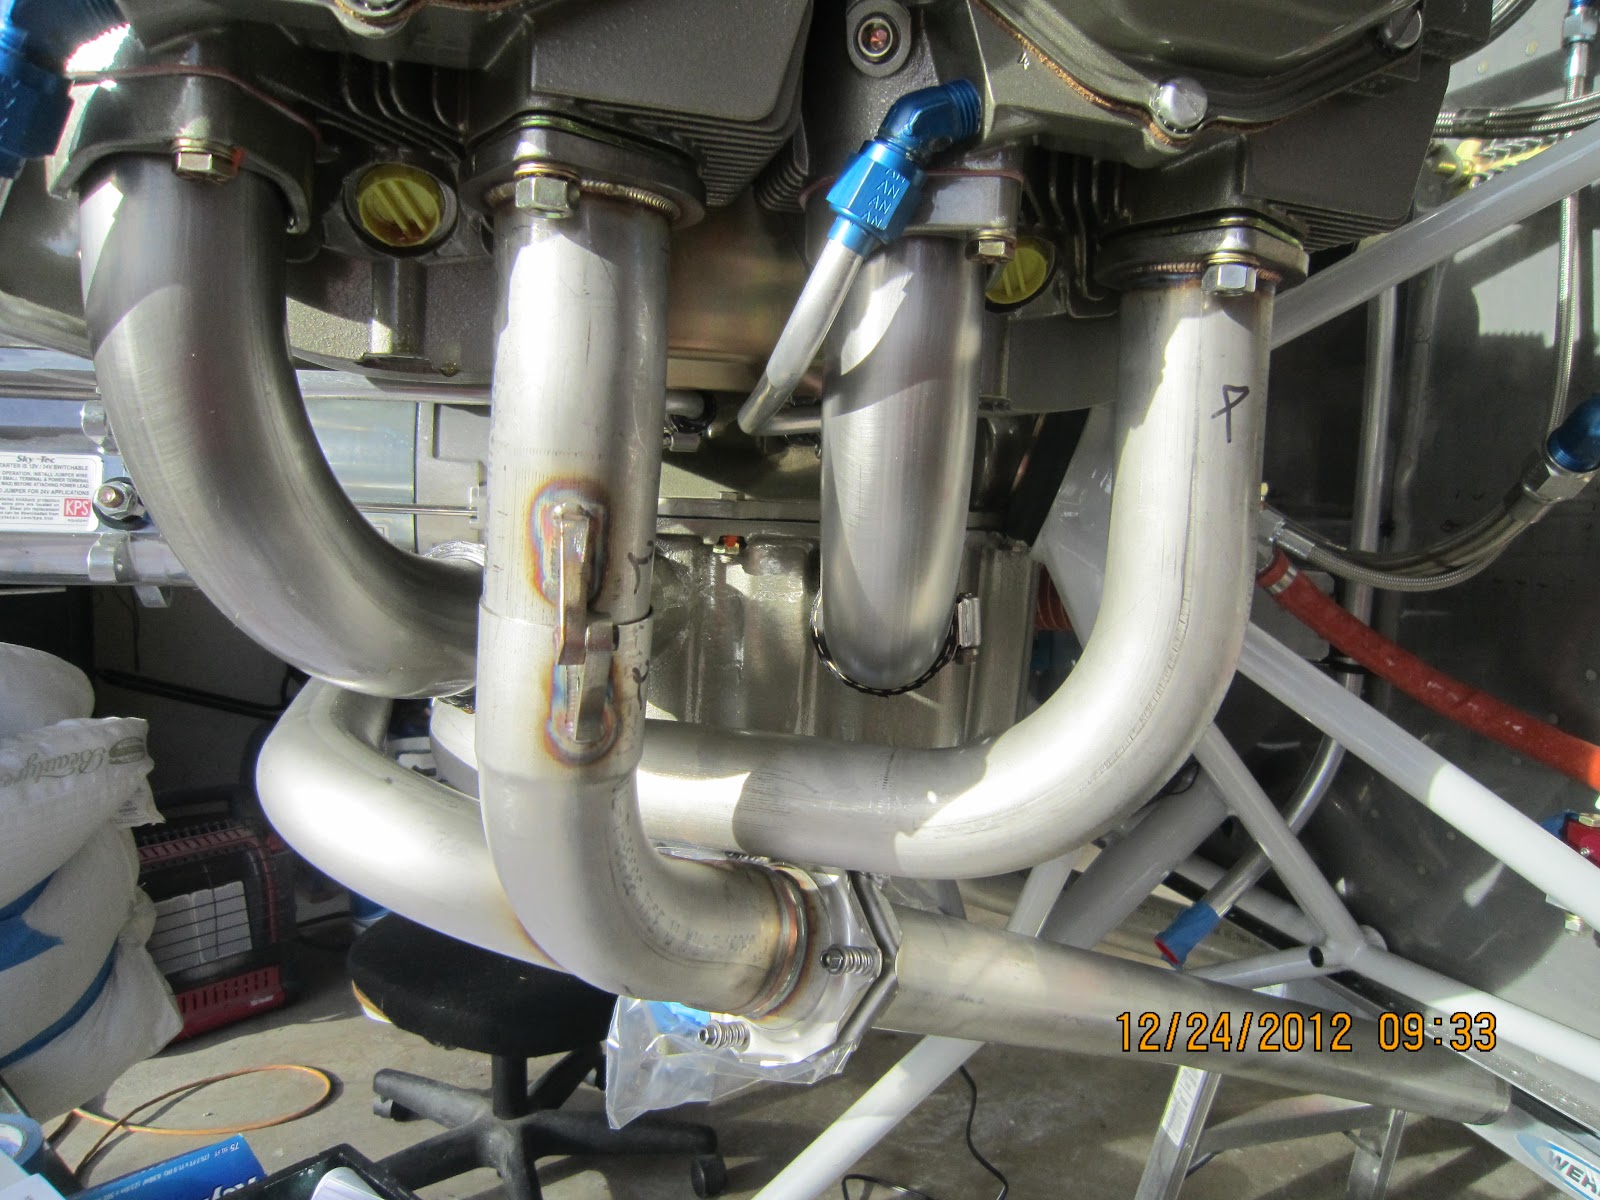
And the exhaust system. We're not planning on mufflers so we'll be nice and loud!
Here's the "forest of tabs" grounding system. The firewall has 1/4 inch faston tabs for any grounding needs plus a brass bolt that is connected to both the negative terminal of the battery and the engine block.
The inside has 48 tabs for all the grounding I'll need.
Monday, December 17, 2012
Starting On Avionics
I've been without a camera as Austin took it after his graduation for some night photos with Kim while the tower was burnt orange. I took these with an iPad. I installed the VP-X Pro and put it in a large ziplock to keep any aluminum shavings or dust out.


Here's the engine monitor mounted temporarily. I added some angle to the left rib to match the center rib. The center rib has extra angle because it will attach to the canopy roll bar. I can now use it to mount a couple of devices that are easily accessible from below after the top skin is riveted.

The radio stack is very solid after I used some angle to attach it to the subpanel.
Here's the engine monitor mounted temporarily. I added some angle to the left rib to match the center rib. The center rib has extra angle because it will attach to the canopy roll bar. I can now use it to mount a couple of devices that are easily accessible from below after the top skin is riveted.
Saturday, December 8, 2012
Radio Stack Mounted
The radio stack was easier than I thought. I set the face of the audio panel and GPS back 1/4 inch to make it a little more flush like the Skyviews. I had to cut the subpanel but I had planned on that and measured twice before I cut. I still need to clean up the edges and make a bracket on the subpanel to anchor everything but I really like how it looks. The tops line up exactly and there's space below the Garmin for a yet-to-be-released Dynon autopilot control head.


Here are the rough cuts in the subpanel.
Wednesday, December 5, 2012
Started Radio Stack
I finished cutting the opening for the radio stack and you can see the racks being test fit. Next, I'll add the angle and supports. I'll have to cut into the subpanel because of the 430W length but that was the plan. I want to make the panel relatively easy to remove so the subpanel bracket supports will take some planning. This is when I wish I had a small bending brake.

Monday, December 3, 2012
Skyviews Installed
I cut the panel for both Skyview displays. Six screws on the perimeter with platenuts behind the panel plus the shallow depth make for an easy install. If I need to service something behind the panel, it will be easy to remove the displays and reach through the big hole. Better than lying on my back on the floor. Next, I'll work on the smaller hole between the displays which will hold the radio stack with the PAR100EX audio panel and the Garmin 430W Nav/Com/GPS.


Wednesday, November 28, 2012
Snap-on Torque Wrench
Here's my new-to-me torque wrench. It was an ebay bargain. Snap-on model QD2R100 sells for $282 new was $100.99. Looks almost brand new and has a recent certification report.


I checked it with my digital fish scale which is very accurate. I use the fish scale for mailing packages and the Post Office says everything I ship is accurate to the ounce. I measured 12 inches from the center of the drive lug and pulled. The torque wrench was spot on with the scale.
Monday, November 26, 2012
Working on Panel Layout
Here's the beginning of my panel planning. Everyone seems to do it differently so it makes it more difficult to start with a blank slate. The white rectangles of paper are where the EFISs go. The radio stack in the middle will take a lot of care as the depth will impact sub panels and other structure. It might not look like it but I've put in several hours of work measuring and test fitting and double checking sizes of holes to cut and bezel overlaps and ergonomics of switchology.

Tuesday, November 20, 2012
Alternator
I've temporarily attached the Plane Power alternator to the engine. I had to remove the prop to get the belt over the flywheel but that only took 5 minutes or so as I don't have the prop bolts safety wired yet. I'm waiting on the bigger torque wrench I bought so I can tighten the bracket bolts. I only have in/lb torque wrenches and need ft/lb for the bigger bolts.


Received the torque wrench so I've started attaching the brackets and safety wiring them. I drilled tiny holes in the brackets to attach the safety wire.
Here's the method for safety wiring two bolts.
Wednesday, November 14, 2012
Mounted Red Cube
I mounted the Red Cube fuel flow transducer. It optically measures the actual fuel flow to the engine, making it easier to determine the fuel quantity. I decided to mount it to the back of the brake bracket and it seems to be a good spot. Now, I have to get the fittings and measure for new fuel hoses.


Inside view of the brake bracket with the two AN3 bolts replacing the middle rivets.
Friday, November 9, 2012
Drilled Brake Master Cylinders
Before drilling the brake master cylinders that are on each brake pedal, I had to align the bottom of each rudder pedal. I used some scrap metal channel that's used for shelving. Worked as if it was made for the job. It fit the bottom tube of the rudder pedals perfectly. Others suggested using aluminum angle but I didn't have any small enough. After I clamped them, I clamped a straight piece of wood trim to the top of the rudder pedals to align them and tilted them forward slightly before drilling.

Thursday, November 8, 2012
VP-X Pro Unboxing
I received the Vertical Power VP-X Pro electronic circuit breaker system.


Here's what comes in the box. I also ordered the Pro wiring kit.
Some of the bags.
And some of the wire.
Tuesday, October 30, 2012
Brakes, Rudder Stop and Rudder Cable Fairing
I got several small tasks done recently. Here's the disc brakes installed with one of the fairing attachments just resting in place.


Here's the rudder fairing complete except for the platenuts.
And, the rudder stops. I made them 1/4 longer and will trim to fit when I put the rudder back on. The first set I made were exactly to plans which made them about 1/8 too short to stop the rudder from contacting the elevator.
Thursday, October 25, 2012
Removable Floor Pans & Electrical
I haven't posted in a while but I have been busy. I finished making the floor pans removable. That was quite a job and if you're building and reading this, do it before you finish the fuselage. It's not hard drilling out the pop rivets but there are a lot of nutplates that go through the floor pans and they are a chore to remove.
I've also been working and studying the avionics and electrical systems. I ordered the electrical diagrams from Vans and have been by to visit with a local avionics tech that helps experimentals. He also check my GNS 430W and it works like a champ. That's comforting as I bought it used. It was from a reputable avionics shop that sent it with a 120 day warranty but it was still used.
Here's part of a page from the plans that helps with the electrical routing.
Monday, October 15, 2012
Making Floor Pans Removable
I spent the weekend removing the right side floor pans and installing nutplates so they are removable. It's a popular option and one I didn't make at the time because I didn't know I was going to install a bunch of electronics and antennas. Being removable will give me access to all the room I need for wires and such.


First Avionics Garmin GNS 430W
I received my first panel box last week. It's a used Garmin GNS 430W. My two friends that I trust most with airplane advice said if you're going IFR then go all the way and get an approach certified GPS. One big reason is that the VORs are being decommissioned and that I could use GPS to get into almost anywhere I want to go. This, coupled with my Skyview system, can legally and safely allow me to land when the clouds are as low as 200 feet. Not that I'd want to fly when the weather is that bad. I can see using the IFR part when the weather is just a little low but still not legal for VFR flight. That way, we can file IFR and leave going to a destination that has good weather. Otherwise, we're stuck on the ground until the weather clears.


Saturday, October 6, 2012
Engine and Prop Mounted
I got up early and hung the engine and prop. Engine only took me about 2 1/2 hours but 45 minutes of that was grinding tools to get them to fit in tight spaces. This is the same spot where Austin and I installed the motor on the Dart.


The prop looks big in the picture. Sure hope I can fit the plane in the garage.

It fits! I had to move things around and put it at an angle, but there's now room to put the tail on too.

Wednesday, October 3, 2012
Nose Gear Installed
I finished the nose landing gear and wheel last night. Still looking at getting the engine hung in a few days.


Tuesday, October 2, 2012
Motor Mount & Firewall Forward
Here's the motor mount attached to the firewall. I also finished most of the attachments and prep to the firewall that need to be completed before mounting the motor. I'm planning on mounting the motor this weekend.
This is a dynafocal type 1 engine mount. See how the four rings are pointed inward? They're pointed to the center of gravity of the engine. This helps reduce engine vibration and movement. They're considered the best type of mount but the drawback is they're more difficult to make which makes them more expensive and they're harder to install.
The tube at the bottom of the picture is where the nose landing gear attaches.

Saturday, September 22, 2012
Finished Painting Cockpit
I got up early this morning and painted the cockpit and all the panels and seats and such. Quite a job and I'm glad it's done. I don't think this picture shows the color well but it's a nice satin blue grey. The paint is Sherwin Williams JetFlex aircraft interior that Boeing uses in its airliners so it should be durable. The part number is L09026, Robin Blue, BAC 510. You can see the three oval samples Paula is planning for the seats and carpet.


Here's the job in progress.

And all the panels in the garage and the seats hanging from the garage door.

Tuesday, September 18, 2012
Painting the Inside
I'm prepping the cockpit and baggage compartment for paint. It's taken much longer than I was expecting as I've removed everything removable and have almost finished masking. I had planned on painting it a light industrial grey but changed to JetFlex Robin Blue (looks like medium grey/blue to me) at the advice of my stylist.


This time I've covered all the exposed parts and won't have to spend two hours with lacquer thinner cleaning overspray!

Wednesday, September 12, 2012
Attached NACA Air Ducts
Attached the NACA Air Ducts last night. Used proseal to attach. Held them in place by temporarily attaching a piece of angle to the longeron and using a stick and clamp with a folded pad for a spacer. Looked good this morning. If the info in the link above didn't satisfy the nerd in you, here's a 12mb "Confidential" report from 1945 on the subject that might.


Thursday, September 6, 2012
Documents

Lycoming Operator's Manual
Revision Number - 60297-30
Publication - O-320 Series
Publication Number - 60297-30
Publication Date - October 2006
Current Revision - September 2006 Revision "M"
Lycoming Operator's Manual
Revision Number - 60297-31
Publication - IO-320 Series
Publication Number - 60297-31
Publication Date - January 2007
Current Revision - September 2006 Revision "M"
Lycoming Operator's Manual
Revision Number - 60297-12-5
Publication - O-360, HO-360, IO-360, AIO-360, HIO-360 & TIO-360 Series
Publication Number - 60297-12
Publication Date - October 2005
Current Revision - December 2009
Lycoming Direct Drive Overhaul Manual
Revision Number - 60294-7-13
Publication - Direct Drive Overhaul Manual
Publication Number - 60297-7
Publication Date - December 1974
Current Revision - October 2010
Lycoming SSP-1776-B
Service Table of Limits and Torque Value Recommendations
January 2011
Tuesday, September 4, 2012
Painted The Bottom
Austin came down this weekend and we got a lot of work done. Shelby was home too and pitched in as we finished the upper aft skins. After the skins were done, Austin and I set to painting the bottom of the fuselage. I'd heard the advice that it's easier to paint the bottom before it's complete. We just rolled it out into the driveway and tipped it on its side and went to painting. Turned out really well. Just a few runs that I'll fix.

You can see the reflection in the paint although I think I'll try some buffing and polishing just for the fun of it. It's Kirker Ultra-Glo Single Stage Urethane in GM white with their Perfect Prime 2K Urethane Primer over Sherwin Williams P60G2 wash primer.


You can see the reflection in the paint although I think I'll try some buffing and polishing just for the fun of it. It's Kirker Ultra-Glo Single Stage Urethane in GM white with their Perfect Prime 2K Urethane Primer over Sherwin Williams P60G2 wash primer.

Tuesday, August 28, 2012
DMC AFM8
Here's my new d-sub crimper - a DMC AFM8. It crimps the tiny pins that go in common electrical connectors that are used in light aircraft. I'm getting ready to order avionics so I'll need a new set of tools and skills. This was another e-bay bargain.


Monday, August 27, 2012
Last Of The Fuselage Skins
Here's the last of the fuselage skins. It's the top skin just aft of the baggage compartment. There will be other small tasks to complete, but other than the canopy, this will mostly finish the fuselage. Next, on to the firewall forward.


Ready to rivet.

Finishing Forward Top Skin
I've completed all the preparations for finishing the forward top skin except for riveting it on permanently. I'll wait until I've painted the cockpit and added a few firewall forward items as access will be easier with the skin off. The time to finish things has been a lot like painting. If you've done much painting, you know that most of the work is in the preparation. A lot of work has gone into getting this section ready for final assembly, probably 80% of the total.


Subscribe to:
Posts (Atom)

