

Showing posts with label 06-Fuselage. Show all posts
Showing posts with label 06-Fuselage. Show all posts
Monday, May 4, 2015
After The Inspection
Austin came down Sunday and spent the day helping me put the airplane back together after the inspection. There are a whole bunch of panels on every airplane that get removed for regular inspections. We almost finished but got tired about 5:30 and went to have dip cones. I'll finish up early this week and hopefully have the first flight very soon. Maybe Thursday, Shelby :).


Saturday, May 2, 2015
It's An Airplane!
It's officially an airplane! I got my airworthiness inspection done on Saturday morning. The inspector was DAR Tim Martinez of San Antonio. There were no problems and he said it was the best homebuild he had inspected and that the quality of riveting was better than the factory airplanes he had inspected. I showed Paula the pink slip (airworthiness inspection) and she said it's peach, not pink.


Thursday, January 29, 2015
Empennage Fairing
I'm working on the empennage fairing. Next time, I won't go to the trouble of making a one piece fairing. Too much work for not much in return. It fits well so I just need to prime and sand before painting.

Tuesday, January 27, 2015
Brakes And Brake Lines
Austin was home for my birthday party and helped me repack the main wheel bearings and drill the axle shaft holes for the big cotter keys. I also fabricated and installed the brake lines between the fuselage and calipers. The green cushion (made from a pool noodle) is to keep me from bending the wheel pant bracket by catching my foot on it.

Friday, January 23, 2015
Fifth Point Harness Installed
I installed the fifth point harness (also known as the crotch strap) last night. The hard part was taking out the trim and floorboards.

Here's the anchor connection. The Crow tab or tang is too long so you drill a hole above the existing one and everything fits fine.

Here's the anchor connection. The Crow tab or tang is too long so you drill a hole above the existing one and everything fits fine.
Thursday, January 22, 2015
Seat Belts and Interior Trim
I'm getting the interior fit and finished. Here are the Crow seat belts installed on the passenger side. I still need to fit the 5th point belt (crotch strap) but I tried them out last night while I was updating software and they're very comfortable.

Here are some of the baggage compartment panels and you can see where the shoulder harness anchors come through.

Here you can see the front cockpit and some of the side panels and carpet. Very comfy.

Here are some of the baggage compartment panels and you can see where the shoulder harness anchors come through.
Here you can see the front cockpit and some of the side panels and carpet. Very comfy.
Monday, August 4, 2014
Spinner
I got the spinner cut, aligned and drilled and started on the two filler pieces behind the prop. The Sensenich template I found on-line wasn't close so I used some card stock and started trimming until it fit. To get the gap consistent, I taped some slick UHMW sheet to the back of sandpaper and slid it up and down around the prop.

I still need to find a way to rotate the spinner while I'm painting it.


I still need to find a way to rotate the spinner while I'm painting it.
Almost finished with one of the filler pieces. I'll work on the gap and then duplicate it for the other side before dis-assembly and painting.
Thursday, July 31, 2014
Cowl Hinge Pin
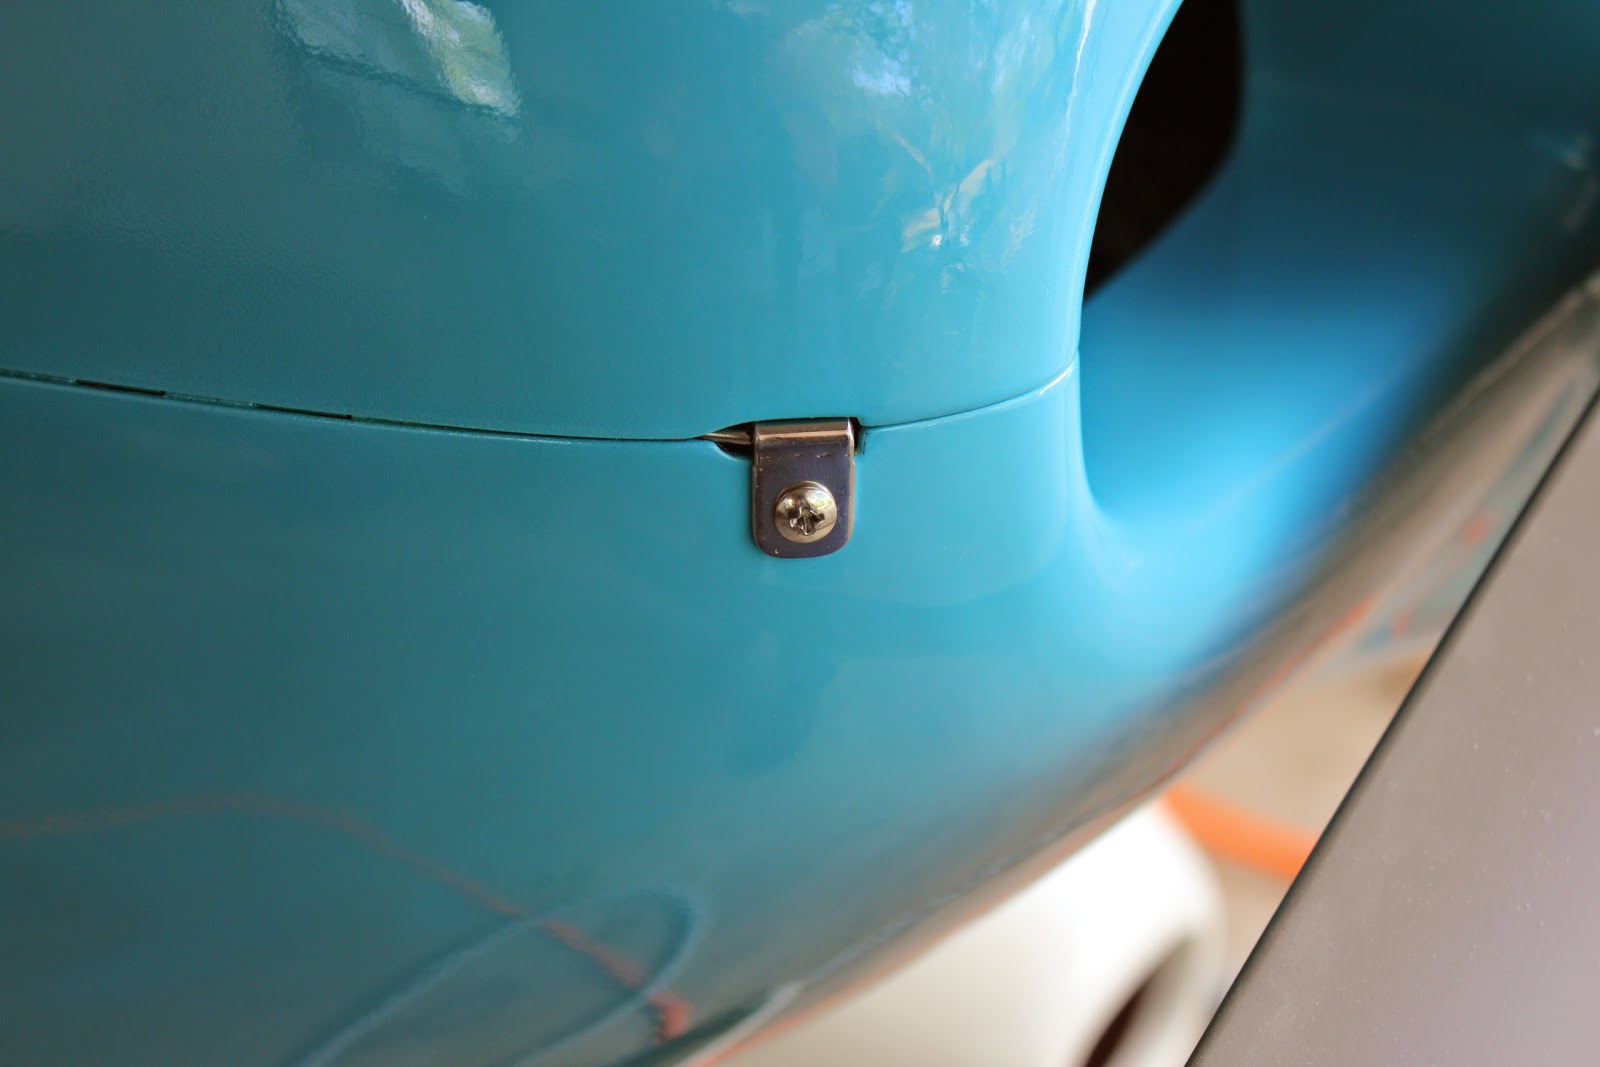
Here's the hinge pin that joins the upper and lower cowl. Not perfect but...
Hopefully better than this sad looking RV.

Hopefully better than this sad looking RV.
Friday, July 25, 2014
Sealing The Cowl
I'm sealing the cowl with West System epoxy resin that's thinned with Acetone. The fiberglass and especially the honeycomb parts are pocked with pinholes which will make the paint look terrible if left unfilled. I paint the resin on with a disposable paint brush and then squeegee it into the holes with a plastic spreader. After it dries I sand, vacuum, and repeat until the holes are filled. Oh, the price of beauty.

Monday, July 21, 2014
Cowl Work
There are a bunch of tasks to complete before the cowl can be painted. Here are two I worked on this weekend. I did quite a bit more on the cowl and I'm close to painting it but these are the only ones I photographed. The first is the hinge pin that holds the top and bottom of the cowl together. There's one on each side. There are many ways to secure the pin and the way I did it is an option that Van's sells with the pin welded to a stainless tab. I think it looks much better and is more secure than the default method of a bent wire held with a hinge eyelet. I polished it on my rouge wheel to make it pretty.

This is the oil access door. A little more sanding and I'll be done. Tonight I'll make a sandwich of fine sandpaper and a thin piece of UHMW sheet. I'll close the door on it and slide it around the perimeter to get a uniform gap.

This is the oil access door. A little more sanding and I'll be done. Tonight I'll make a sandwich of fine sandpaper and a thin piece of UHMW sheet. I'll close the door on it and slide it around the perimeter to get a uniform gap.
Sunday, June 8, 2014
Fuselage Prep With Austin
Austin was home a week early for Father's Day as he will be gone next week. He's helping scuff the fuselage prior to paint.

Thursday, May 15, 2014
Cowl Almost Finished
I'm almost finished with the cowl. At least the structural parts. I put everything together last night and it looks like all that's left is prettying up stuff. I've ordered new hinge pins with the welded stainless tabs instead of the ugly bent wires I've got now. I'm also getting the insulating blanket material to put on the inside hot spots near the exhaust. I'm still looking for a good spring for the oil door as the ones I ordered from McMaster Carr were much too small. I've heard that a mousetrap spring works well.
There are a bunch of details left to finish the airplane but the only plans pages I've not used are for the spinner and the wheel and landing gear fairings so I'm getting close to finishing. I also have to do the baffles but the new ones with the revised directions from Vans are supposed to be relatively easy. I told Paula that if I could get Norm, Phil, Ted and Ron to help and I didn't have to do any paperwork or make it pretty or wait for any parts or hardware, I could safely fly it in a week.

There are a bunch of details left to finish the airplane but the only plans pages I've not used are for the spinner and the wheel and landing gear fairings so I'm getting close to finishing. I also have to do the baffles but the new ones with the revised directions from Vans are supposed to be relatively easy. I told Paula that if I could get Norm, Phil, Ted and Ron to help and I didn't have to do any paperwork or make it pretty or wait for any parts or hardware, I could safely fly it in a week.
Thursday, May 1, 2014
Oil Door Latch
I've got the push-button latch temporally fitted. The strip of metal with the duct tape will be the inside striker plate for the latch so it doesn't wear the fiberglass. It's part of a stainless steel clip that was on an old garage door opener. I keep a junk bucket for bits and pieces I think will be useful someday. I told Paula about using a part from the junk bucket and she correctly identified it as being from a garage door opener and wanted to know what she won for guessing correctly!


Here's the underside with the stainless steel striker plate attached. That should be plenty durable.
Here's a better picture of the push button.
Monday, April 28, 2014
Oil Access Door
I made good progress on the oil access door on the cowl. It was a busy weekend with not much time to build so this was done Sunday afternoon. Most of the day Saturday was spent at the AOPA San Marcos Fly-In. It was a great success but they had me at "Free BBQ" for lunch from Hays County BBQ. Friends also came to visit with the boys meeting me at the Fly-In and the girls going shopping in Gruene. Dan and Beth brought Franklin's BBQ for dinner and Paula baked an apple pie. Mark and Wendy from Pennsylvania were visiting Dan and Beth and also came. They have a booth at Airventure Oshkosh and let Dan and me have entrance wristbands and rest in the shade during our week in Oshkosh. We also had a visit from a VAF friend, Dan, and family to look at the interior seats and trim as they are considering the same for their RV-9A. What a great day! Friends, airplanes and BBQ from two of the top joints in Texas.

Monday, April 21, 2014
Finishing Lower Cowl
I'm almost finished with the lower cowl. I've attached the hinges and put two coats of thinned epoxy on the inside. The epoxy helps keep it clean by sealing the surface so oil and stains don't soak in. I'll paint the inside with white paint soon.

I also finished the lower cowl support bracket. It was a fun challenge as the only instructions were the blueprints and there was a complicated order of fabrication to avoid violating edge distances for rivets and holes. It turned out well as five years of building experience must be good for something. The red wire is just there to temporarily hold the exhaust pipe out of the way. The two pins sticking out the bottom are how the hinge pins for the bottom cowl attachment are secured.

I also finished the lower cowl support bracket. It was a fun challenge as the only instructions were the blueprints and there was a complicated order of fabrication to avoid violating edge distances for rivets and holes. It turned out well as five years of building experience must be good for something. The red wire is just there to temporarily hold the exhaust pipe out of the way. The two pins sticking out the bottom are how the hinge pins for the bottom cowl attachment are secured.
Thursday, April 3, 2014
More Cowl Work
I'm making good progress and the end is in sight for the cowl. I think doing the hinges and pins is harder than camlocs but the look is a smooth cowl. All the hinges are sill clecoed as I've got to do some minor fiberglass work including sealing and painting the inside before I rivet them permanently.

Monday, March 3, 2014
Air Vents
I installed the air vents last night during the Academy Awards. It was too cold to open the garage door which I need to do to work on the cowl. So much for global warming. It was 26 degrees this morning and there's sleet and ice in the forecast for tonight and tomorrow morning IN MARCH IN TEXAS!

Saturday, March 1, 2014
Started On Bottom Cowling
Austin came home to visit and work on the airplane a little. Actually, he wanted to avoid having to shop at the outlet mall so he asked if I would come pick him up. The bottom cowl is large so having extra hands was a big help.

Here's the oil door latch I'm planning on using. They were used on Cessna oil doors and look nice on the RV installations I've seen. It's a Camloc KM610-64. The "-64" is the preferred size for the oil door and indicates the height of the raised center part of the button but they're getting hard to find. I got this from Univair Aircraft in Kansas and it was the lowest price I could find ($26 shipped). B&B Aircraft has the "-32" size for only $10 but they fit a thinner door. It's the same latch, just with a lower raised center.

Here's the oil door latch I'm planning on using. They were used on Cessna oil doors and look nice on the RV installations I've seen. It's a Camloc KM610-64. The "-64" is the preferred size for the oil door and indicates the height of the raised center part of the button but they're getting hard to find. I got this from Univair Aircraft in Kansas and it was the lowest price I could find ($26 shipped). B&B Aircraft has the "-32" size for only $10 but they fit a thinner door. It's the same latch, just with a lower raised center.
Sunday, February 23, 2014

Sunday, January 19, 2014
Heated Pitot Installed
I removed the stock pitot tube and installed my Dynon heated pitot and Angle of Attack (AOA) probe this weekend.

Here's the routing I used for the pitot and AOA tube routing around the aileron bellcrank.

Here's where I mounted the controller. I was able to get my pneumatic rivet squeezer up into the space and install nutplates. I cut some small UHMW blocks and used them as spacers between the controller and the rib. The spacers also helped by holding the screws in-place to make it easier to screw them into the nutplates.

Here's the routing I used for the pitot and AOA tube routing around the aileron bellcrank.
Here's where I mounted the controller. I was able to get my pneumatic rivet squeezer up into the space and install nutplates. I cut some small UHMW blocks and used them as spacers between the controller and the rib. The spacers also helped by holding the screws in-place to make it easier to screw them into the nutplates.
Subscribe to:
Posts (Atom)

 Posts
Posts

