
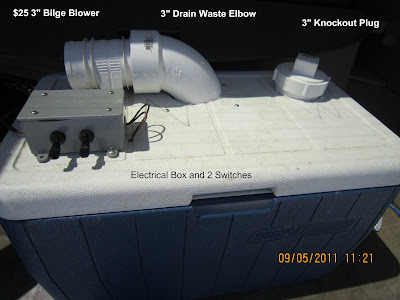
We looked at several different designs but chose this one for several reasons. With the blower on the outside, it creates suction that helps keep the ice chest cooler lid closed. Also, with the screw-in plugs, the ice will last a lot longer when you're not using it as you can seal the two big holes (vent and blower).
We also liked the design of blowing air over the chilled heater core instead of just blowing it over ice. That keeps the humidity lower as it's doing basically the same thing as a freon system.
Hopefully, the pictures and video will answer most of the questions but here are some things that might not be clear. We didn't get a good picture of the plenum but all we did was take some scrap aluminium and mark a square the size of the heater core and added 1 1/2" to form a lip that we folded up and riveted to form an open top box. I used the skin from a rejected trim tab. Everyone that's building an RV knows what that is and probably has one. Some weather stripping would help seal it. The strap goes across the bottom to hold the heater core in. The plenum makes it cooler and more efficient by making all the air go past our heat exchanger (heater core) plus it makes room for the elbow of the blower to come down through the hole in the lid. It also eliminates a lot of sealing to the bottom of the lid that's required without it. We don't show it but another female clean out (or knockout) goes on the end of the blower so you can put a plug in it. Also, the wood block above the plenum shouldn't be there. That's to fill the hole in the bottom of the lid from one of our earlier attempts. On our next one, the plenum will screw right to the bottom of the lid.

The bilge pump and blower were both bought at Academy Sports and made by Attwood. Walmart probably has them, too. Get the smallest as they put out plenty of volume. The white 3" plastic pipes, clear tubing and electrical box were bought at McCoys but Lowes or Home Depot will have them, too. Get the size tubing that fits your heater core and bilge pump.

We haven't finished all the sealing and such as this was just a prototype. It cools unexpectedly well and you can hear how well it seals in the video when the vent plug is removed.


No comments:
Post a Comment
Comments?