

Tuesday, August 11, 2009
Finished the Empennage
Well, I've finished the empennage, sort of. Just a few little details like trimming the counterweights to balance the elevators. I still have to do the fiberglass tips but most people wait to do all the fiberglass work together because of the mess. The wings are next and I've gotten the OK from my Chief Financial Officer to order them once I've gotten the Hardi siding for the house ordered.


Saturday, August 1, 2009
Finished Trim Tab
Yea! I finished the trim tab version II. This one turned out much better. I hadn't planned on this being a "how to" blog but I learned so much and the trim tab turned out so good, I thought I'd share some of what I learned. This post may be a little jumbled as it will take me more than one sitting to put everything together.
You can stop reading now if you don't want the technical stuff. Here's what I learned to make a great trim tab:
1. Use hard wood. I used oak. I first tried pine and it wouldn't make a crisp bend.
2. Use a strong clamp. I used a Bessey parallel jaw woodworking clamp.
3. Make your jig from 1 inch nominal (3/4) stock. I first tried 1 1/2 in. stock and the extra width put a crease in the skin when clamping.
4. Use a back brace. You can see it in one of the pictures below. Basically, it kept the jig from sliding when using the rivet gun on the fold.
5. Use a protective strip when softly riveting the folds. I used a very thin strip of oak but something like formica would work well, too. You can see me using the strip in the last video below.
You can stop reading now if you don't want the technical stuff. Here's what I learned to make a great trim tab:
1. Use hard wood. I used oak. I first tried pine and it wouldn't make a crisp bend.
2. Use a strong clamp. I used a Bessey parallel jaw woodworking clamp.
3. Make your jig from 1 inch nominal (3/4) stock. I first tried 1 1/2 in. stock and the extra width put a crease in the skin when clamping.
4. Use a back brace. You can see it in one of the pictures below. Basically, it kept the jig from sliding when using the rivet gun on the fold.
5. Use a protective strip when softly riveting the folds. I used a very thin strip of oak but something like formica would work well, too. You can see me using the strip in the last video below.


Thursday, July 30, 2009
New (Used) Compressor
Finally, a quiet, powerful air compressor. Here's my newest addition to the aircraft factory tool crib. I found it on craigslist late Wednesday night. It was in San Antonio and very close to my Dad so I asked him to go by and look at it Thursday. It was owned by an older gentleman who appeared to have only used it a couple of times. The oil is still a golden color. I gladly paid $160 (sells new for around $500-$600 plus tax and shipping) for a belt driven, oil fed, cast iron twin cylinder, 5.5cfm @90psi, 115v, 20 gallon air compressor. That's about the biggest you can get and still run off household current. Any bigger and you'll need 220v. Now, I need some wings to drill and rivet to really put the compressor to the test.


Tuesday, July 28, 2009
Elevators Hung
I hung the elevators on the horizontal stabilizer to check for fit while I'm waiting on the replacement trim tab. There was a little trimming to fit required per the plans on the stab where the elevator horns swing. Also, I wanted to see a big airplane part. With the fiberglass tips, it's almost 9 feet wide. Cool, something that's starting to look like an airplane.


Ad for Van's RV-7 from Kitplanes Magazine
Here's an ad I saw in the most recent Kitplanes magazine. I liked the headline. Blazing trails is exciting but maybe not when it comes to answering the question, "will it fly?".


Sunday, July 26, 2009
Elevator Riveting Help
I had some help today riveting the leading edges of the elevators. Here are nephews Spencer and Cameron with sister-in-law Jamie inspecting Cameron's riveting expertise. Looks great. Too bad it isn't cold as Cameron could wear his new letter jacket he got for varsity wrestling AS A FRESHMAN!

Here's Spencer pulling a cleco as he rivets the leading edge. Shelby and I got to watch him play in a select basketball tournament today. His Texas Tar Heels placed 3rd in Texas in the MAYB state tournament.


Here's Spencer pulling a cleco as he rivets the leading edge. Shelby and I got to watch him play in a select basketball tournament today. His Texas Tar Heels placed 3rd in Texas in the MAYB state tournament.

Thursday, July 23, 2009
Ordered New Elevator Trim Tab
Dang...Dang...Dang. I said I wouldn't let perfect get in the way of very good and I've gone and done it. I've ordered a new elevator trim tab. I bent the elevator tabs and I let the edge hang over my workbench just slightly. When I clamped it down with my Bessey KR3 woodworking clamp (very high clamping pressure), I put a very slight bend near the edge. I can't measure it and can only see it in the right reflection but it really bothers me. I won't make that mistake again.


Monday, July 20, 2009
Bandsaw Part II
Help, I'm addicted to bandsaws. Or so you would believe if you listened to Paula and Austin. I just bought a used bandsaw off craigslist on Friday when I happened upon this one at Sears on Saturday. Returned but never used. Heavily marked down. I went out to the car where Paula and Austin were waiting and told them about the bargain. When I went back in to buy it, it had just been marked down further. I returned to the car with my bounty and told them about the extra markdown and they started laughing uncontrollably. Apparently, they had been making up stories about me being addicted to bandsaws and other such nonsense.
Well, I got the last laugh. I just sold the first bandsaw on craigslist today for more than I bought it. I showed them...ha..ha...ha. Wait, is that another bandsaw. I gotta' go!

Well, I got the last laugh. I just sold the first bandsaw on craigslist today for more than I bought it. I showed them...ha..ha...ha. Wait, is that another bandsaw. I gotta' go!

Saturday, July 18, 2009
Finished the Left Elevator
I finished the left elevator this morning. Sure was nice to get up early and not have to sweat through another 100+ degree evening in the garage. If you look closely in the reflection on the elevator, you can see Austin holding my laptop taking this picture. Next, the trim tab and I'll be through with the empennage except for the fiberglass tips.

New (Used) Bandsaw
Here's the latest addition to the aircraft factory tool crib. It's a used Delta 28-180 bandsaw I bought through craigslist from some nice people in Austin. I needed a bandsaw to cut the jig that's used to make the trim tab. I'll also use it to trim the lead counterweights in the elevators plus probably a thousand other uses. I'm going to San Antonio today to visit my Dad and we'll go to Woodcraft to get some ceramic blade guide blocks for the bandsaw. I'll also need to order a new blade or two. Otherwise, it's in pretty good shape and I like that it's not made in China.


Thursday, July 16, 2009
Bent the Left Elevator Trim Tab Cutout
One of the harder things to do on the empennage is bending the side tabs on the trim tab. The first tabs to be bent are on the elevator cutout where the trim tab goes. I'm happy with the bend but even more so with the flush rivets. The plans call for pop-rivets which aren't flush and then caution about interference with the trim tab. Binding flight controls = bad. I thought, why not make them flush. I searched my main reference, vansairforce.com, and couldn't find anything except countersunk pop-rivets or cutting off the tabs and using riblets. After sleeping on it and checking all the angles, I couldn't see why it couldn't be done so I just did it. Turned out nice.
Yes, that's my reflection. My face is red because it's 100 degrees in the garage. I'm still using the camera in my laptop so I have to contort myself to get a good picture. It is nice, though, having the pictures easy to post plus I get good wireless reception in the garage so I can post immediately. I'd like to have a live webcam going when I wanted. That would be nerdy but cool.

Yes, that's my reflection. My face is red because it's 100 degrees in the garage. I'm still using the camera in my laptop so I have to contort myself to get a good picture. It is nice, though, having the pictures easy to post plus I get good wireless reception in the garage so I can post immediately. I'd like to have a live webcam going when I wanted. That would be nerdy but cool.

Sunday, July 12, 2009
Left Elevator Deburred, Dimpled and Primed
I got the left elevator deburred, dimpled and primed with a little help. Here's Shelby helping me deburr as my delayed Father's day present. She did a really good job deburring the inside of the skin. Much better than me.
Yes, we're inside. It has been too hot to do much in the garage so we carried one of the workbenches right into the living room. After Shelby and Paula left to go shopping, I brought my small pancake compressor inside and dimpled with the pneumatic squeezer while watching the movie Aliens. Don't tell the girls that I had much more fun than them! Later, Austin cleaned parts with MEK and primed them for his part of my delayed Father's day present. He was proud of his painting and for good reason. Loved all the help today.

Yes, we're inside. It has been too hot to do much in the garage so we carried one of the workbenches right into the living room. After Shelby and Paula left to go shopping, I brought my small pancake compressor inside and dimpled with the pneumatic squeezer while watching the movie Aliens. Don't tell the girls that I had much more fun than them! Later, Austin cleaned parts with MEK and primed them for his part of my delayed Father's day present. He was proud of his painting and for good reason. Loved all the help today.

Saturday, July 4, 2009
Final Drilling Left Elevator Skin
All clecoed together and ready to final drill the left elevator skin. I got up early this morning to beat the heat. It's been over a hundred degrees almost every day for the last several weeks. The big odd shaped hole in the skin is for the inspection plate for the electric trim motor.


Happy Fourth of July
Happy fourth of July! I got my flag out early this morning. I feel very blessed to live in such a wonderful country. In the paper this morning, there is a full page ad paid for by Hobby Lobby. The title at the top is "In God We Trust". It's a collection of quotes about how America is a Christian nation. The sources for the quotes include presidents, founding fathers, Supreme Court Justices, congressional reports, Harvard and Yale, Supreme Court rulings and others. Here's a copy of the page from the Hobby Lobby website. I'm going to make sure I buy from Hobby Lobby.


Thursday, July 2, 2009
Finished the Right Elevator
Here's the right elevator all finished except for rolling the leading edge which I'll do when I do the left elevator. I have been making good progress despite the lack of posting and the 100+ degree heat. My old laptop died which had the Sony software for easily importing pictures. This picture is from the webcam on my new HP laptop. Shelby held the laptop and clicked the picture capture. The skin from the left elevator is behind me on the workbench and I've already started on the understructure. Oh, and that's not a wrinkle in the skin, just a reflection of Paula's car.


Sunday, June 28, 2009
New Sioux 1410 Pnuematic Drill
I finally got a Sioux 1/4 inch drill that I had been wanting. I got it on E-bay for $49! Used, of course, but it works great. The best price new I could find was $225. It's much quieter than my others so now our neighbor can't accuse me of torturing cats. NO, I never tortured cats. She just said from across the street, that's what my pneumatic drill sounded like.


Wednesday, June 17, 2009
Finishing Right Elevator
I've started the easy part, the final riveting of the right elevator. I haven't posted in a while because my laptop battery died. I do all the pictures from my laptop. Got a new one off ebay. I have been working on the plane, though. Since my last post I match drilled, deburred, scotch-brighted, dimpled, primed and reassembled the right elevator.


Tuesday, June 9, 2009
Right Elevator Match Drilling
Here's the right elevator clecoed together ready for match drilling the skin. That should only take 30 minutes and then it's on to the familiar pattern of deburring, dimpling, priming as required and reassembly for final riveting. I'm looking forward to using the pneumatic squeezer to dimple and rivet.
I mentioned (OK, I bragged) to Paula about how well things have been going together while I was showing her the trailing edge of the elevator below. She was thrilled, as those who know her could imagine. One thing that's surprised me about the build so far is how well the instructions from the manufacturer work. I made the bending brake exactly as described in Van's instructions and the trailing edge came our near perfect. I didn't make it like all the modified and improved versions I've seen on other's websites. I'm sure there are some great ideas out there but I will think long and hard before I deviate from Van's words of wisdom!

I mentioned (OK, I bragged) to Paula about how well things have been going together while I was showing her the trailing edge of the elevator below. She was thrilled, as those who know her could imagine. One thing that's surprised me about the build so far is how well the instructions from the manufacturer work. I made the bending brake exactly as described in Van's instructions and the trailing edge came our near perfect. I didn't make it like all the modified and improved versions I've seen on other's websites. I'm sure there are some great ideas out there but I will think long and hard before I deviate from Van's words of wisdom!

Friday, June 5, 2009
Elevator Trailing Edges Done
I finished bending the trailing edges of the elevators last night. It took me three days to bend the first one with all the careful measuring and reading and visiting websites to read about it and remeasuring, etc. The second one took 10 minutes. Life is kinda' like that. Once you've done it, it's easy.

NOT MUCH LEFT NOW! These are all the parts I have left to finish the entire empennage. I have to learn fiberglass for all the tips but most of the remaining work left to do is more of the same. Time to order the wings as there's an 8 week delivery time. I have to schedule an appointment with my aviation Financier.


NOT MUCH LEFT NOW! These are all the parts I have left to finish the entire empennage. I have to learn fiberglass for all the tips but most of the remaining work left to do is more of the same. Time to order the wings as there's an 8 week delivery time. I have to schedule an appointment with my aviation Financier.

Monday, June 1, 2009
Bending the Elevator Trailing Edges
After a little bit of a break working on the vehicle in the background (the famous Dodge Dart), I finally got my bending brake made for bending the trailing edges of the elevators. The hardest part was finding a straight board. I make sure I used plenty of hinges as I've read you can't have too many.

It's pretty simple, really. You just put the part between the boards and smoosh it. The trick is getting the correct radius of the bend. Too much and the aluminum will crack, too little and it will affect the flying qualities. I'm getting close to the goldilocks amount.


It's pretty simple, really. You just put the part between the boards and smoosh it. The trick is getting the correct radius of the bend. Too much and the aluminum will crack, too little and it will affect the flying qualities. I'm getting close to the goldilocks amount.

Friday, May 22, 2009
Finished Elevator Stiffeners
I finished riveting the stiffeners on the left and right elevators. The picture below is the inside of the right elevator. I haven't been posting much lately but I have been making progress. I always try and do at least something everyday even if it's just reading the plans or straightening up. Next, I'll make a bending brake to bend the trailing edge of the elevators. The plans call for 2 straight 2x8's with door hinges.

Here is the outside of the skin of one of the elevators after riveting the stiffeners. It's really easy to get a smooth rivet with the 3/4 inch plate steel back rivet plate I have.


Here is the outside of the skin of one of the elevators after riveting the stiffeners. It's really easy to get a smooth rivet with the 3/4 inch plate steel back rivet plate I have.

Tuesday, May 12, 2009
Pneumatic Squeezer
Here's a new tool in the crib. It's a pneumatic squeezer. A member of Van's Airforce had it for sale at a good price and I was the first to grab it. I've been bidding on ebay for a year and probably bid on 30 of these looking for a steal. It's used but works well. Austin and I dimpled about 30 stiffeners in about 10 minutes. Paula and Shelby even gave it a try. Should be just the ticket to give my sore arm a rest.


Saturday, May 9, 2009
RV Grin - First Flight in an RV
I got to fly an RV this weekend! Here's a picture of the plane I flew. That's Norm and his lovely bride.

Norm (he's the Tech Counselor who inspected my plane about a month ago) gave me a ride in the RV-7A that he built. He's an A&P certified mechanic and did a really beautiful job.
We flew for 40 minutes and I did 1 takeoff, 3 touch-and-go's, steep turns and stalls. It had been quite a while since I had flown so I was definitely rusty! I've landed on aircraft carriers and snow covered runways but this was the first time I've landed on a grass strip.
Norm said it would be a motivational flight and it really was. There's clearly a reason why the RV's are such an incredibly popular line of homebuilts. I don't have much small single time but I do have a little flight time in Cessnas and the RV felt like twice the airplane to me. I am certain now that I made the right choice of aircraft to build!
One thing that surprised me was how foreign the EFIS (Electronic Flight Information System) in Norm's RV felt. An EFIS is the computer screen that has replaced most of the older round gauges. I'm comfortable around computers and I've studied the EFIS and thought flying behind one would come naturally but I was wrong. My eyes kept going back to the "steam gauges" that Norm had left as backups. It will definately require some hanger flying to get comfortable with them. Here's an example of a popular EFIS.


Norm (he's the Tech Counselor who inspected my plane about a month ago) gave me a ride in the RV-7A that he built. He's an A&P certified mechanic and did a really beautiful job.
We flew for 40 minutes and I did 1 takeoff, 3 touch-and-go's, steep turns and stalls. It had been quite a while since I had flown so I was definitely rusty! I've landed on aircraft carriers and snow covered runways but this was the first time I've landed on a grass strip.
Norm said it would be a motivational flight and it really was. There's clearly a reason why the RV's are such an incredibly popular line of homebuilts. I don't have much small single time but I do have a little flight time in Cessnas and the RV felt like twice the airplane to me. I am certain now that I made the right choice of aircraft to build!
One thing that surprised me was how foreign the EFIS (Electronic Flight Information System) in Norm's RV felt. An EFIS is the computer screen that has replaced most of the older round gauges. I'm comfortable around computers and I've studied the EFIS and thought flying behind one would come naturally but I was wrong. My eyes kept going back to the "steam gauges" that Norm had left as backups. It will definately require some hanger flying to get comfortable with them. Here's an example of a popular EFIS.

Saturday, May 2, 2009
Started Elevators
I started on the elevators. Here are the stiffeners being match drilled to the inside of the skins.


Friday, May 1, 2009
Elevator Stiffener Oops
I had a small setback when I trimmed three of the elevator stiffeners too short. I missed note 2 on the blueprints below and trimmed the distance "X" on note 1 from the next to the last hole. Note 2 said the last hole was not drilled until later. Dang! I was initially bummed when I went to order replacements but was happily surprised when the price was only $6.49 for the pack of 4. Way to go Van.


Added Drawers to Workbench
I added drawers to my workbench. The clear shoeboxes weren't working well as toolboxes and I had most of the material for drawers including the slides which are the expensive parts. These seem to be working well so far.


Friday, April 24, 2009
Elevators Next
Next up are the elevators. Below is the blueprint for the right elevator. It's built before the left elevator which has a trim tab making it more difficult.
The elevators are control surfaces like the rudder. They have thinner skins and light weight stiffeners. The flying surfaces that support the weight of the aircraft in flight like the horizontal and vertical stabilizers have thicker skins and heavier ribs. I've noticed that as the building has progressed, it's gotten more challenging. I guess Van wants to ease us into the hard stuff. Sounds kind of addicting, doesn't it?

The elevators are control surfaces like the rudder. They have thinner skins and light weight stiffeners. The flying surfaces that support the weight of the aircraft in flight like the horizontal and vertical stabilizers have thicker skins and heavier ribs. I've noticed that as the building has progressed, it's gotten more challenging. I guess Van wants to ease us into the hard stuff. Sounds kind of addicting, doesn't it?

Wednesday, April 22, 2009
Finished the Rudder
I finished the rudder today. Three components down, elevators left and that will finish the empennage. I don't want to think too far ahead but the wings will come next.

Here, I clamped the rudder to the workbench to get an idea of how big it is.


Here, I clamped the rudder to the workbench to get an idea of how big it is.

Finished the Trailing Edge of the Rudder
I'm not sure that this makes a good picture below. What I'm trying to show is the straightness of the trailing edge of the rudder. The instructions say this is one of the most difficult parts to get right. One of my friends actually ordered and built a second rudder to get it right. I have to admit that I'm not completely satisfied with my work. I'm trying hard not to let perfect get in the way of excellent but it's not easy. The rudder is certainly built within specs and all and I'm sure I'll forget about the small appearance flaws but things were going near perfect up until now.

Here's the rudder all riveted. The only thing left besides the fiberglass tips is to roll the leading edge.


Here's the rudder all riveted. The only thing left besides the fiberglass tips is to roll the leading edge.

Tuesday, April 21, 2009
Custom 60 degree Rivet Set
Here's a nifty little tool I modified to be able to rivet in really tight areas. I ground down the tip to make it thin enough to get into the last hole or two in a narrow rib like the rudder tips. I tried several other techniques including one on the "Hints for Homebuilders" section of the EAA website. This method is far superior to every one I tried. I also like that this was an ebay bargain. Got it for $2 plus about $5 for shipping. Can you say steal? They normally sell for about $50.


Thursday, April 16, 2009
Prosealed the Rudder Trailing Edge
This is proseal. It's a 2-part epoxy "glue" that's used extensively in aircraft construction. The main place it's used on the RV is sealing the fuel tanks. I'm using it here for the first time to glue the trailing edge of the ruddder together before riveting as recommended in the plans. It's really a mess and gets everywhere. The thing that makes me laugh for some reason is that this stuff has NO KNOWN SOLVENT. Nothing will melt it! Now that's a glue! Hope I didn't get it on my favorite shirt.

Here's the rudder all glued on the trailing edge. It's clecoed to a heavy piece of aluminum angle to keep it straight while the proseal is drying.


Here's the rudder all glued on the trailing edge. It's clecoed to a heavy piece of aluminum angle to keep it straight while the proseal is drying.

Wednesday, April 15, 2009
Counterbalance Lead Weight
This is the top of the rudder before installing the top rib. It contains a lead counterweight that helps balance the control forces during flight.


Tuesday, April 14, 2009
EAA Technical Counselor Visit
I invited Norm, our EAA chapter's Technical Counselor over to take a look at my project. It's not a requirement but I really wanted to have another set of "educated" eyes look at how I was doing early in the project. I'd hate to get to the end of the build and have someone ask why I put all the rivets in backwards! Norm has built the same aircraft that I'm working on and is finishing his second (an RV-9). He's what you call a repeat offender. Anyway, Norm was nice enough to drive over from Seguin and give me some good pointers and validate that I wasn't putting the rivets in backwards. Thanks, Norm.
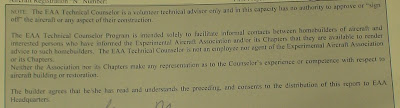
I'll let you read what he wrote. No, I didn't bribe him with a beer or anything!


I'll let you read what he wrote. No, I didn't bribe him with a beer or anything!

Sunday, April 12, 2009
Rudder Ready for Button Up
I finished all the prep work for the Rudder and now it's time to button it up. Here's the view of the inside of the rudder that won't be seen after riveting on the other side skin.

Here's the front of the rudder at the bottom. The hole is where the hinge rod will be screwed. On the right side you can see a couple of manufactured heads of rivets. I'm proud of those as the plans call for optional pop-rivets if you can't get a good structural rivet in there. With the help of my trusty tungsten bucking bar, no problem!

Here are some of the stiffeners that I got help riveting (see the video several posts back). The specs are dust that I'll blow off before sealing it up.


Here's the front of the rudder at the bottom. The hole is where the hinge rod will be screwed. On the right side you can see a couple of manufactured heads of rivets. I'm proud of those as the plans call for optional pop-rivets if you can't get a good structural rivet in there. With the help of my trusty tungsten bucking bar, no problem!

Here are some of the stiffeners that I got help riveting (see the video several posts back). The specs are dust that I'll blow off before sealing it up.

Wednesday, April 8, 2009
Dimpling the Narrow End of the Rudder Rib
Here's another McGyver tool. I had to dimple the very narrow end of the upper rudder rib. My visegrip dimpler wouldn't fit in the last hole so I had to improvise. I used my pop-rivet dimpler with spacers and came through the opposite side hole.

Turned out just fine:


Turned out just fine:

Sunday, April 5, 2009
Dimpling the Rudder Spar
I'm working on dimpling the rudder prior to riveting and got a visit by niece Micaeli. She was here for Shelby's birthday. Happy Birthday Shelby! She helped by dimpling a couple of holes in the lower rudder spar. Thanks! Also got some help dimpling from R who came out to the shop to see what's new.
Wednesday, April 1, 2009
Change In Direction
Well, after all the work I've put in on the airplane, I've decided it's not for me. I'm going a different direction now and plan on building a Shelby Cobra replica car. I saw a couple dozen of them drive through town last Friday and loved the look. It's all aluminum so the construction is surprisingly similar to aircraft construction so I'll have a head start on the learning curve. I'll keep you updated under the same label below as this post.


Subscribe to:
Posts (Atom)

 Posts
Posts


