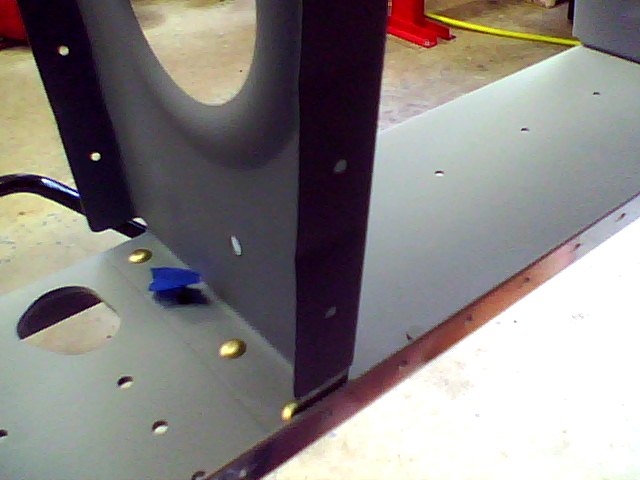
Here's a picture of a P-51 Mustang wing being restored. I thought the similarity was interesting.
Tuesday, April 27, 2010
First Skin on Wing
I got the first skin put on top of the right wing. Yeah! Looks a little like an airplane part. It looks small now because there's no leading edge or flaps or ailerons yet. See the wood brace under the middle of the wing? The middle of the wing has to be supported while you're attaching the wing skins otherwise it sags a little. I made adjustable poles when I was tiling the ceiling of the shower and I get to keep using them for different projects. It's a two piece pole with a tee nut and hole in one end and a hanger bolt in the other. The top is padded and to use it, you just turn one section to raise or lower it. Paula said I should patent them. I suspect they're a little too simple to patent but I appreciate the compliment!
Labels:
05-Wings
Sunday, April 25, 2010
Riveting Main Wing Ribs to Spars
Although I haven't posted in a while, I have been making good progress. Here are some pictures of the right wing with the main ribs riveted to the main and rear spar. I've finished the left wing main ribs and only need to prime them.
This is looking through the lightening holes.
Rear spar as attached to a main rib.
Top of the main spar with the rivets holding the main ribs below. I shot the rivets old school - rivet gun with bucking bar. I like doing it that way. Definitely takes more care and practice but rewarding. Like making consistent 3' putts.
Labels:
05-Wings
Monday, March 29, 2010
Flight Instructor Ratings
I took my flight instructor test this morning and passed with a 97! It was the military competence instructor exam which allows me to use my military flight instructor experience to get my CFI, CFII (instrument) and MEI (mulit-engine) civilian instructor ratings. All I need to do now is take my paperwork to the FSDO (Flight Standards District Office) and apply. Not sure if I'll use the ratings but nice to have.
Labels:
99-Other
Saturday, March 27, 2010
Real Purpose of Lightning Holes
I think I found the real purpose of lightning holes. Gotta' love those old Wurstfest beer pitchers used as cleco buckets. Perfect fit.
Labels:
99-Other
More Ribs Starting to Look Like a Wing
Got some more ribs done this morning. I had enough hung on the left wing to attach the rear spar. Looks vaguely like an airplane part.
Labels:
05-Wings
Monday, March 22, 2010
Still Working on Ribs
Man-o-man, there are a lot of ribs. I have an assembly line set up but it takes a long time to deburr all the little nooks and crannies.
I have been putting the ribs on the wing spars when I finish deburring and straightening them although I'll have to take them back down before final assembly. Seeing them hanging makes it look like I'm making a little progress and motivates me to deburr some more.
Labels:
05-Wings
Saturday, March 6, 2010
Time to Start the Ribs
No, I'm not barbecuing. The ribs are the internal bracing that go between the spars. There are a lot of them in the wings and they all have to be deburred and straightened. That's going to take me a while!
Labels:
05-Wings
Finished the Rear Spars - For Now
Finished up the rear spars. Several other parts attach to the rear spars so I haven't seen the last of them but I've done all I can do for now. I sure like having a pneumatic squeezer for the bigger rivets like on the reinforcing plates below (painted grey). Big rivets are hard to accurately squeeze by hand. Almost feels like cheating...but I'm not giving it up.
Labels:
05-Wings
Friday, March 5, 2010
Nifty New Seat
Here's a new addition to the Aircraft Factory (garage) I got for my birthday from my Mother and Father-in-Law, Dean and Jerry. Since I'm building the wings, there will be a lot of work that can be easier accessed from sitting height. The stool is on rollers so I'll be able to scoot around. I'm using it here to finish riveting the rear spar. Thank you for the present. It was the only airplane related one I got.
Labels:
03-Tools
Sunday, February 28, 2010
Working on the Rear Spar
Starting the rear spar. Not real difficult so far, just a lot of deburring. Deburring keeps scratches from growing into cracks due to vibration. It is convenient having two of the standard sized (5'x2') EAA 1000 work tables on wheels and bolted end-to-end as the spars are about 9' long. I built the standard tables but customized them with locking wheels, an inset back-rivet plate, two drawers, an electric plug strip, and long bolts that allow them to be bolted side-by-side or end-to-end.
Labels:
05-Wings
Saturday, February 27, 2010
Finished with Tie Downs
Here are the finished tie downs. Picture the threaded ring hanging down under the wing. That's where the rope or chain will attach. I had to tap (thread) the inside of the block where the ring screws. Austin and I have a lot of experience using the tap and dies from working on the Dart. It was much easier working with aluminum which gives me pause about the strength but there are over 6500 RV's flying and I've never heard about people having problems.
Speaking of RV's flying, I read yesterday that an organization that covers certified aircraft reported that 965 CERTIFIED piston aircraft were sold in 2009. Contrast that with 1032 EXPERIMENTAL piston aircraft that were given airworthiness certificates in 2009 in the U.S. alone. Of those 1032, well over half were RV's!
The tie down assembly also doubles as the attach point for the aileron pushrod brackets as seen below.
Labels:
05-Wings
Tuesday, February 23, 2010
Working on Tie Downs
Tie downs are the metal rings that hang down under the wings where you attach ropes or chains to hold the aircraft firmly on the ground when it's parked. Small airplanes are surprisingly light. An average completed RV weighs around 1000 lbs. That's not much when you consider they have a wing span of 25 ft. A strong gust of wind can tip over most small airplanes if they're not tied down. The two large rectangles of metal get bolted to the main wing spar and the rings are screwed into the bottom. You can see how it works on the plans in the upper right corner of the photo below. These can also be used as jack points for lifting the airplane.
The shiny rectangles of aluminum with the holes in them (bottom right in picture) are spacers that go behind the tie down brackets against the spar. I fabricated them from scratch and put lightening holes in them. Lightening holes are just a way to make things lighter without affecting the strength of the item. I like to tease the gullible that lightning (without the "e") holes let the lightning out if you're struck by it.
Labels:
05-Wings
Wednesday, February 17, 2010
Countersinks and Plate Nuts in Spar Flange
This is a wing spar with the attach points on the flange for the fuel tank. The fuel tank skin will be dimpled to fit into the shiny countersunk holes with screws holding to the plate nuts behind the holes. This is one of those steps that everyone worries about and tries to improve on Van's technique. I have to admit I was nervous drilling into that beautiful gold anodized spar. I followed Van's instructions exactly and they came out near perfect. I used the micrometer that Peggy and Stephen gave me to measure the outside diameter of the holes with the target being .365-.375 and they were .370! The more I build, the more I realize that Van's instructions work great and that I'll need a compelling reason to deviate from them.
This is a plate nut that's behind one of the countersunk holes you see in the picture above. A plate nut is simply a nut for screws or bolts that can be permanently attached to the underlying surface. This one has two wings on either side of the threaded nut with holes in them that are riveted to the flange. There are quite a few different flavors of plate nuts like ones with one long wing with both rivet holes on the same side or 90 degree corner ones but this is the most common style.
Labels:
05-Wings
Monday, February 15, 2010
Wing Plans
Time to start diving into the wing plans. Here's one of the pages from the wings. Definitely more stuff but I haven't seen any new skills required. Just lots of drilling, deburring, dimpling and riveting.
Labels:
05-Wings
Sunday, February 14, 2010
Wing Inventory Complete
Shelby helped me finish the wing inventory and also helped me find a place for all the parts. None of the big pieces were missing or damaged in any way. Good job packing, Van's! There were a few rivets and bolts missing (out of thousands) but nothing serious. I called Van's about a bag of wrong size rivets and they said to call when I finished inventory and they would replace them and anything else missing at no charge.
Here's how we used the long skinny (16') box. I mounted storage brackes to the ceiling and Sheby and I just put the box sitting sideways on the brackets. Simple and provides plenty of storage for long items like the longerons (used in the fuselage) and it's up high and out of the way but easily accessible. It's a challenge building in a two car garage while keeping room open for Paula's car.
Labels:
05-Wings
Saturday, February 13, 2010
Paula Helps Inventory the Wings
We dove into inventorying the wing kit and made it through the long skinny box. It's not a great picture but here's Paula checking off items for me as I dig them out of the box.
Labels:
05-Wings
Friday, February 12, 2010
Sorting Hardware
Wow, there are a lot of little parts that go into the wings. I spent about 5 or 6 hours inventorying and sorting all the rivets and bolts and bits into drawers. It was a lot of work but it will make it much easier to find what I need when I need it.
Labels:
05-Wings
Tuesday, February 2, 2010
Wings Delivered
The wings are here! FedEx Freight did a great job. They arrived 10 minutes before their scheduled delivery time and the crates were in perfect condition. I had my camera ready to photograph any damage but there wasn't any. The boxes were even oriented with the arrows up. I've read about crates being delivered by other freight companies that were half destroyed. My neighbor, Tim, was nice enough to help me unload them. I was a little disappointed that he didn't accept my offer of a Shiner Bock. Here they are between the stands I'll mount and build them on. I have 30 days to inventory and report any discrepancies to Van's. I will certainly have plenty to keep me busy for quite a while. As my Dad said, "that will sure keep you off the streets".
Labels:
05-Wings
Wednesday, December 30, 2009
Finishing Wing Stands with a Little Help
I got a little help finishing my wing stands. Nephew Cameron (smiling) was visiting from Houston so I put him to work drilling brackets for my Rudi Greyling of South Africa inspired wing stands. Austin had previously helped me with welding the bottom feet. I painted one set red and the other set green. For those unfamiliar with aircraft or boat lighting, red is for the left wing or port side and green for the right or starboard side. The memory aids I was taught were: "red, right, returning" - if the red light is on the right, the aircraft or ship is pointed toward you and "port wine" - port is left in boat speak and port wine is reddish. I figure the simple color coding might prevent me from reversing parts.
I only need to bolt them to the floor and I'll be ready for the wings. Location will be important as I plan on building both wings at the same time but I want to have enough room to park a car in the garage. They're scheduled to ship during the week of the 18th of January.
Labels:
05-Wings
Monday, November 2, 2009
YEA! Wings Ordered!
I ordered my wings today! YEA!!!!! More details to follow. I'm glad I got them before the 1st of the year price increase. These aren't mine but what they'll look like soon. There is a 3 month backlog but better than never!
Labels:
05-Wings
Saturday, August 29, 2009
Helped Norm install Wings on his RV-9A
Here's Norm's RV-9A that we just finished installing the wings. He invited me over both to help (it takes about 4 people) and to learn. It wasn't terribly hard but definitely one of those things where seeing it done was worth more than reading a 1000 pages of instructions.
Here's Norm and his wife Carol on the left and Phil the RV guru in the chair and Skip who's building an RV-6 taking pictures after installing the wings.
Norm was nice enough to give me his wing cradle after we finished. He (Carol) also fed us lunch. I think I got the best end of the deal. I've got to think of a good way to return the favor to Norm.
Labels:
99-Other
Wednesday, August 26, 2009
Plumbed for Air
Here, I've plumbed the aircraft factory (garage) for compressed air. It's both a convenience to have air outlets in more places and important to condition the air. Air compressors heat the air when compressing it. That causes problems because when the air cools, it condenses moisture which ends up inside tools or paint guns.
My solution to the moisture problem was to pipe the air through steel pipe which allows the air to cool and then give it a place to go before getting to the tools. I've got risers like the one pictured here that send the air up and the water down to a drain. Not real interesting but important for keeping rust out of your tools or spots out of your paint.
I promised my friend John that I'd help him with his layout for his garage so I annotated the pictures below and added an abbreviated description of what I did.
My solution to the moisture problem was to pipe the air through steel pipe which allows the air to cool and then give it a place to go before getting to the tools. I've got risers like the one pictured here that send the air up and the water down to a drain. Not real interesting but important for keeping rust out of your tools or spots out of your paint.
I promised my friend John that I'd help him with his layout for his garage so I annotated the pictures below and added an abbreviated description of what I did.
1. I used 3/4" galvanized steel piping for the perimeter and 1/2" for each drop leg. I tried to slope the pipe toward every drop to help control moisture. Water goes down, air goes up. On some of the drops, I just used a 3/4" Tee.
2. I used several unions in the perimeter piping. Unions allow you to disconnect the two pipes on either side of the union without turning either pipe to unscrew it. I was able to build the system in sections and put them up one section at a time. It really made it easier to trouble shoot leaks since I could just remove one section and work on it while leaving the rest in place.
3. The basic set-up of each drop is shown above. I used 1/2" unions on each branch-off from the drop to allow me to remove it without having to twist pipe. I used brass ball valves on the bottom of each drop as that's where the water will collect. On some of the drops, I added a male air fitting after the ball valve which allows me to add another compressor to the system. If you have a different size filter (3/8" is common), just change the reducer bushing and nipple coming out of the union to that size. On the branch above, I have an oiler in addition to the filter/regulator because this is the place I run most of my air tools. That saves me from having to remember to add oil drops to every tool before use. The other drops don't have an oiler.
4. I used Rector Seal #5 pipe thread sealant from Home Depot and teflon tape for every joint. I first wrapped the threads with teflon tape and then "painted" the Rector Seal over the teflon tape. I tried several variations and this way works best for me. I used a spray bottle with slightly soapy water to test all the joints and I don't get any leaks.
5. For my compressor hook-up, I just have a drop like shown above but instead of a filter, I have a short length of air hose that attaches to the reducer bushing on the union. By keeping all the drops standard, I can move the compressor or any fitting like the one with the oiler to any location in the garage I want by just disconnecting the union.
6. I have 5 drops in my system. I put the drop I plan on painting from on the last leg. My tool drop is the next to the last. When I bleed each drop, I get very little moisture after the first drop from the compressor which is the way it's supposed to work. There are fancier ways to do this but it works well for me. Some folks have a loop type arrangement at each drop where the pipe first goes up and then back around and down but I didn't have enough room against the wall plus it would add several additional joints for each drop.
Hope this helps, John.
Labels:
02-Workshop
Tuesday, August 11, 2009
Finished the Empennage
Well, I've finished the empennage, sort of. Just a few little details like trimming the counterweights to balance the elevators. I still have to do the fiberglass tips but most people wait to do all the fiberglass work together because of the mess. The wings are next and I've gotten the OK from my Chief Financial Officer to order them once I've gotten the Hardi siding for the house ordered.
Labels:
04-Empennage
Saturday, August 1, 2009
Finished Trim Tab
Yea! I finished the trim tab version II. This one turned out much better. I hadn't planned on this being a "how to" blog but I learned so much and the trim tab turned out so good, I thought I'd share some of what I learned. This post may be a little jumbled as it will take me more than one sitting to put everything together.
You can stop reading now if you don't want the technical stuff. Here's what I learned to make a great trim tab:
1. Use hard wood. I used oak. I first tried pine and it wouldn't make a crisp bend.
2. Use a strong clamp. I used a Bessey parallel jaw woodworking clamp.
3. Make your jig from 1 inch nominal (3/4) stock. I first tried 1 1/2 in. stock and the extra width put a crease in the skin when clamping.
4. Use a back brace. You can see it in one of the pictures below. Basically, it kept the jig from sliding when using the rivet gun on the fold.
5. Use a protective strip when softly riveting the folds. I used a very thin strip of oak but something like formica would work well, too. You can see me using the strip in the last video below.
You can stop reading now if you don't want the technical stuff. Here's what I learned to make a great trim tab:
1. Use hard wood. I used oak. I first tried pine and it wouldn't make a crisp bend.
2. Use a strong clamp. I used a Bessey parallel jaw woodworking clamp.
3. Make your jig from 1 inch nominal (3/4) stock. I first tried 1 1/2 in. stock and the extra width put a crease in the skin when clamping.
4. Use a back brace. You can see it in one of the pictures below. Basically, it kept the jig from sliding when using the rivet gun on the fold.
5. Use a protective strip when softly riveting the folds. I used a very thin strip of oak but something like formica would work well, too. You can see me using the strip in the last video below.
Labels:
04-Empennage
Thursday, July 30, 2009
New (Used) Compressor
Finally, a quiet, powerful air compressor. Here's my newest addition to the aircraft factory tool crib. I found it on craigslist late Wednesday night. It was in San Antonio and very close to my Dad so I asked him to go by and look at it Thursday. It was owned by an older gentleman who appeared to have only used it a couple of times. The oil is still a golden color. I gladly paid $160 (sells new for around $500-$600 plus tax and shipping) for a belt driven, oil fed, cast iron twin cylinder, 5.5cfm @90psi, 115v, 20 gallon air compressor. That's about the biggest you can get and still run off household current. Any bigger and you'll need 220v. Now, I need some wings to drill and rivet to really put the compressor to the test.
Labels:
03-Tools
Tuesday, July 28, 2009
Elevators Hung
I hung the elevators on the horizontal stabilizer to check for fit while I'm waiting on the replacement trim tab. There was a little trimming to fit required per the plans on the stab where the elevator horns swing. Also, I wanted to see a big airplane part. With the fiberglass tips, it's almost 9 feet wide. Cool, something that's starting to look like an airplane.
Labels:
04-Empennage
Ad for Van's RV-7 from Kitplanes Magazine
Here's an ad I saw in the most recent Kitplanes magazine. I liked the headline. Blazing trails is exciting but maybe not when it comes to answering the question, "will it fly?".
Labels:
99-Other
Sunday, July 26, 2009
Elevator Riveting Help
I had some help today riveting the leading edges of the elevators. Here are nephews Spencer and Cameron with sister-in-law Jamie inspecting Cameron's riveting expertise. Looks great. Too bad it isn't cold as Cameron could wear his new letter jacket he got for varsity wrestling AS A FRESHMAN!
Here's Spencer pulling a cleco as he rivets the leading edge. Shelby and I got to watch him play in a select basketball tournament today. His Texas Tar Heels placed 3rd in Texas in the MAYB state tournament.
Labels:
04-Empennage
Thursday, July 23, 2009
Ordered New Elevator Trim Tab
Dang...Dang...Dang. I said I wouldn't let perfect get in the way of very good and I've gone and done it. I've ordered a new elevator trim tab. I bent the elevator tabs and I let the edge hang over my workbench just slightly. When I clamped it down with my Bessey KR3 woodworking clamp (very high clamping pressure), I put a very slight bend near the edge. I can't measure it and can only see it in the right reflection but it really bothers me. I won't make that mistake again.
Labels:
04-Empennage
Monday, July 20, 2009
Bandsaw Part II
Help, I'm addicted to bandsaws. Or so you would believe if you listened to Paula and Austin. I just bought a used bandsaw off craigslist on Friday when I happened upon this one at Sears on Saturday. Returned but never used. Heavily marked down. I went out to the car where Paula and Austin were waiting and told them about the bargain. When I went back in to buy it, it had just been marked down further. I returned to the car with my bounty and told them about the extra markdown and they started laughing uncontrollably. Apparently, they had been making up stories about me being addicted to bandsaws and other such nonsense.
Well, I got the last laugh. I just sold the first bandsaw on craigslist today for more than I bought it. I showed them...ha..ha...ha. Wait, is that another bandsaw. I gotta' go!
Labels:
03-Tools
Saturday, July 18, 2009
Finished the Left Elevator
I finished the left elevator this morning. Sure was nice to get up early and not have to sweat through another 100+ degree evening in the garage. If you look closely in the reflection on the elevator, you can see Austin holding my laptop taking this picture. Next, the trim tab and I'll be through with the empennage except for the fiberglass tips.
Labels:
04-Empennage
New (Used) Bandsaw
Here's the latest addition to the aircraft factory tool crib. It's a used Delta 28-180 bandsaw I bought through craigslist from some nice people in Austin. I needed a bandsaw to cut the jig that's used to make the trim tab. I'll also use it to trim the lead counterweights in the elevators plus probably a thousand other uses. I'm going to San Antonio today to visit my Dad and we'll go to Woodcraft to get some ceramic blade guide blocks for the bandsaw. I'll also need to order a new blade or two. Otherwise, it's in pretty good shape and I like that it's not made in China.
Labels:
03-Tools
Thursday, July 16, 2009
Bent the Left Elevator Trim Tab Cutout
One of the harder things to do on the empennage is bending the side tabs on the trim tab. The first tabs to be bent are on the elevator cutout where the trim tab goes. I'm happy with the bend but even more so with the flush rivets. The plans call for pop-rivets which aren't flush and then caution about interference with the trim tab. Binding flight controls = bad. I thought, why not make them flush. I searched my main reference, vansairforce.com, and couldn't find anything except countersunk pop-rivets or cutting off the tabs and using riblets. After sleeping on it and checking all the angles, I couldn't see why it couldn't be done so I just did it. Turned out nice.
Yes, that's my reflection. My face is red because it's 100 degrees in the garage. I'm still using the camera in my laptop so I have to contort myself to get a good picture. It is nice, though, having the pictures easy to post plus I get good wireless reception in the garage so I can post immediately. I'd like to have a live webcam going when I wanted. That would be nerdy but cool.
Labels:
04-Empennage
Sunday, July 12, 2009
Left Elevator Deburred, Dimpled and Primed
I got the left elevator deburred, dimpled and primed with a little help. Here's Shelby helping me deburr as my delayed Father's day present. She did a really good job deburring the inside of the skin. Much better than me.
Yes, we're inside. It has been too hot to do much in the garage so we carried one of the workbenches right into the living room. After Shelby and Paula left to go shopping, I brought my small pancake compressor inside and dimpled with the pneumatic squeezer while watching the movie Aliens. Don't tell the girls that I had much more fun than them! Later, Austin cleaned parts with MEK and primed them for his part of my delayed Father's day present. He was proud of his painting and for good reason. Loved all the help today.
Labels:
04-Empennage
Saturday, July 4, 2009
Final Drilling Left Elevator Skin
All clecoed together and ready to final drill the left elevator skin. I got up early this morning to beat the heat. It's been over a hundred degrees almost every day for the last several weeks. The big odd shaped hole in the skin is for the inspection plate for the electric trim motor.
Labels:
04-Empennage
Happy Fourth of July
Happy fourth of July! I got my flag out early this morning. I feel very blessed to live in such a wonderful country. In the paper this morning, there is a full page ad paid for by Hobby Lobby. The title at the top is "In God We Trust". It's a collection of quotes about how America is a Christian nation. The sources for the quotes include presidents, founding fathers, Supreme Court Justices, congressional reports, Harvard and Yale, Supreme Court rulings and others. Here's a copy of the page from the Hobby Lobby website. I'm going to make sure I buy from Hobby Lobby.
Labels:
99-Other
Subscribe to:
Posts (Atom)